
Lord777
Professional
- Messages
- 2,577
- Reaction score
- 1,556
- Points
- 113
STAGE 1.0 - STORE REGISTRATION
To register a store, we will need (there will be lists of stores where you can get everything, do not rush with this)
1.1 Store data storage system.
Each store will be a separate folder where we will store:
Mozilla Firefox Portable browser can be downloaded and installed from this link: https://sourceforge.net/projects/portableapps/files/Mozilla Firefox, Portable Ed./
link and looking for old versions of Mozilla 2019-2020 (scroll down):
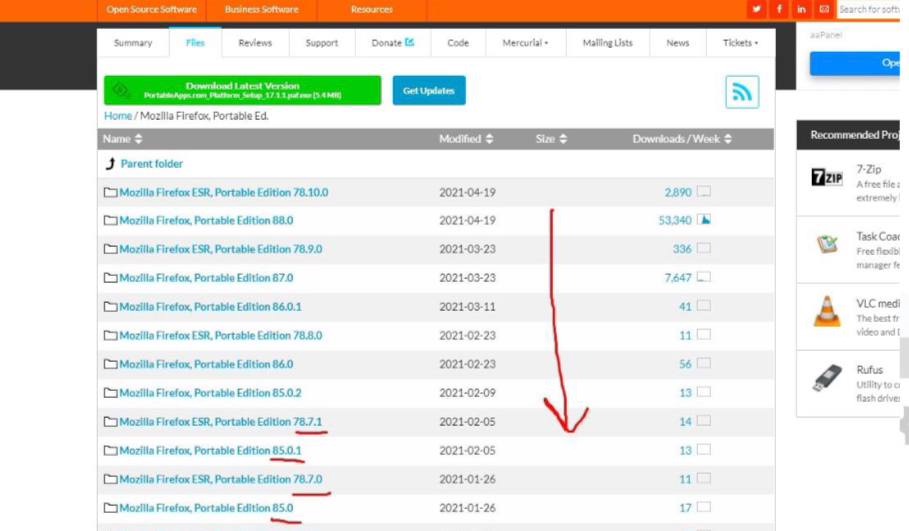
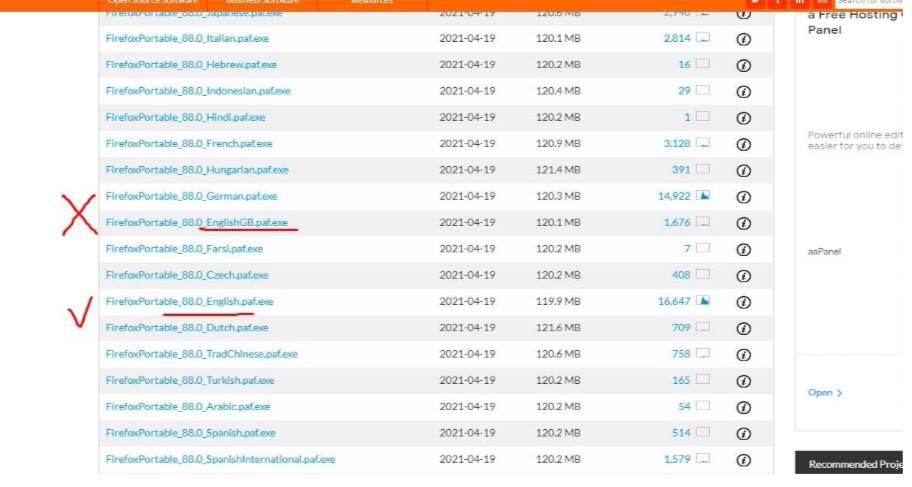
Important: We download English.paf.exe (NOT EnglishGB.paf) versions, older versions.
Downloaded and installed. WHEN INSTALLING, specify the WAY WHERE TO INSTALL: IN THE FOLDER where we will keep the store.
Create a text file in the same Merchant.txt folder (here we will store logins, passwords and all the data for which we registered)
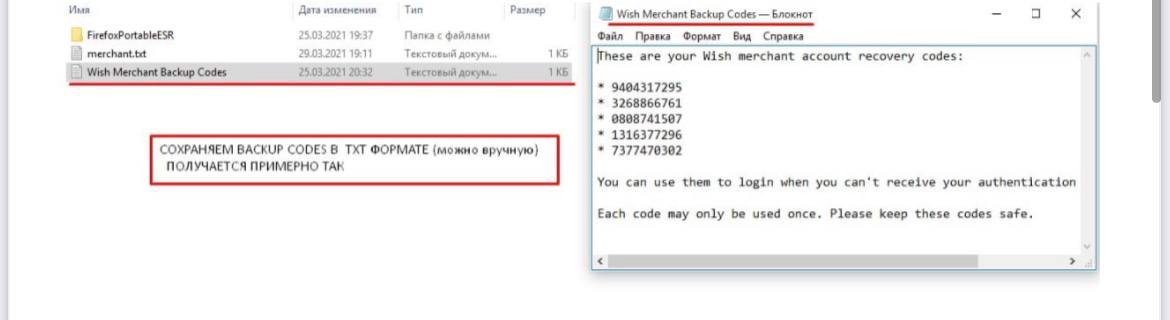
Back-up codes - needed to restore access to the store in case of loss of Google Voice.
Total at the end of all registration we will get folder with the following content:

1.2 Preparation of data for registration (Filling in Merchant.txt)
Take the purchased fullz and write it to a text file.
Don't have money to buy Full info? Not a problem! We generate a fake-fullz.
Link to the generator site: https://www.fakenamegenerator.com/
Follow the link and click on -> Advanced Options
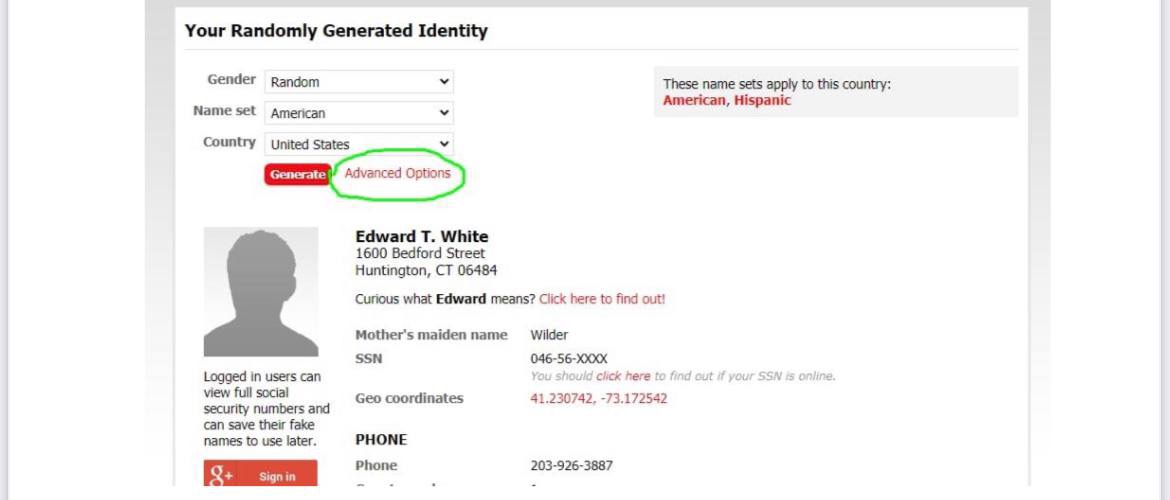
After clicking you will see the following filters (1-5):
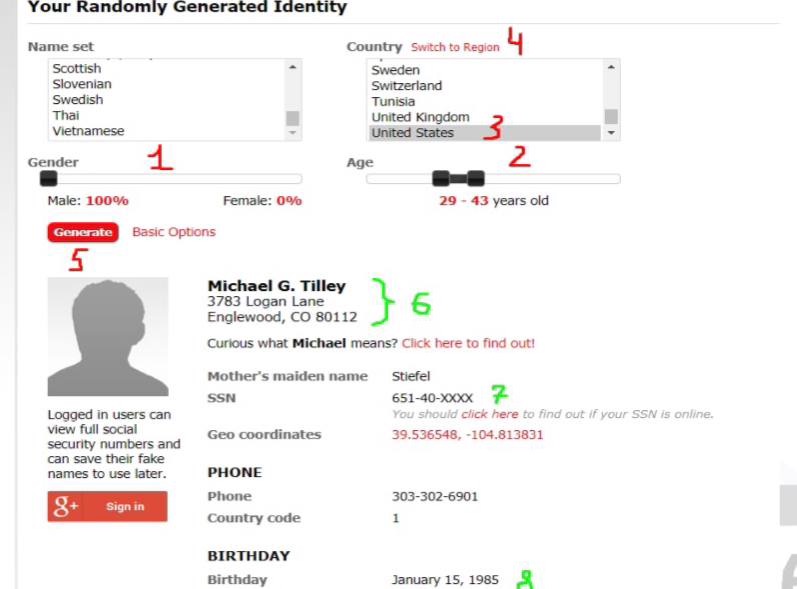
1 - Choose a gender: preferably male. Alternate.
2 - Set the age range: preferably from 25-30 to 50 years.
3 - Select the country: United States
4 - The Switch to region button allows you to change the state to the one you need (choose any, alternate)
5 - Press the Generate button and generate a fake-fullz.
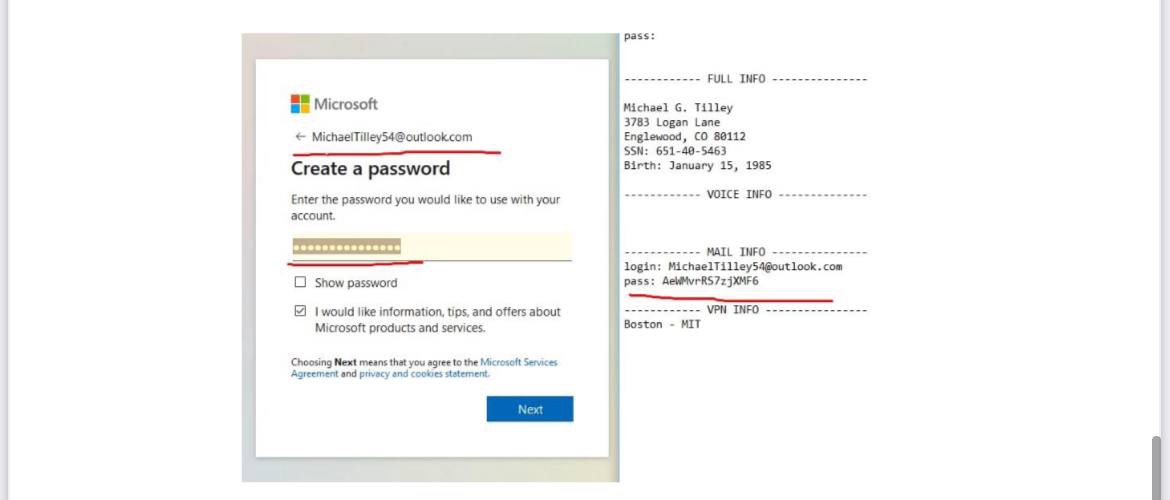
We write down the fake data - fullz (6–8): (See the screen above)
6 - Michael G. Tilley (name of American)
3783 Logan Lane - address of residence of American
Englewood (city), CO (abbreviation of the State of America - in our case Colorado) 80112 (mail index)
7 - SSN - US taxpayer document number, or Social Security Number 651-40-xxxx - instead of four claims (xxxx) we come up with any 4 numbers, for example: 651-40-6194
8 - Birthday: January 15, 1985 - the date of birth of the American
We finished generating the fake-fullz and recording it in Merchant.txt. Go ahead.
1.3 Installing the Windscribe for Mozilla Firefox extension
Launch the installed Firefox Portable and click on the following link:

 addons.mozilla.org
Click Add to Firefox and after downloading the Windscribe extension will appear in the upper right corner.
Click on the extension and enter the username and password of your Windscribe Pro account. Log in? Open the Location Menu to change the country to USA.
Select any US geolocation and any location.
We write the selected geolocation to our Merchant.txt
Very important: In the future, when working with this store, we always use this geolocation, city.
1.4 We register mail, for example outlook.com (does not ask for SMS)
We go to the site https://outlook.live.com/
In the lower right corner we click on the Create Free Account button
Coming up with our mail (preferably we make mail under the name of the fullz)
We write the login to Merchant.txt. On the site Click Next. Also, we come up with a password. IMMEDIATELY WRITE INTO Merchant.txt our data
Next:
1) Enter the name and surname of the fullz
2) Select the country United States (if not automatically selected)
3) Set the date of birth (the same as in the fullz)
4) Pass the captcha (turn the pictures so that they stand exactly)
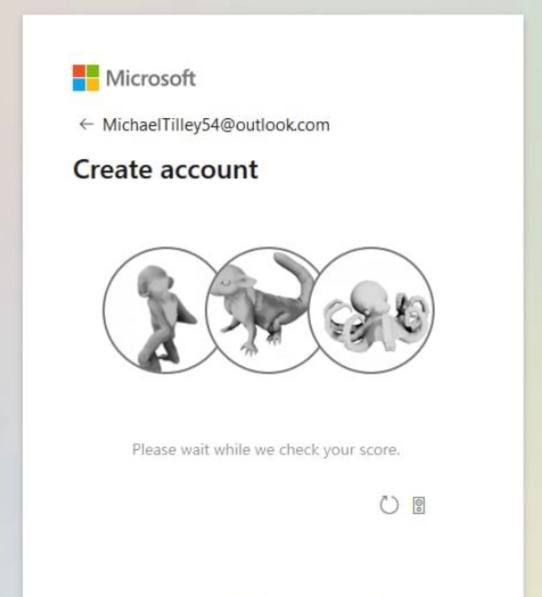
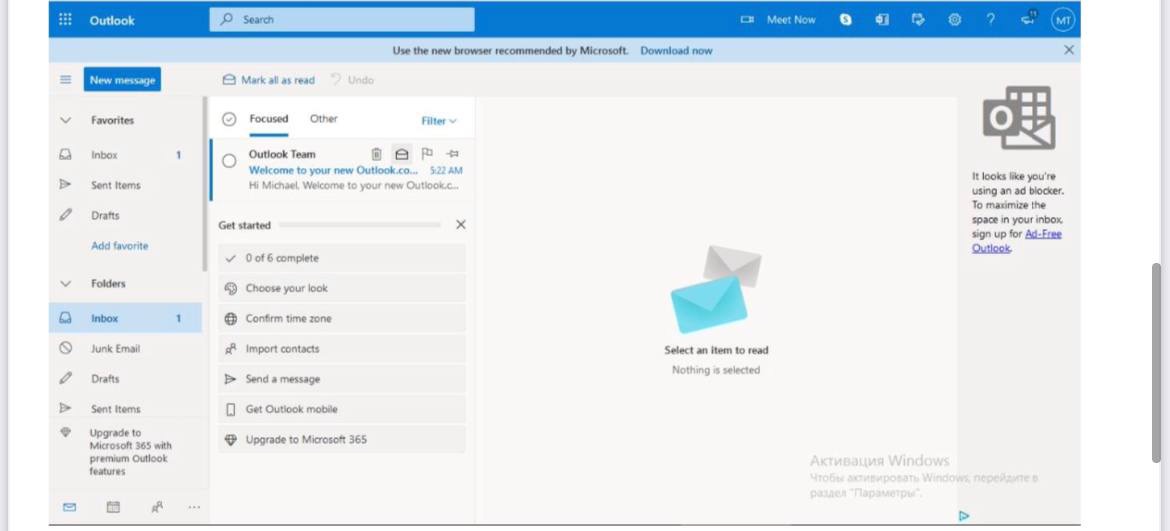
Got the captcha? Congratulations. Mail registered successfully.
1.5 We buy Google Voice and enter it
Usually Google Voice account consists of the following data: jeromeabdiel907@gmail.com | pass: m@Zamun@26 | reserve mail: maryr.254cronk@outlook.com | pass: NO PASS | MA | (339) 364-8380
Where:
Understood. We log into our Google Voice
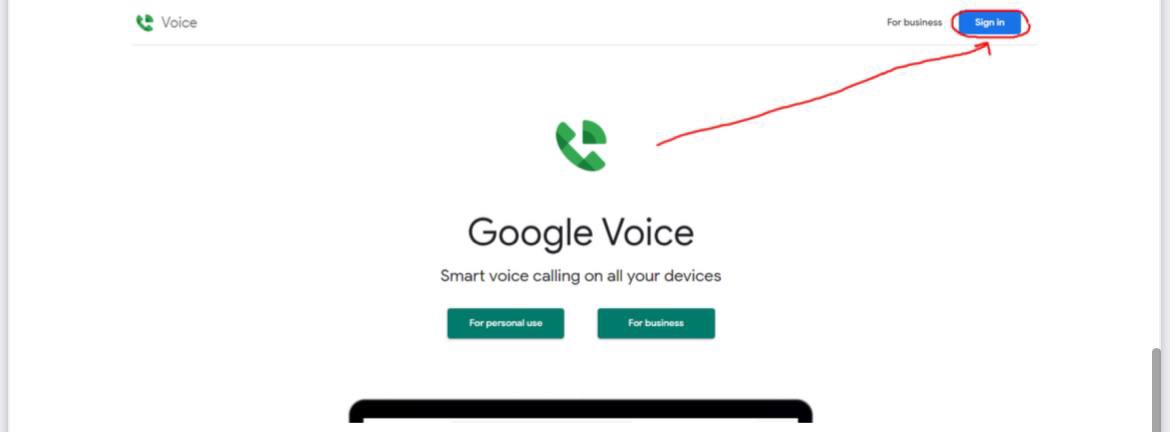
account Logging in is the simplest, like a regular Google account. Follow the link: voice.google.com and click Sign In
Important: do this from an American ip-address.
Next is the most common login to Google Account, where you use the login and password of the purchased Google Voice, and also enter the backup mail login so that you will be allowed into your account.
Are you in? This window will open:
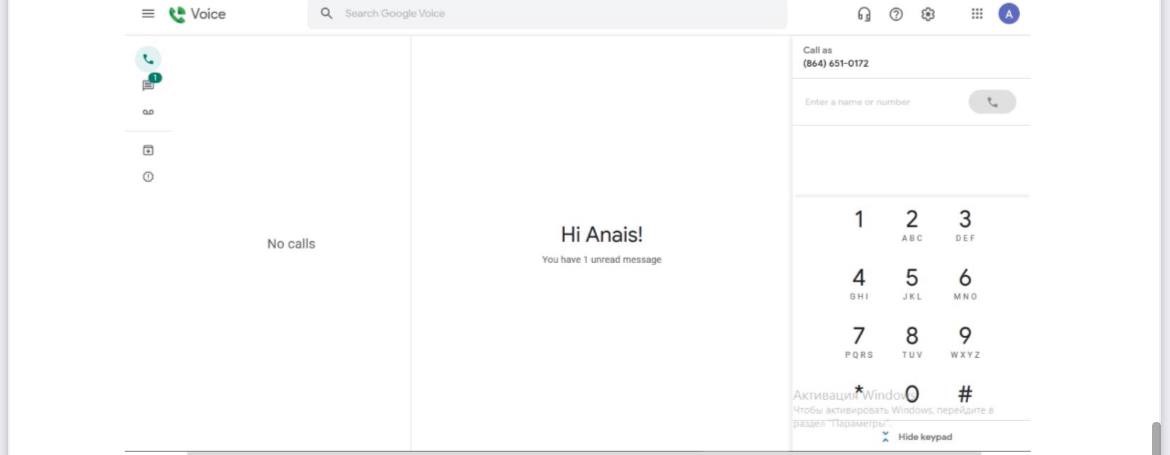
On the left, as you can see, we have a panel with sections for Messages, Calls and Voice-messages. Everything is as simple as possible. We will need a message section, click on it.
We leave the tab with Google Voice open and move on to the main part of our training - registering the store itself.
1.6 Store registration.
The climax of fucking has come and it's time to show the cards.
We will not raise the site and create a store from scratch. Instead, we will use a ready-made and popular platform - merchant.wish.com
Wish.com is a popular Chinese store of all kinds of junk all over the world, which has the opportunity even for ordinary people to create their own store without having an official brand and not being a representative of existing brands (which we will actually use). We will create stores without a brand on this platform and pour money into it (from the brute of wish.com + CC accounts) or self-registers + CC (purchased already in the CC shop), and if the scenario is successful, we will receive payments every 15-20 days.
Go?
We start registering the store. Follow the link merchant.wish.com
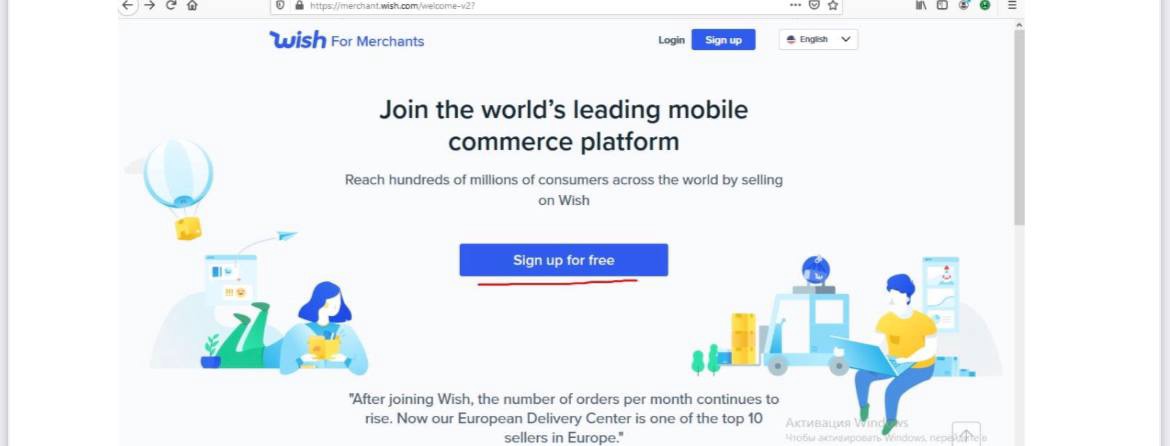
Here we click Sign Up for Free. We start filling in the store data:

IMPORTANT: Try to come up with a normal English name for the shop (I usually call it depending on what products I will have in the future). Do not use: too long names, as well as full names.
Email Address - take our previously created outlook
Password - come up with a password AND IMMEDIATELY WRITE ALL DATA IN Merchant.txt Solve the captcha and click Continue.
We are transferred to the second stage of registration: Filling in personal information
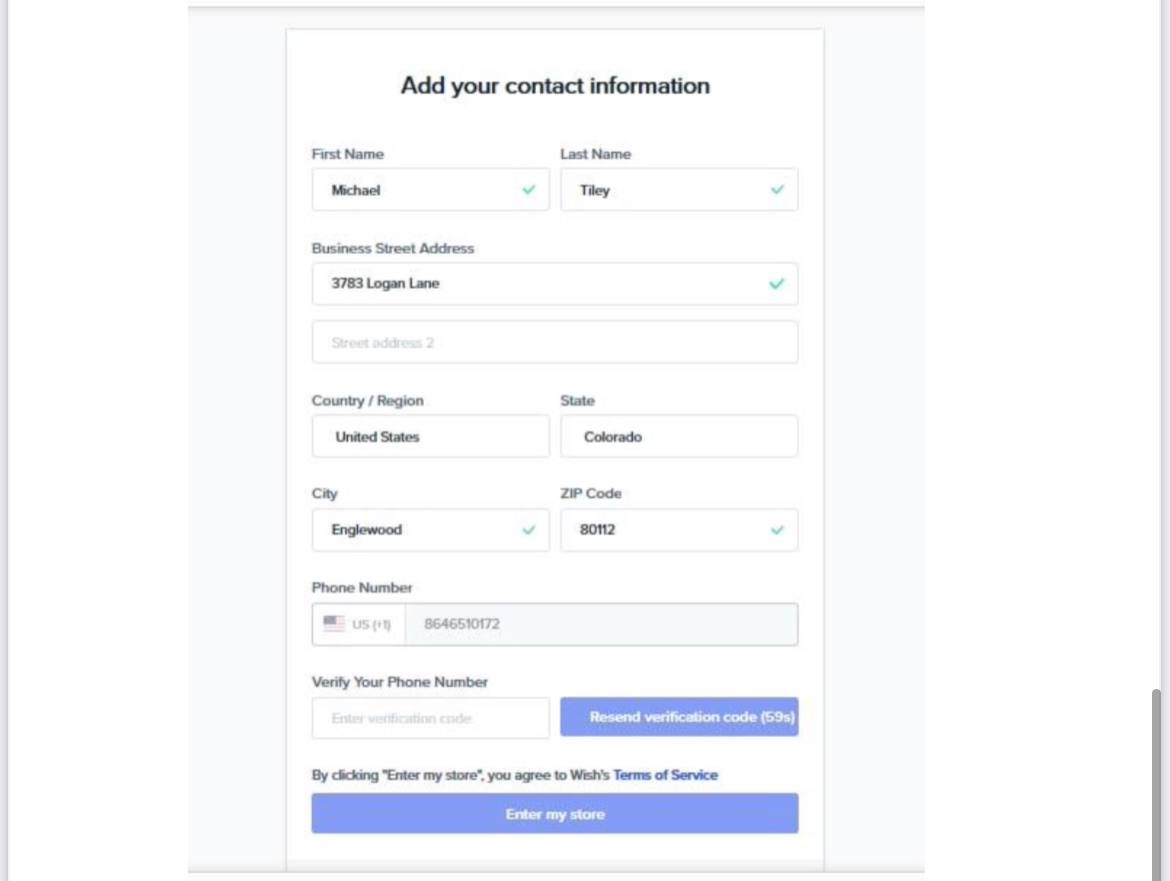
Everything is simple here. MANUALLY Fill in the fields using our fullz.
We enter the phone number without spaces and dashes, and then press the Send Verification Code button to confirm and send SMS to our Google Voice. Open the tab with Google Voice.
Enter the received code in the Enter Verification Code field and press the Enter my Store button.
The third moment of registration: Confirm the mail
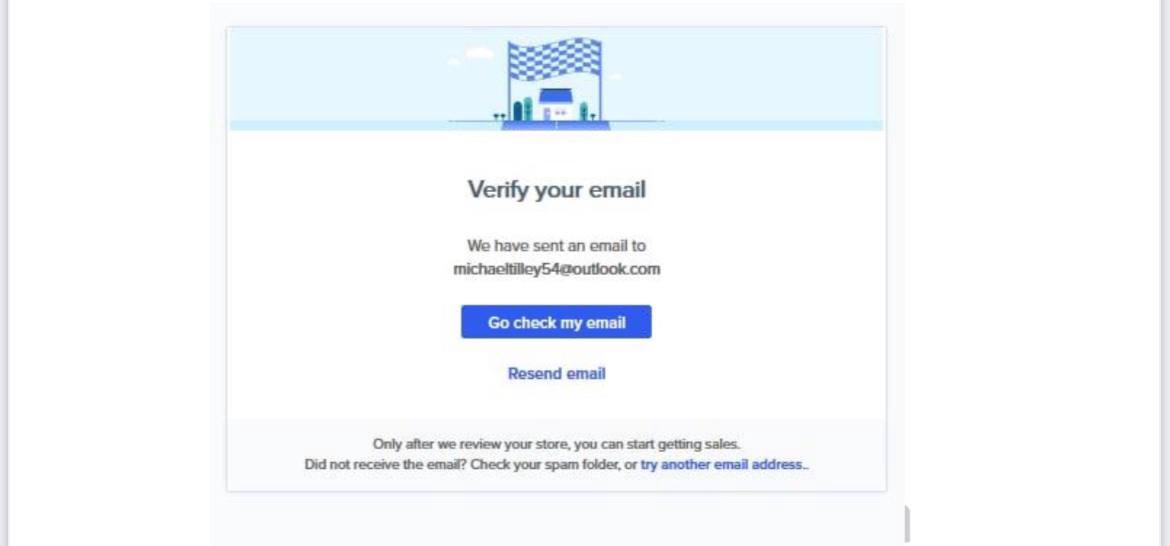
We press the Go check my email button and you will be transferred to the tab with outlook mail. Here we press Enter My Store
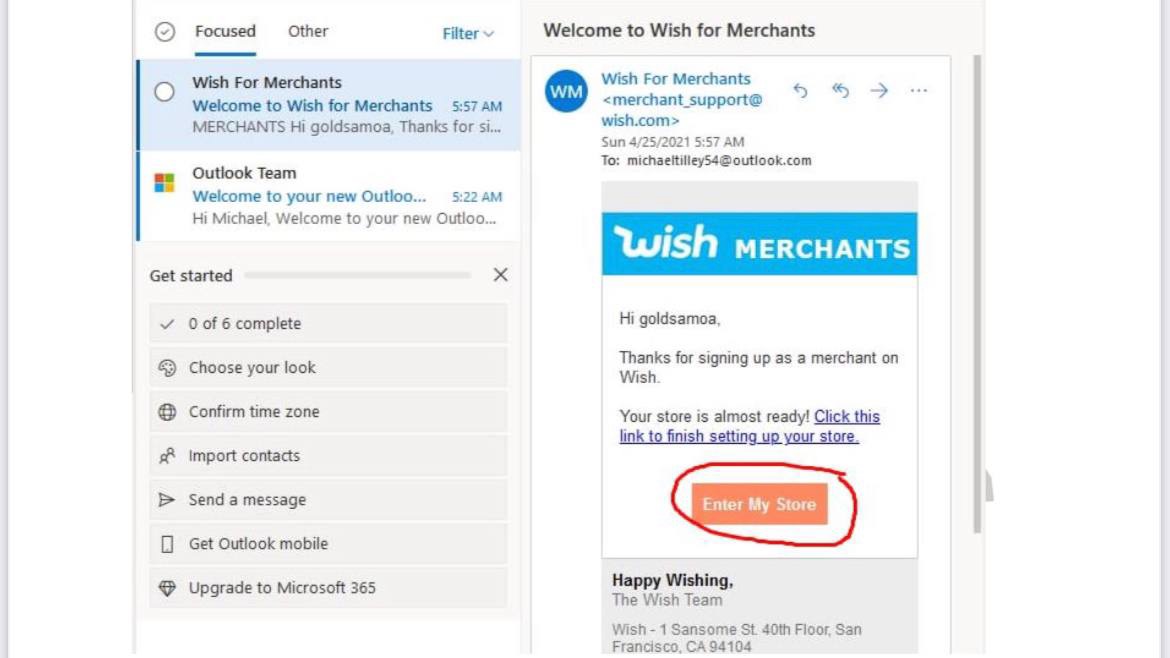
Congratulations, the store is almost complete and the bulk of registration is over.
You will be redirected to the main page of the store:
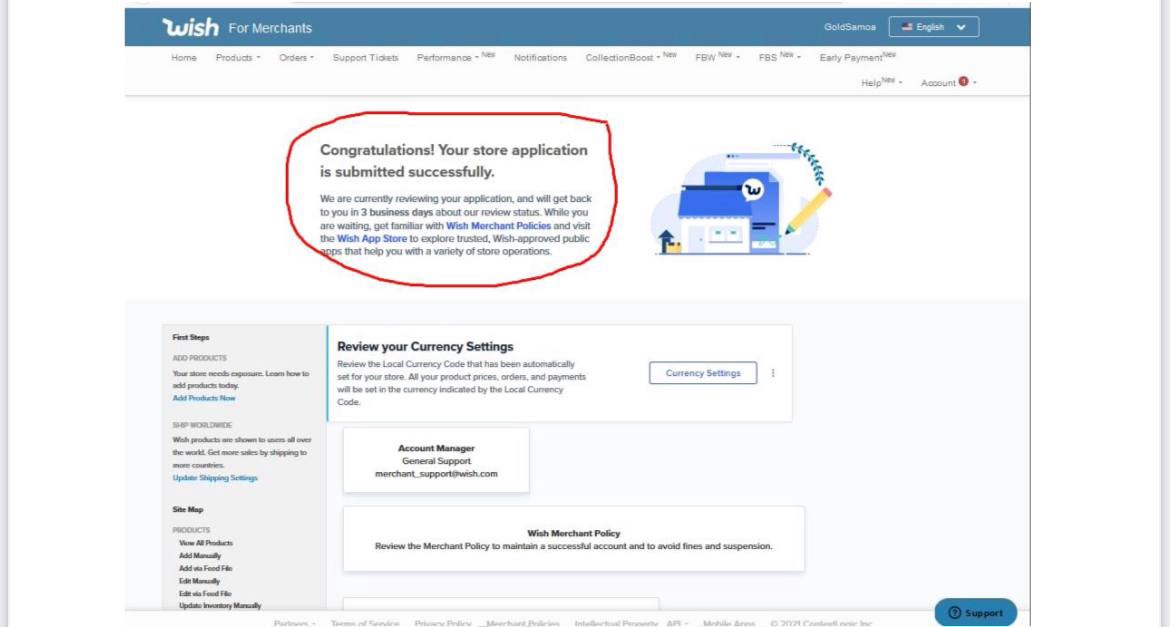
They write to you that your application for creating a store will be reviewed and approved \ Rejected within 1-3 business days.
Recommendations: We do not recommend creating stores at the end of the week or on weekends, as there is a high probability of the store being blocked. Also, after registering a store, you need to simulate a real seller and climb the site, by tabs for 20-30 minutes (at the bottom of the site there is a panel with the Privacy Policy, Merchant Policy tabs - you can study the rules for running stores pretending to be a real newbie seller)
After 30 minutes , we take the last step for today - We expose delivery to all over the world
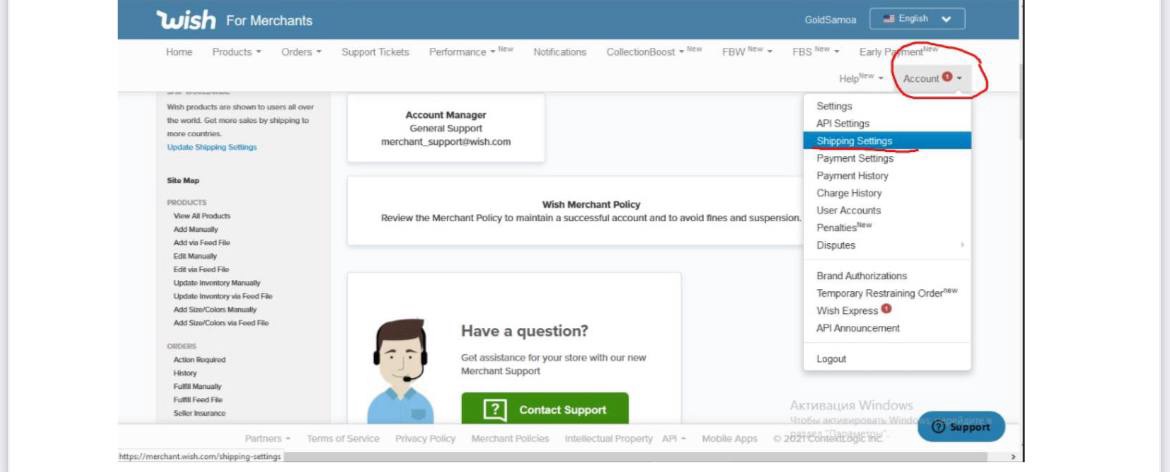
We climb into the Account -> Shipping Settings tab.
Re-enter the store's login and password, and we are transferred here:
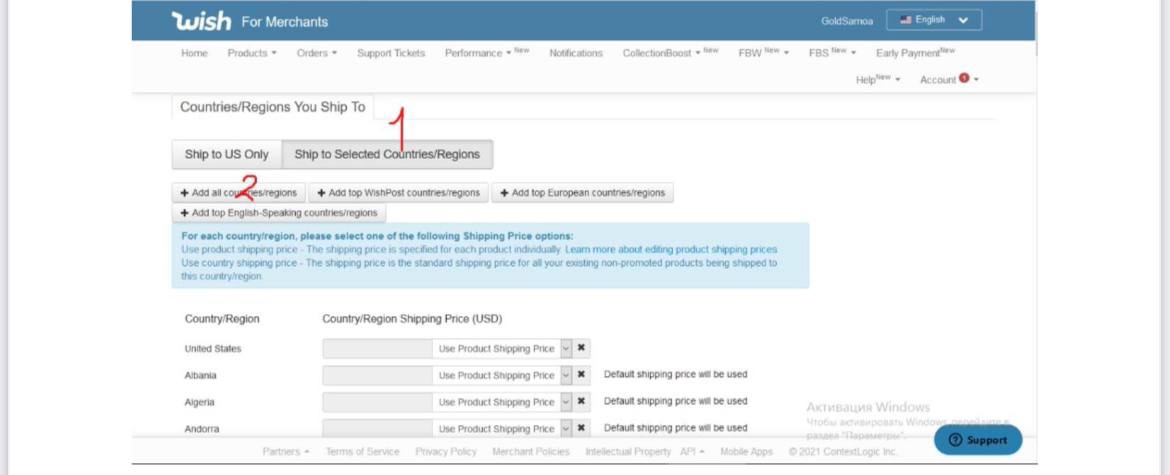
1 - Click on the Ship to Selected Countries / Regions button 2 - Click on the Add all Countries / Regions button
Next, scroll to the bottom of the site and click on Apply to existing non-promoted products
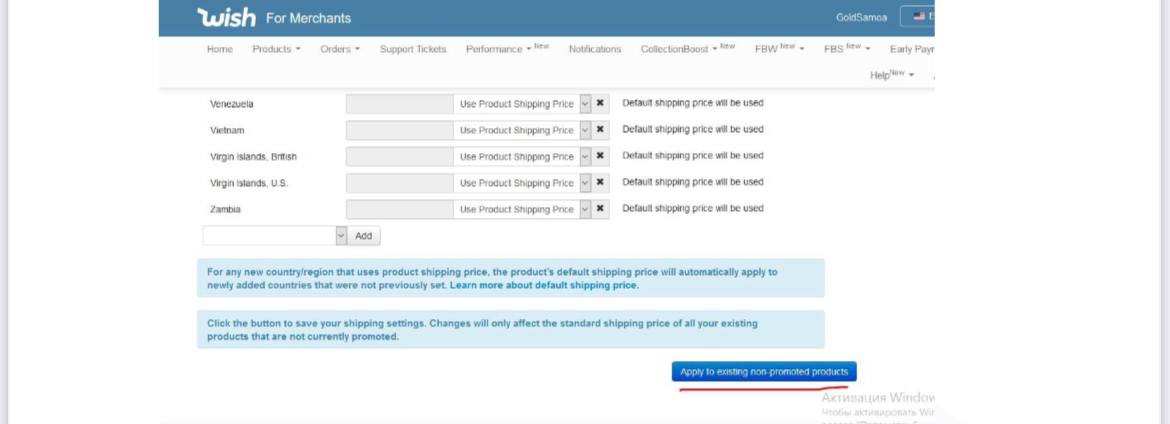
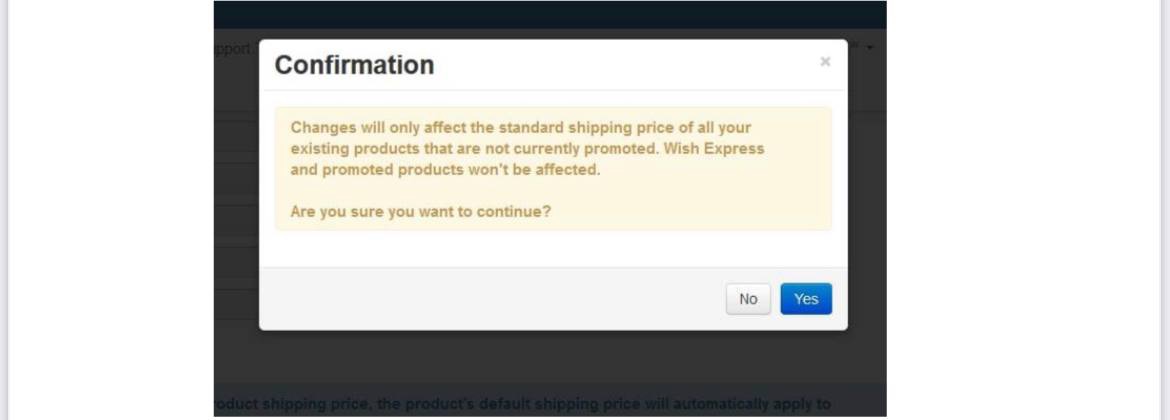
Click YES and then OK
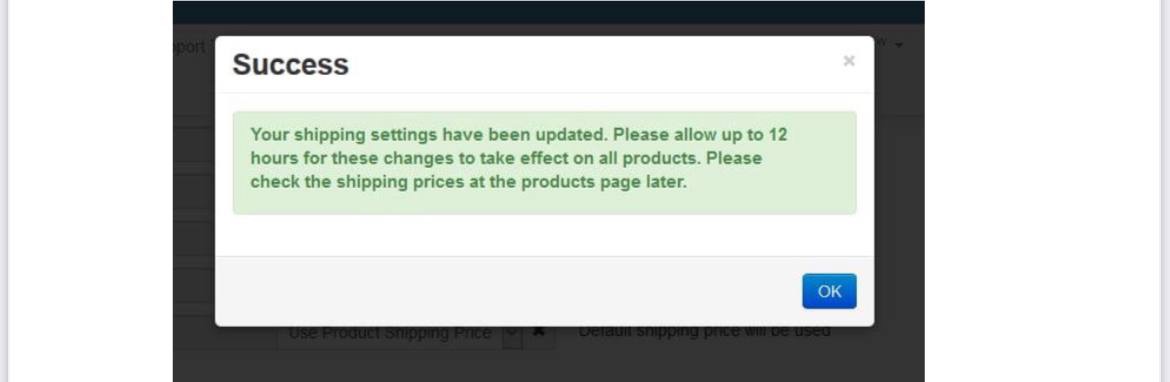
And damn it, this is Victory - you have successfully completed STEP 1.
Now you just have to wait 24-72 hours for your application to create a store to be approved. In the next step, we will talk about what a successful / rejected order looks like, and also start adding products for sale.
Well, if you read to the end, and also tried it in practice, then I can congratulate you - your burning desire to cut some money took up.
STEP 2.0 - Checking the store's approval. Add products to the store.
So friends, last time in STEP 1 we registered a store with you and had to wait at least a day for our store to be approved.
Today we will check and analyze how the approved store looks like and how it is declined.
We open our folder, where we previously recorded all the information.
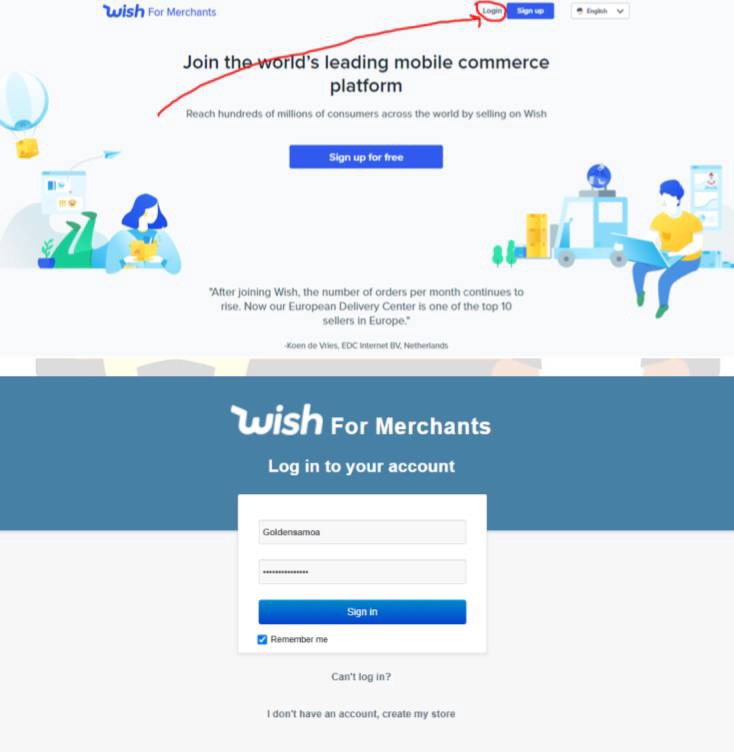
We launch the Mozilla browser and open Windscribe in the upper right corner - we connect to the same ip and the same geolocation that we connected to during registration (you should have written it to a text file)
Connected? Go to merchant.wish.com and enter our store using Login (store name) and store password.
After entering, we can have 2 outcomes of events: 1 - Store approved. 2 - Store rejected
Rejected request. The store was blocked.
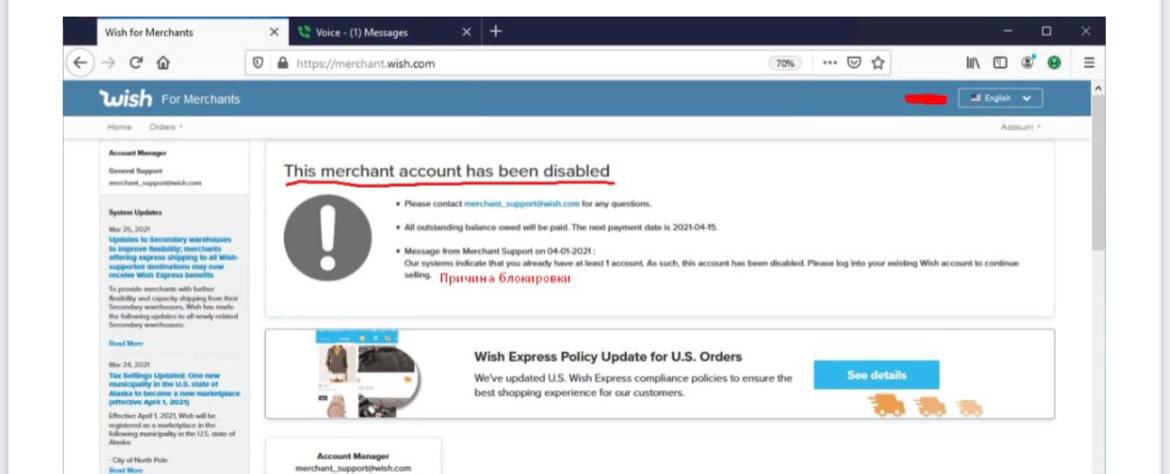
To avoid frequent blocking of stores at the registration stage, it is recommended:
Unfortunately, it is more common to reach out to those. support does not work. Therefore, if your store is blocked, then you return to stage 1 and register the store (s) with a new one with new data.
Approved application. Shop approved:
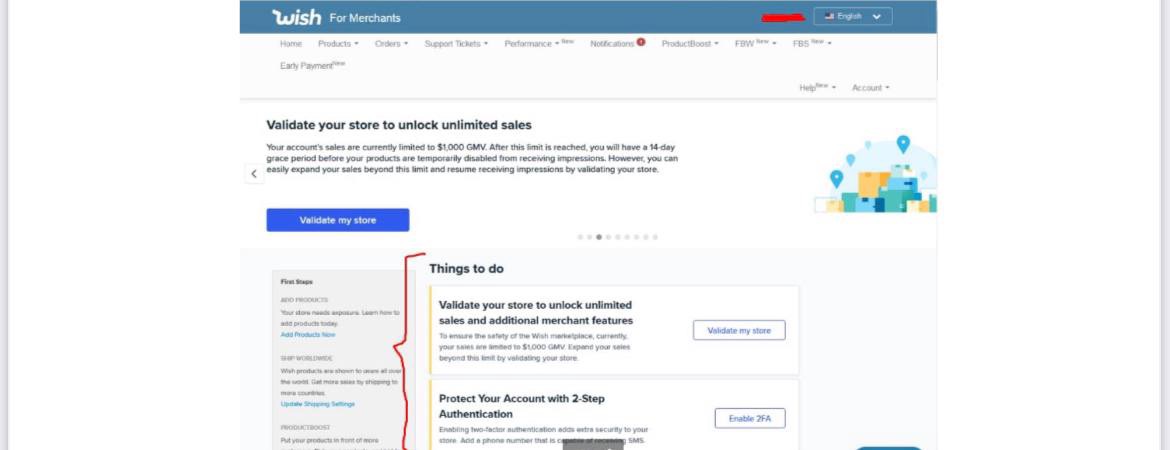
How do I know if a store is approved?
1) You have Things to do tasks where you are asked to go through verification and enable 2fa on your store.
2) Our mail, which we registered in stage 1, receives a message with the following content:
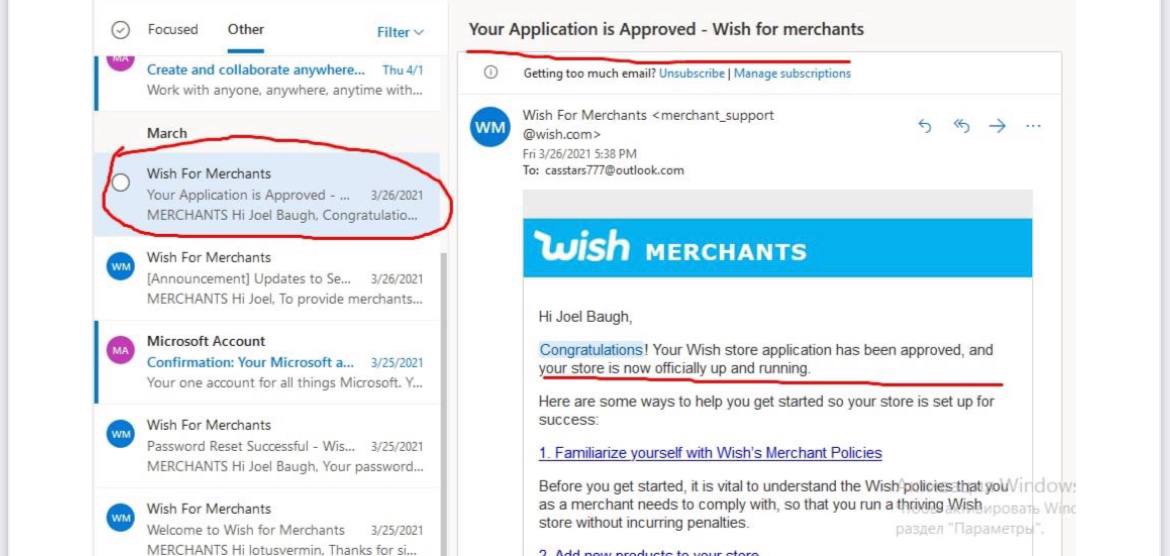
We translate from English into your language and it becomes clear that Wish notified us that our application was approved.
If your store has been approved, you follow me further through STEP 2.0
Go to Account -> Settings
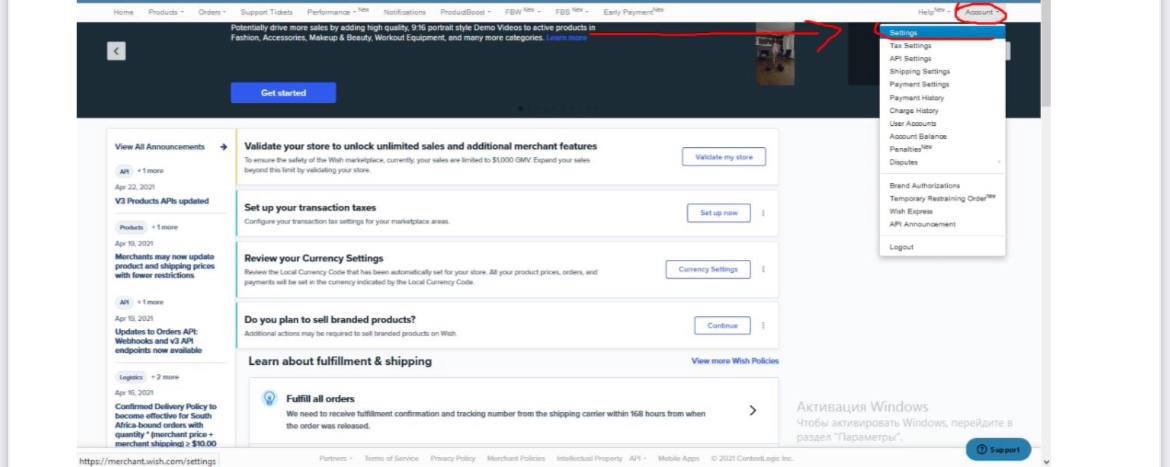
Turn on 2FA.
Enter the username and password of the merchant. And we are transferred to the account settings. Click the Turn On button in the Two Factor Authentication item.
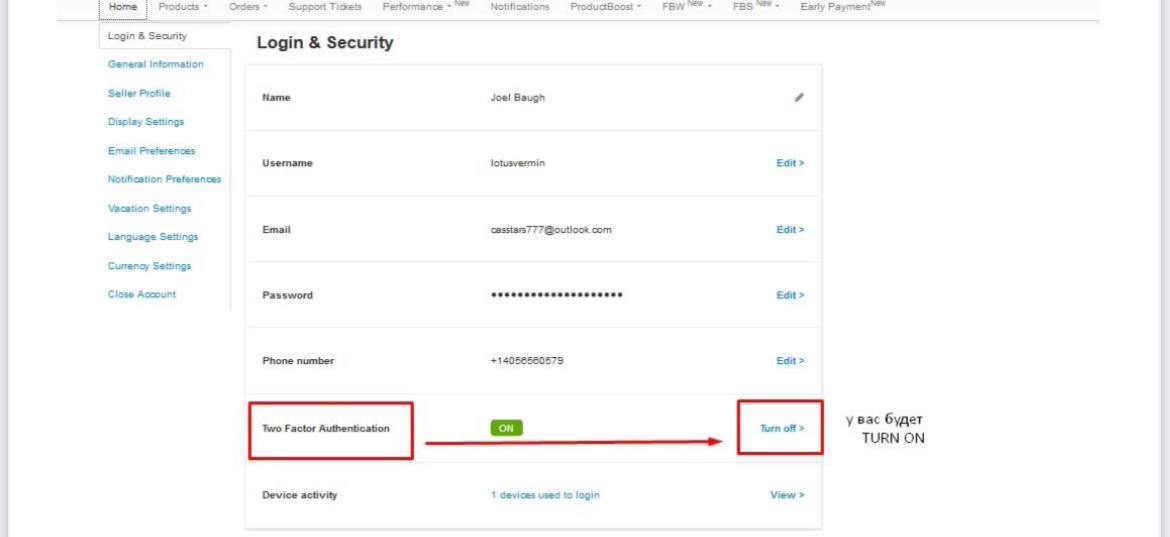
We enter your Google Voice number, receive and enter the SMS code that will also be sent to Google Voice.
Next, a window pops up with Back-up codes (codes for restoring access to the store in case of loss of google voice or passwords). WE SAVE Back-up codes as a text file in a folder with all the information.
Two-factor connected successfully. Go ahead. Now we need to add products. We will search for products without a popular brand on Amazon or Ali Express and copy all the information to register them in our store.
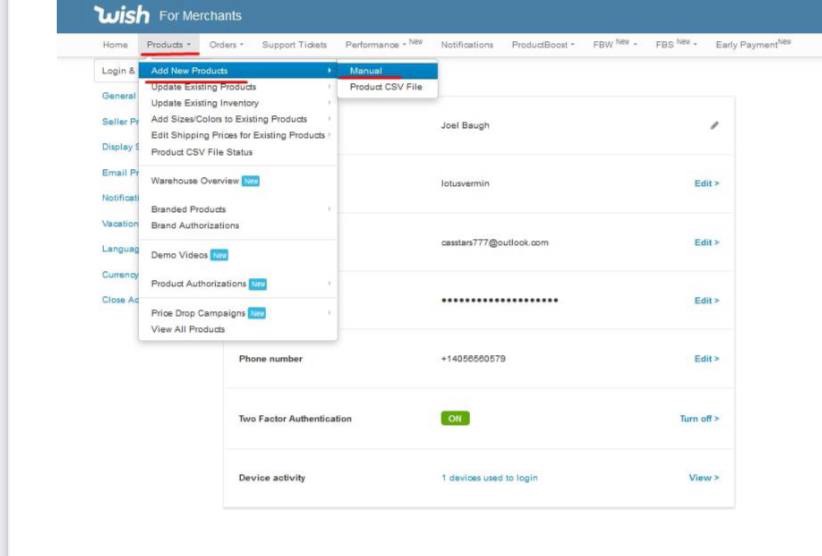
Adding products to the store Open the Products tab -> Add new products -> Manual
In parallel, open a new tab in a separate browser and go to the amazon.com site where we will look for products without popular brands.
Now we need to decide with you what products you will upload to the store. I usually add products of one theme. Example:
IMPORTANT: Pay attention to pictures and product descriptions. The description and photos should not contain the brand name, otherwise the product may, after approval, fall under the branding policy and your product will have to be removed or documents proving that you are a brand representative.
Accordingly, if a brand name appears in the main or additional product description on Amazon, we will erase it. If there is a name on the pictures, crop or blur in Paint or Photoshop.
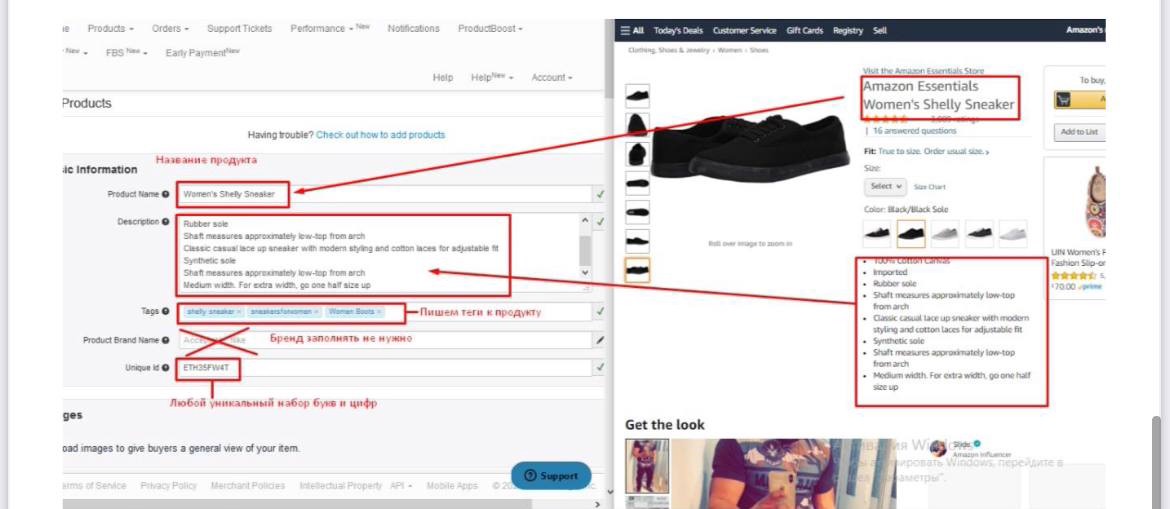
Start filling. After we have opened Products -> Add new products -> Manual We are transferred here
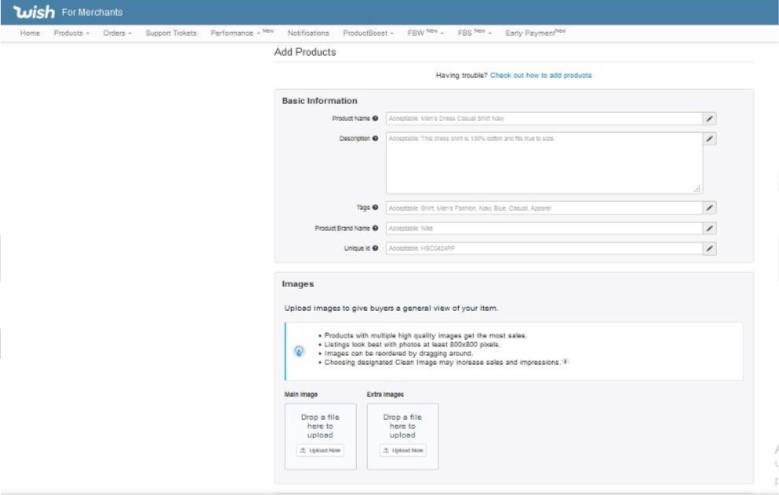
We start filling in the Product Name, Product Description, tags and come up with a unique product id.
For example, I found unbranded shoes on Amazon. We will issue them.
Go ahead. Fill in the main and additional product photos. Nothing complicated here. Download Lightshot to take screenshots. Create a separate folder where you will add product photos. Screen each photo on Amazon and save to this folder. Next, upload them to wish from your computer
Drop a file here to upload (Upload New) button:
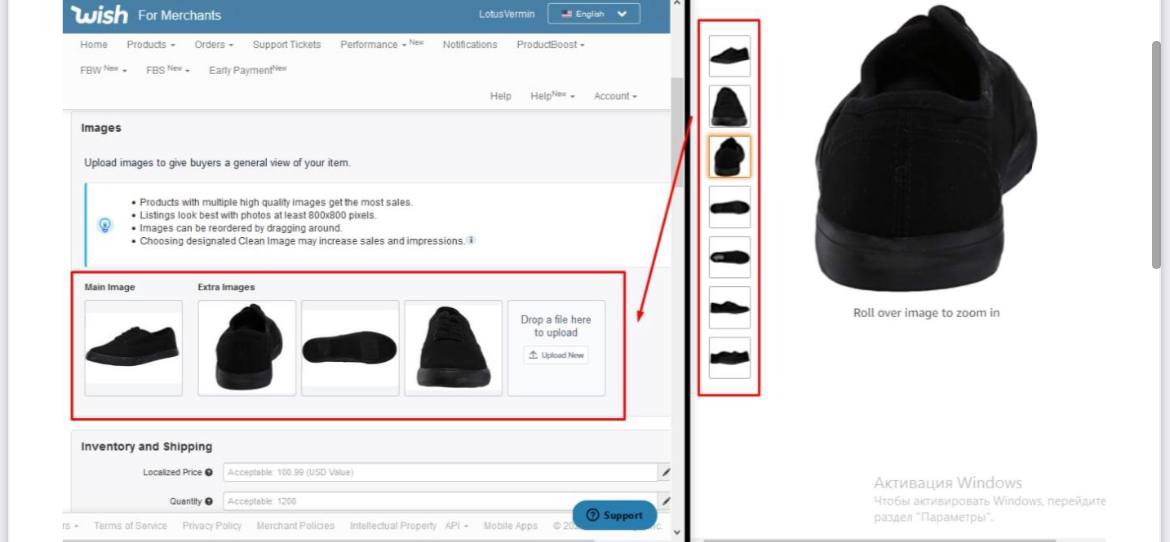
Go ahead.
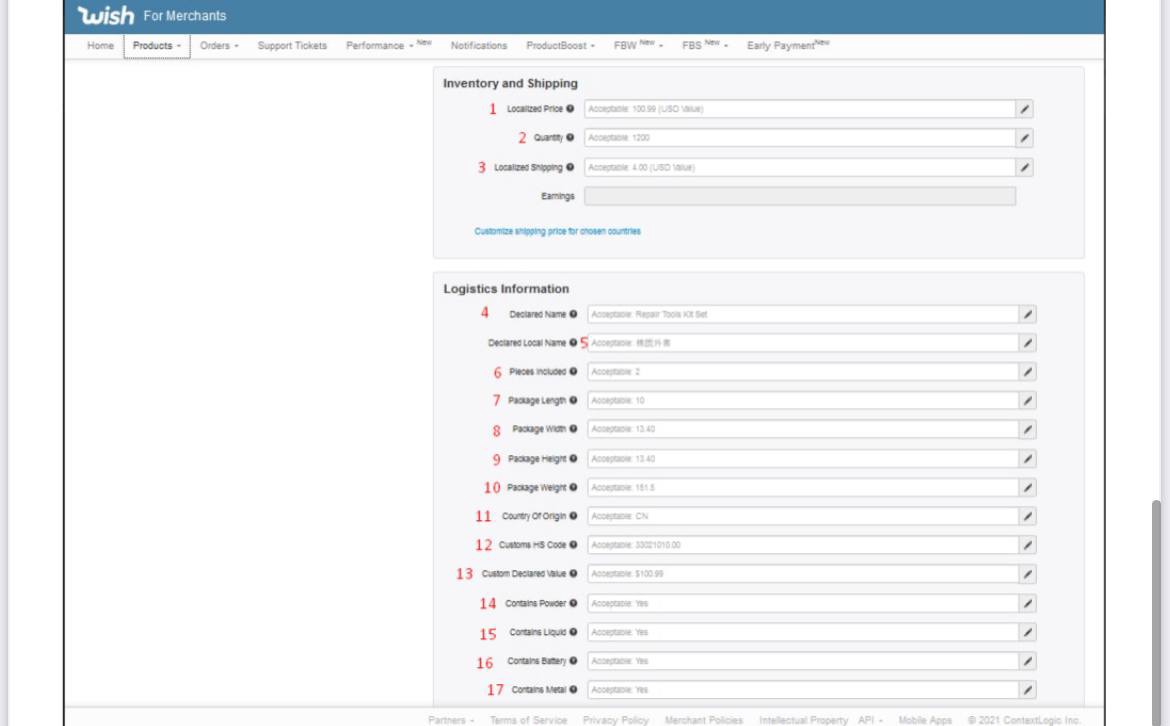
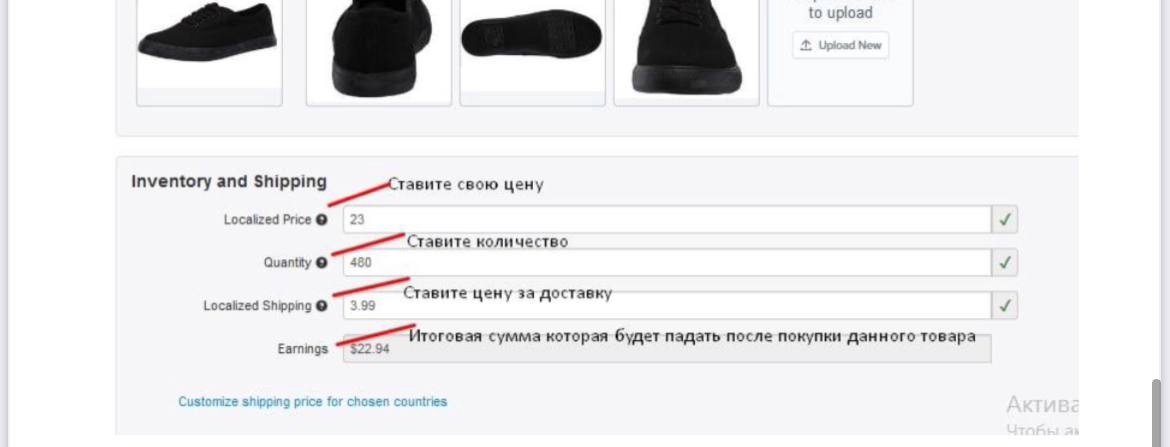
We expose:
1) The price of the product (Localized Price, in dollars. I am not greedy, I put from 10 to 100 $ depending on the price of the product on the Amazon)
2) The quantity of goods in stock (Quantity)
3) The price for delivery (I usually put from 2 to 6-8 dollars)
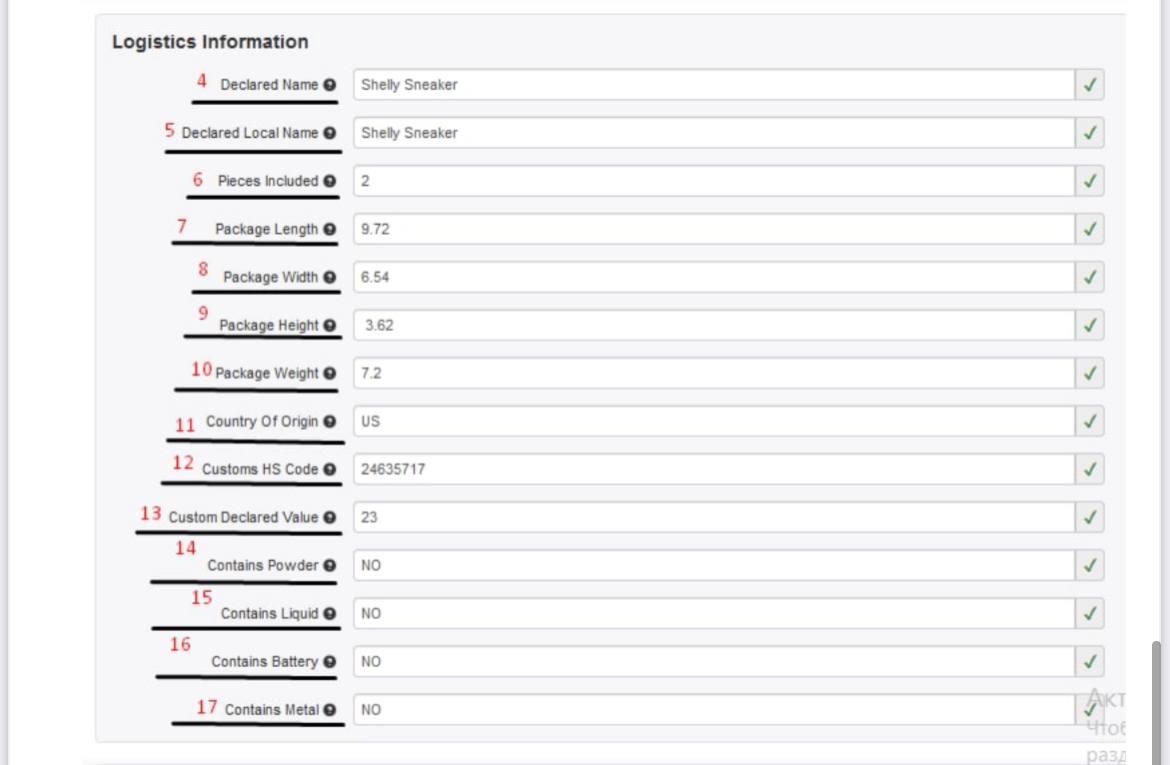
4) Declared \ Original name of the goods (we take 2 words from the bulldozer in the main description of the goods)
5) The declared local name of the goods (you can duplicate point 4 in this line
6) How many parts will be in the parcel (since these are shoes, I expose 2)
7) Length of the parcel
8) Width of the parcel
9) Height of the parcel
10) Weight of the parcel
11) Country of origin (I am setting US or any European country - DE, GB, IT)
12) HS Code (coming up with 8-9 random numbers from the bulldozer)
13 ) Declared Value - the declared price (we set exactly the same one that was set above in paragraph 1)
14) Does it contain gunpowder / powders? (Answer Yes \ No) 15) Does it contain liquid? (We answer Yes \ No)
16) Does it contain batteries? (Answer Yes \ No)
17) Does it contain metal? (We answer Yes \ No)
IMPORTANT: According to the point from the 7th to the 10th. If you cannot determine the weight, width and length of the parcel by eye, you can take information from Amazon. To do this, scroll down below and see a description of the parcel of the goods.
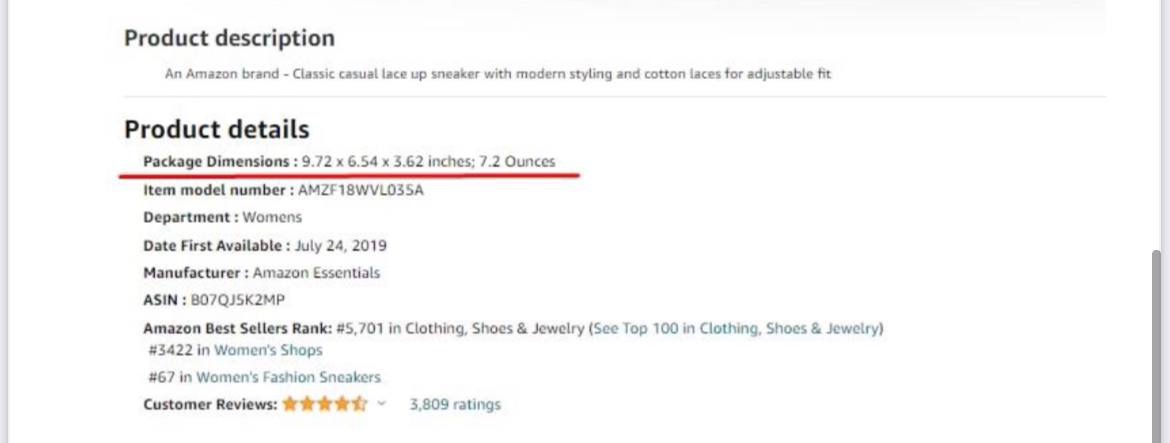
After filling out points 4-17, it should look something like this:
Go ahead.
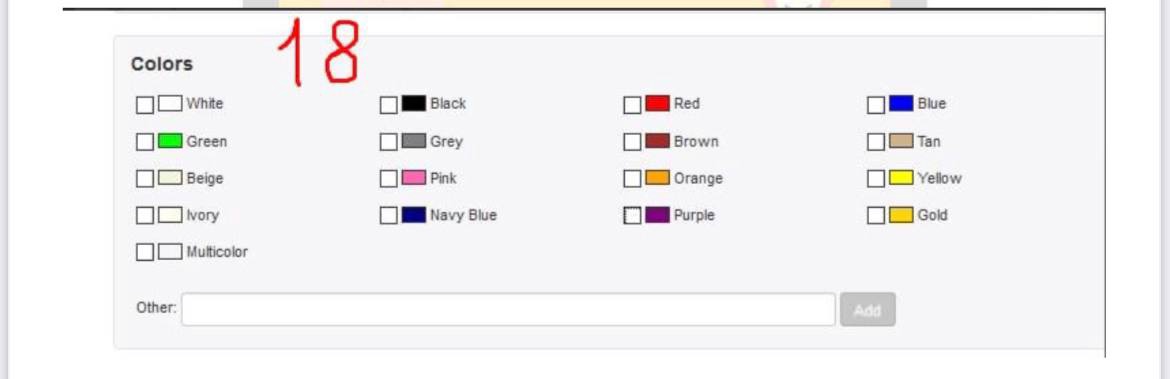
18. We choose which colors of the product we have in stock (look at the pictures that were filled in at the beginning). Check the boxes. If this color is not available, use the Other line
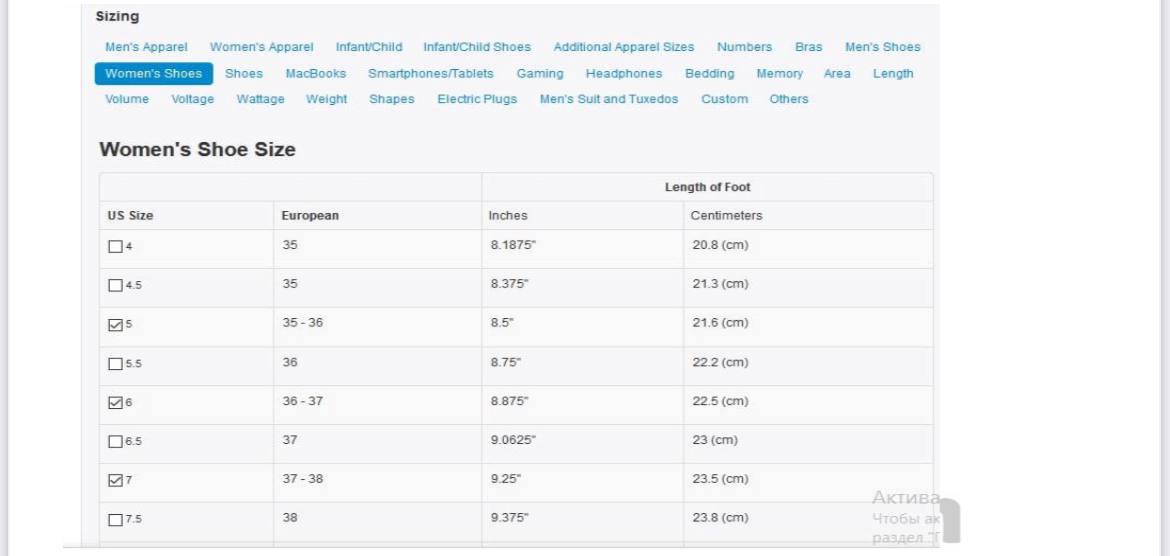
19. We select the Type of size for this item (Men, women, children, hand sizes, etc.) I chose Women's Shoes.
Next, put a checkmark, which sizes we will have in stock.
Moving on. Now we need to fill in each product size / color variation.
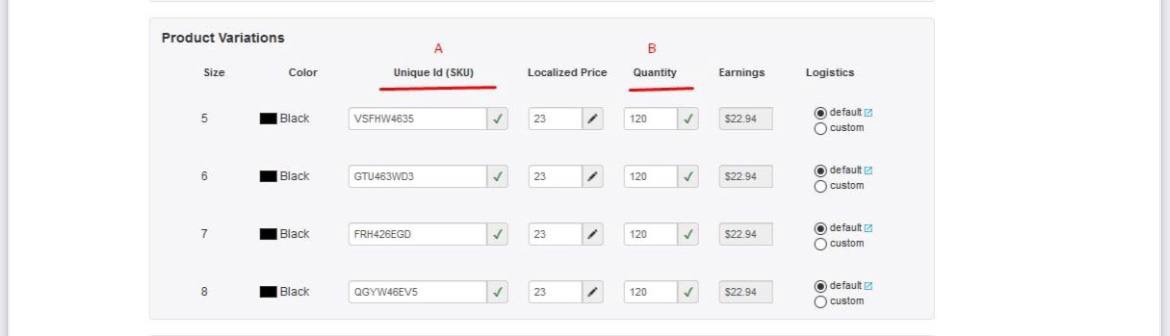
A - We set a unique identifier for each product. (Coming up with a set of letters and numbers from the bulldozer)
B - Change the quantity of goods.
IMPORTANT: At the beginning, I indicated the total availability of 480 items, respectively, here I indicate that I have 120 items in stock for each variation. 480 \ 4 options = 120 DONE. Congratulations, you have completed your first product.
We press the Submit button (IN NO EVENT CLEAR, otherwise reset everything that you filled in)
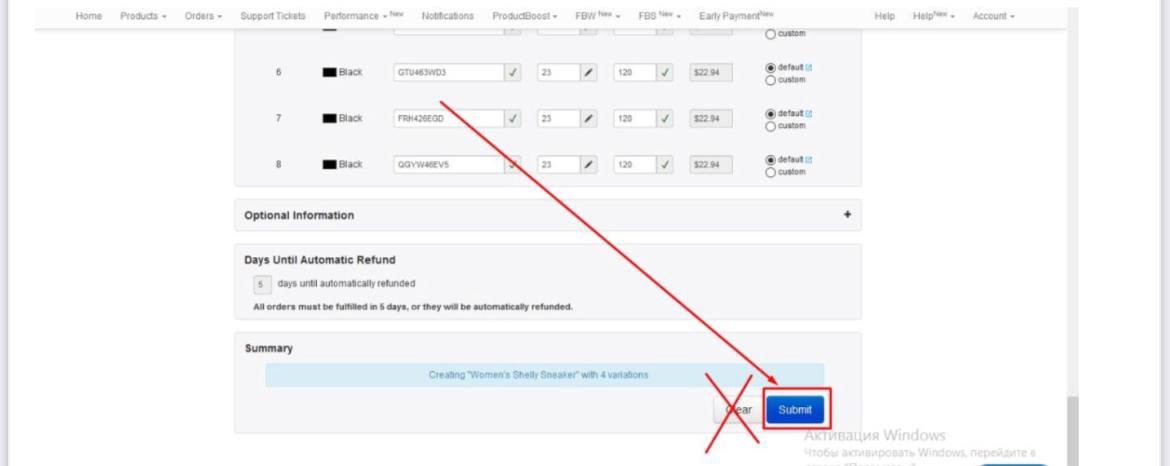
Done, the first item has been successfully added. I usually fill in from 2 to 8 products in each store to make it believable that I am a real seller and to have a variety of purchases. Therefore, I recommend doing the same.
Recommendations
Always set different prices for goods, for example, 14.99, 20, 27.5, 32, 41, 55, 70
Country of Origin for all goods in one store - the same. 1 store - all goods have a country of production US
2 stores - all goods have a country of production DE, etc.
The Product Brand Name item (it is at the beginning of filling) is always left blank.
We vary the price for delivery for each product from $ 2 to $ 8-15
In the future, if you pour from brute, then brute accounts will not allow you to buy for large amounts. Consider this and try to set the price of goods from $ 5 to $ 30-40, this is enough.
Where to see the added product. How do I get a link to a product? Go to the Product tab again -> View All Products
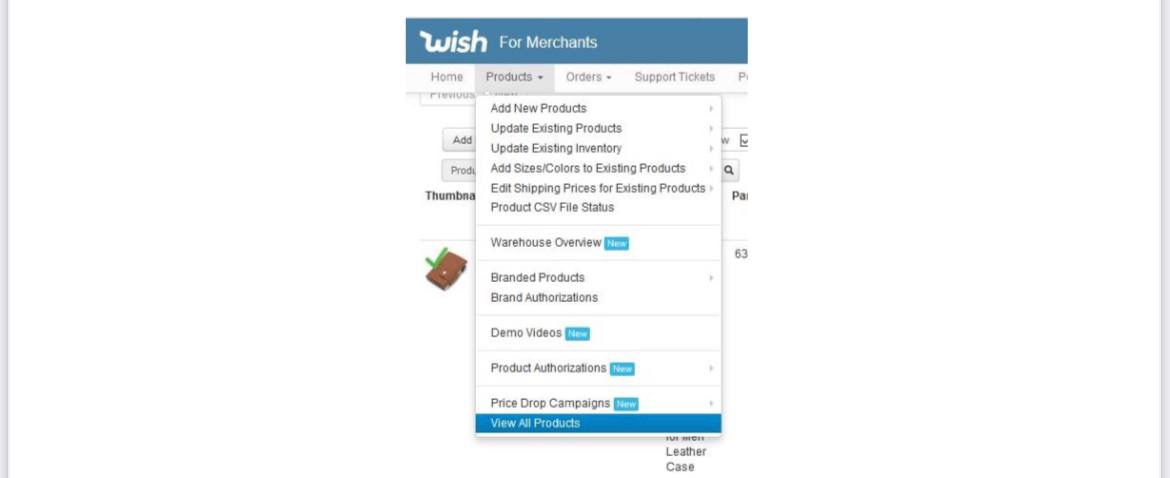
We see our newly added product.

Recently added products have the Hourglass sign hanging on them, which means that the product is in the approval process, which lasts 48-98 hours.
Approved items are marked with a check mark.
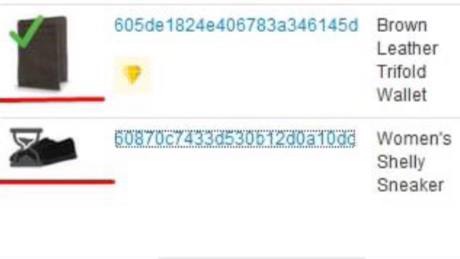
In order to pull out a link to our product (in the future, it will be needed to click on it and drive in our product) - click on the link to the right of the product photo.

A link to our product opens in a new tab. It will become operational after the product is approved. Now we just save it to a .txt file and wait 2-5 days for our products to be approved.
Congratulations, you have successfully completed STEP 2 of adding items to your store.
In the next steps, we will disassemble directly by driving our approved products, registration and binding of payment systems (Payoneer or PP), as well as the design of our products.
STEP 3 - Setting up the system and buying (driving in) the products of your store
Hello, annoying newbie. If you read and continue to study STEP 3, then you are already one step away from success and the first cache. Today we will touch upon all aspects of the system settings in different versions, and also consider the successful / unsuccessful driving of your products.
Let me remind you that in the last STEP 2, we learned how to add products to our registered and approved store. Today you will need the links to the products that you pulled out in the last lesson.
For STEP 3 you will need:
Are you ready? Let's get started.
1.1 Purchase 911. Setting up 911 and installing Google Chrome Portable \ Che Browser
First of all in setting up the system, it is important to have the purchased 911 ready (at least with the minimum package) and install Google Chrome. In order not to stretch this stage and not repeat myself, I will leave a link to an article in which I previously explained how to install, configure and use 911 software. Official link to their product: 911.re
Link to an article on setting up and using:
Link to Che Browser: https://chebrowser.site/
Recommendations. Download Google Chrome Portable from here https://portableapps.com/, as on other sites a browser with a virus is possible. And also, if you remember, it is not advisable to download the latest versions of the browser, because an ordinary American / European does not update his browser every day and does not follow its updates. We make the maximum imitation of an ordinary customer. Download only the ENG version, and when installing, also specify the language English.
1.2 Basic links during work + Limits on the use of ip 911
The main and simplest links during driving, as I said, are:
911 + Google Chrome Portable 911 + Che Browser
Google Chrome differs from Che Browser in its speed of work. The thing is, Che Browser slows down your internet speed a lot. With it, wish is loaded very slowly, and, accordingly, the speed of driving in your goods is significantly reduced.
In turn, Che Browser has the following advantages:
- When connecting to ip 911 and launching Che Browser, the browser itself is completely reconfigurable. Your browser has built-in unique options for screen expansion, Finger print (a unique imprint of your hardware), and the browser language is completely changed to the language of the country to which you are connected.
- For paranoid psychos: provides greater anonymity.
Based on my work experience, I can conclude that I had great productivity with the usual Google chrome, so today we will consider working with it.
Limits
When driving in, I noticed the following pattern: in the case when you use 1 ip address for one wish brute \ wish self-registration account, the chance of successful driving is much higher (provided that you have normal unused material).
• Ideal driving in (the most productive and at the same time the most expensive)
We use 1 ip address for 1 Wish Brute 2021 \ Wish self-registration account.
At the same time, even if the product was unsuccessful, we clean the browser cookies, exit the browser, change the ip and go to the next account.
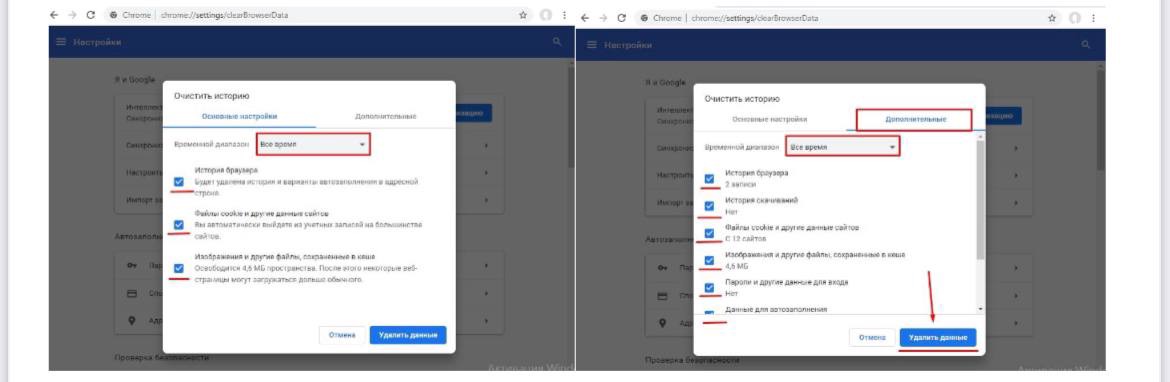
How do I clear cookies? The shortcut keys Ctrl + Shift + Delete
In the main settings, put all the checkboxes and set the Time range for all time
. We do the same with the "Additional" tab, check the boxes everywhere and set the Time range for All Time (Screens below).
We clean cookies EVERY TIME BEFORE CHANGING IP AND EXITING THE BROWSER.
• Economical driving (fewer successful drives, less wasting ip, more wasting of material)
We drive in exactly the same way as in an ideal drive, BUT we change ip less often. In this case, we drive in either until the first successful product, or we work out 5-15 Wish Brute accounts, and then we change the ip.
IMPORTANT: If you bought Wish Brute accounts of a certain country, then we select the ip address in 911 for the country of this account (s).
1.3 Purchase of material. We analyze what kind of material we are dealing with.
For driving in, the cheapest option would be to buy Brute Wish accounts.
For those who are in the tank, Brute accounts are accounts that people massively hack using special programs, and then sell. Usually brute accounts are sold in the Login assword format.
Example: krossfire2003@hotmail.co.uk:seamiaks, where
krossfire2003@hotmail.co.uk - account login
seamiaks - account password.
You can learn more about Bruteforce from your beloved google, and we go further.
The priority for us is Wish Brute accounts for 2020-2021 + CC of European countries, namely:
CH - Switzerland (the best in my experience. Allows you to successfully drive in once, + bold cards)
BE - Belgium (In terms of quality, it comes second after CH. Each third account in 2021 = successful driving)
FR - France (Medium quality material. Out of 10 accounts - from 2 to 3 successful driving)
What does 2020-2021 mean? This means that the owner of this account made the last purchase in 2020 or 2021 (accordingly, Wish has more trust in us, the linked CC and the address is in place and the chance of driving in is more)
What does + CC mean? This means that the account holder's credit card is already linked to the account and all we have to do is go to the account, add our product to the cart and try to buy it.
There are also Wish Cash Balances Accounts - these are accounts with an existing internal balance. (The goods bought on such a balance often do not reach our store, so we are not interested in such accounts)
1.4 Directly, having driven (purchase) the goods himself.
What we need to start uploading to our store (create a separate .txt file for convenience):
- Purchased material
You can buy material here:
@Corn_Shopbot
@BruteAreaBot
@razvedkashop_bot
@WishKishMish_bot
@Mewishbot
PS I'm not forcing anyone to buy accounts here. You can search for buyers or get wish accounts yourself. You can also create a Wish Self-Reg account using the cardholder's data and link the already purchased CC to it, and then do it in.
- Virtual card (in the case when you logged into your account and there was no credit card attached during the purchase, we enter our virtual card, update the site and the owner's card should appear in 90% of cases)
- Links to our products
From theory to practice.
We bought the material, open 911 and select the ip address for the country of the material. (ProxyList tab). In my case, I bought accounts Wish Brute FR 2021 (France)
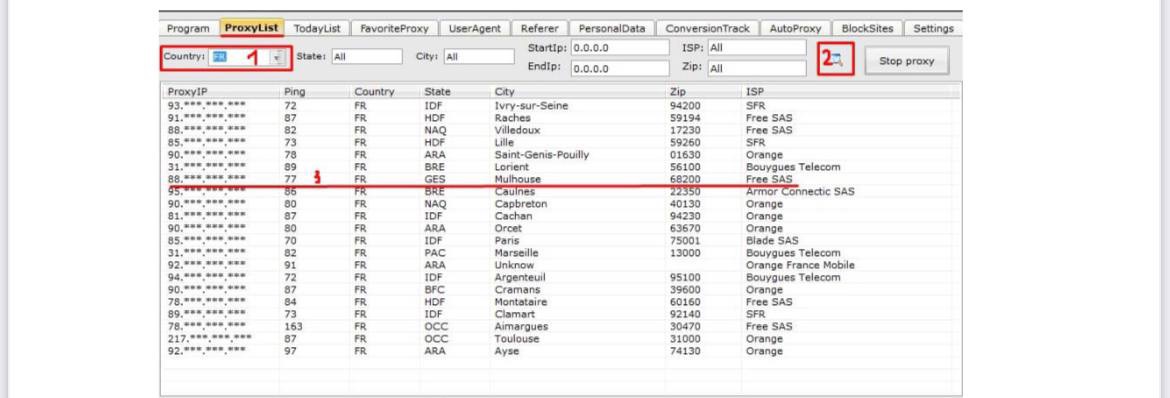
In the Country field, I entered FR (1), and then clicked Search (2). I picked up the ip and double-click on it. Are you connected? Now we need to check our ip for cleanliness on the website whatleaks.com or whoer.net.
Launch the browser from our 911. To do this, go to the Program tab and double-click on our added Google Chrome browser

Go to whoer.net. With proper installation and configuration of 911 (there was an article above), and also if you are lucky and you get one, a clean ip looks like this:
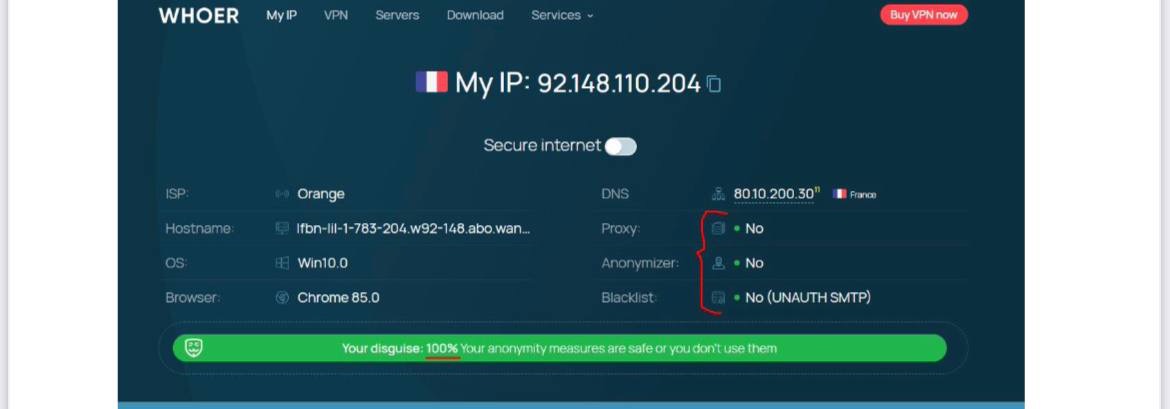
If your ip has 1-2 blacklist, or the Proxy Connection item is red, it's okay, we still use this ip. (It is logical that if all or most of the items are red, change the ip)
Next, clear the cookies and restart our browser. We go to the site wish.com
Without unnecessary dances with a tambourine, we immediately enter the account by entering \ copying the login and password of our account.
Have you entered? Click Log In.
We are admitted to the account on the main page. (if he writes Login or Password incorrect, then the account is not working and you need to request a replacement from the seller)
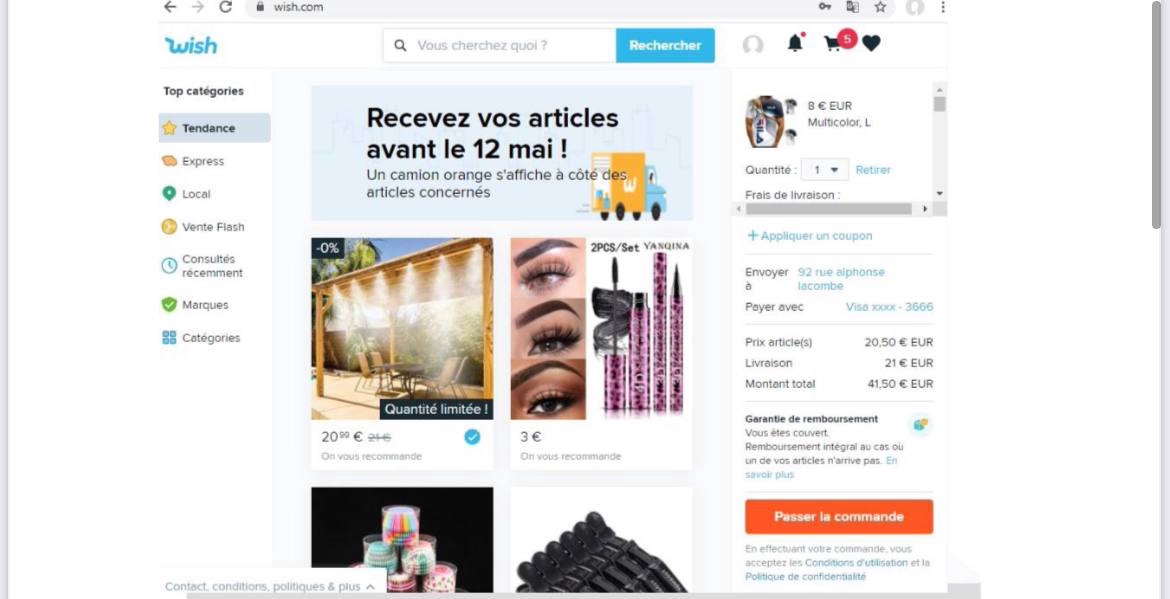
We have 5 items in the basket, but that's okay. Already finally, before driving in the goods, we will remove them.
We open a new tab and in a new tab insert a link to our product.

We follow the link and our product opens in front of us, which we added to the store in STEP 2.
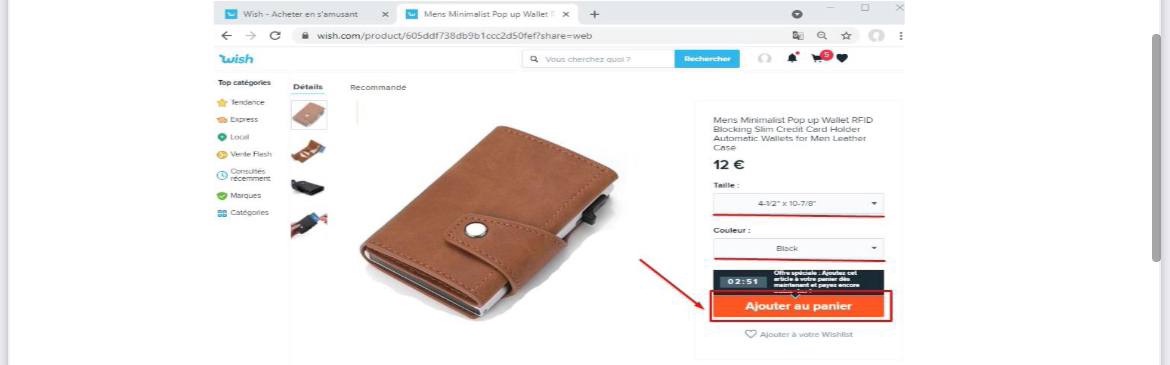
Choosing a size and color. Click the Buy button (Ajouter au painer). It's simple.
Before buying, be sure to link a virtual card so that we do not ask for the CVC code and the payment goes through immediately.
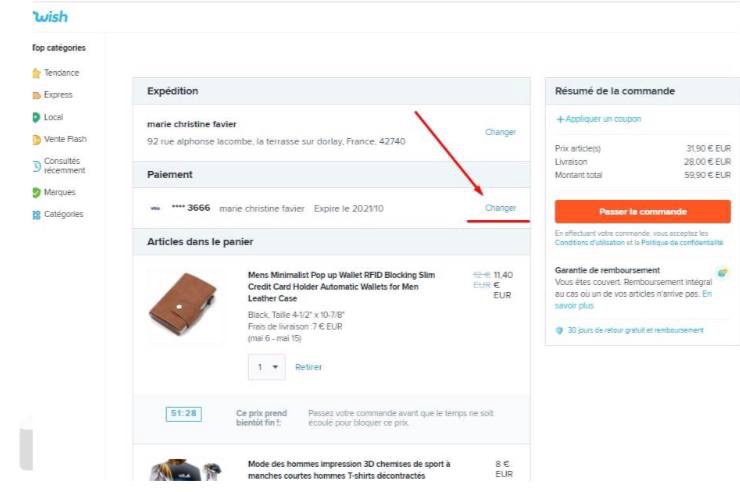
Click the Change button (To add a credit card)
We fill in the data of our card:
1 - Card number
2 - CVC code
3 - Validity period
4 - Full name of the card holder (since this is a virtual machine, you can write anything. We write the name from the delivery address)
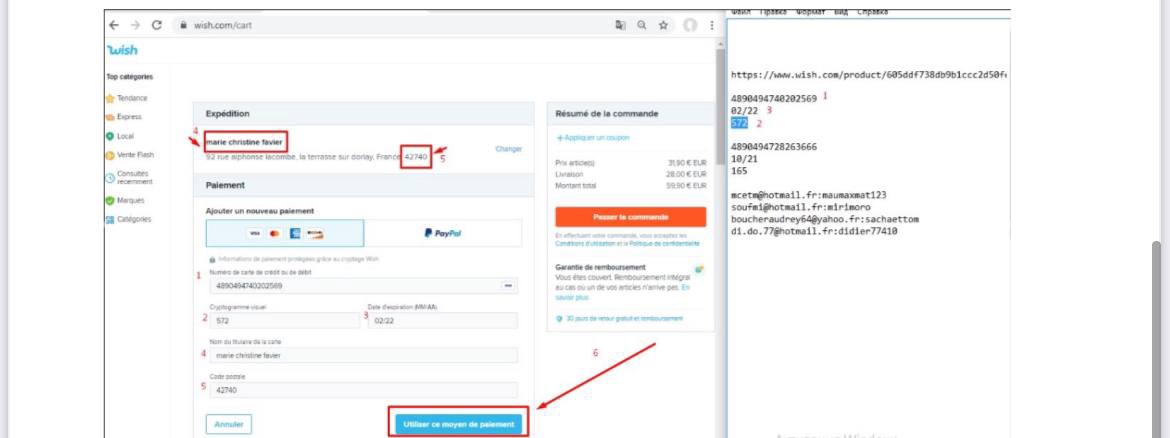
5 - Postal Code (mail index, similarly we take from the delivery address)
6 - Click “Add card”
After we update the site. (in the upper left corner, if that is the update button)
Now our Card is selected as the main one for payment. Click Change again and change the card to the account owner's card.
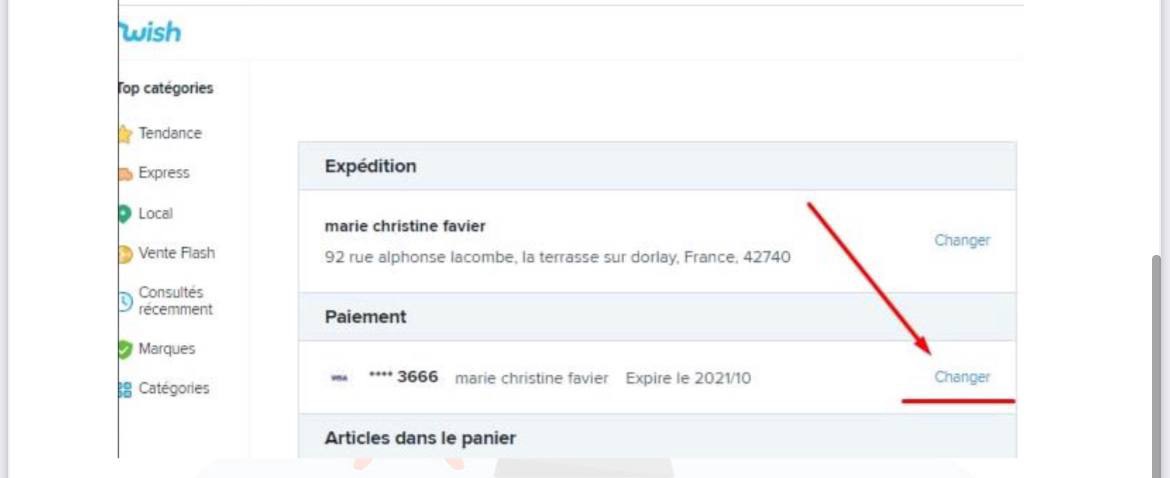
We switch to the owner's card (Sometimes there are several of them, try everything)
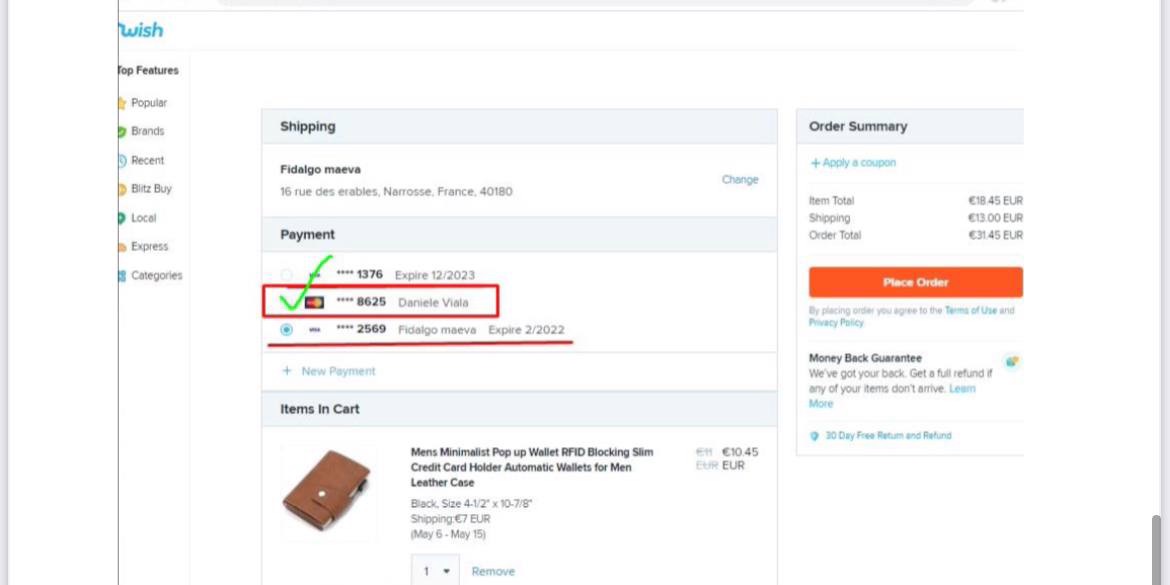
Removing the rest of the items from the cart
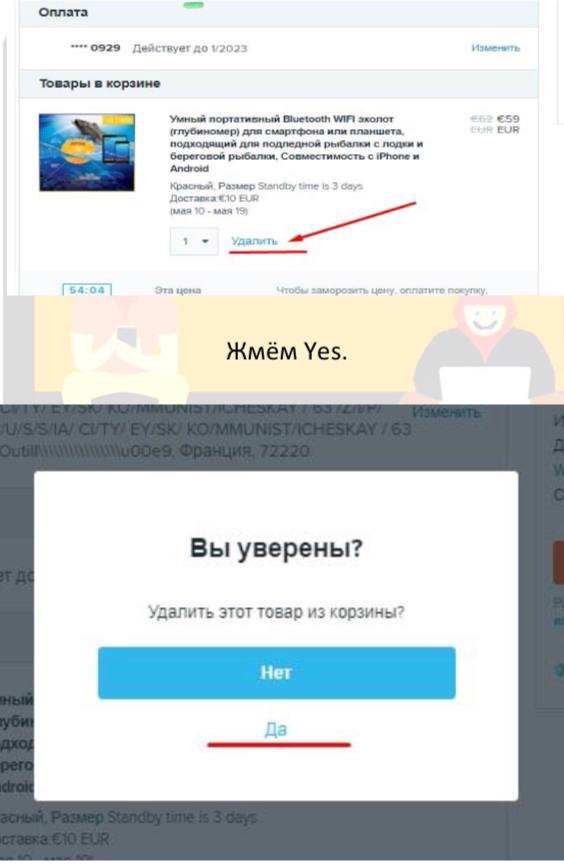
The moment of truth. We press the button Pay.
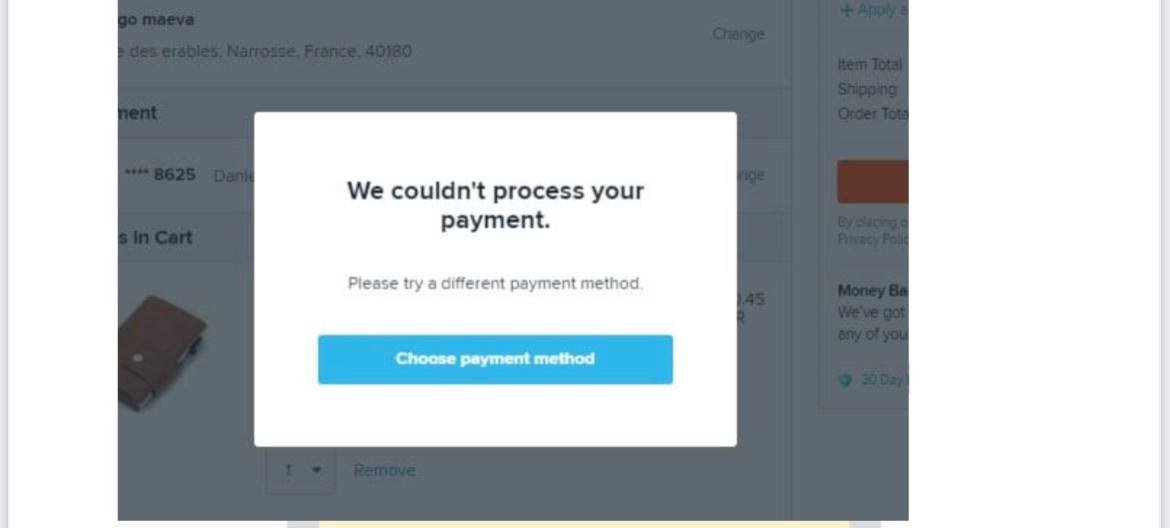
There are 3 possible events:
1 - We couldn`t process payment - which means: the owner has no money on the card, or other problems with the card.
2 - Asks to enter the cvc code. We enter any 3 digits from the bulldozer (yes, he don't give a fuck what cvc you write, it often allows you to successfully drive in despite the random cvc code)
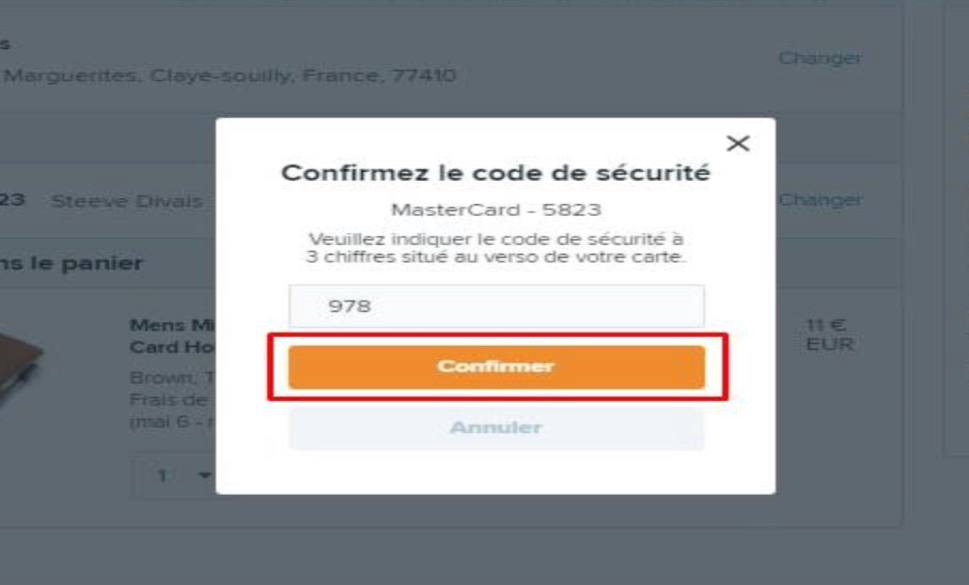
3 - Immediately throws it to the page with the successfully hammered in the product.
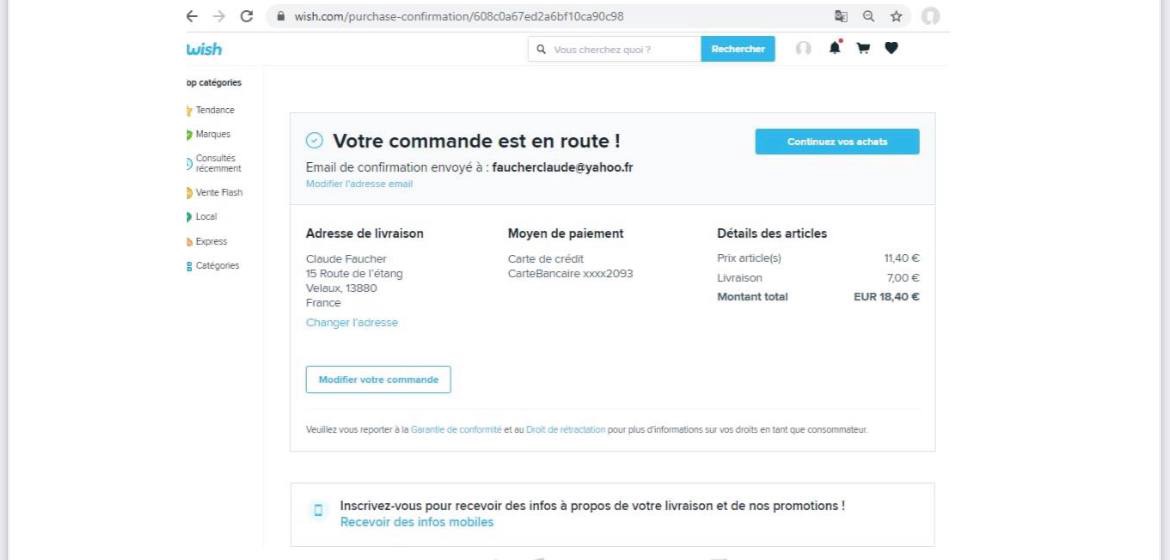
Now we need to check if our product has crashed. To do this, we need to go to the Order History.
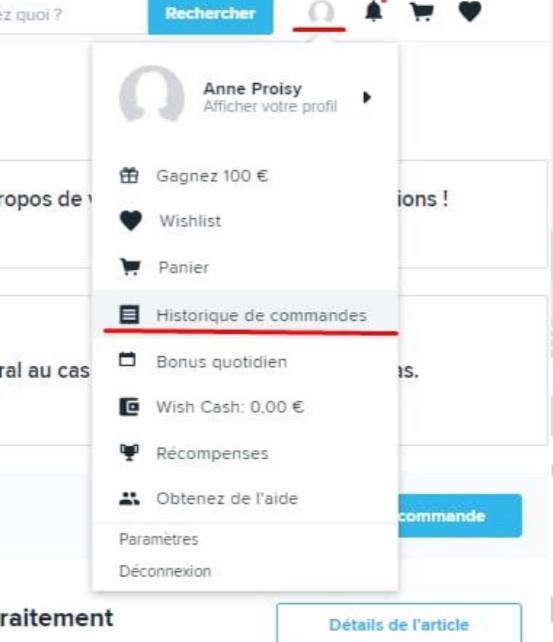
In the upper right corner, we have a profile button with you. We point at it with the mouse, but do not poke it. The main account menu opens, and we need to go to Order History.
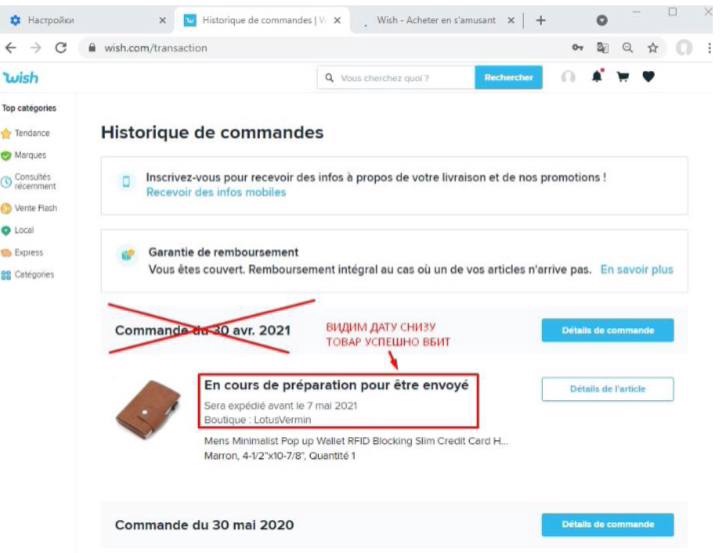
In this tab, we check if the date is in the main inscription of our order.
To check whether the purchased product has flown off, you MUST refresh the Order History page within 2-3 minutes. So we make sure that the product is successfully driven in and will reach our store 8 hours after ordering.
1 - DATE IS. GOODS SUCCESSFULLY DRIVEN
We update several times
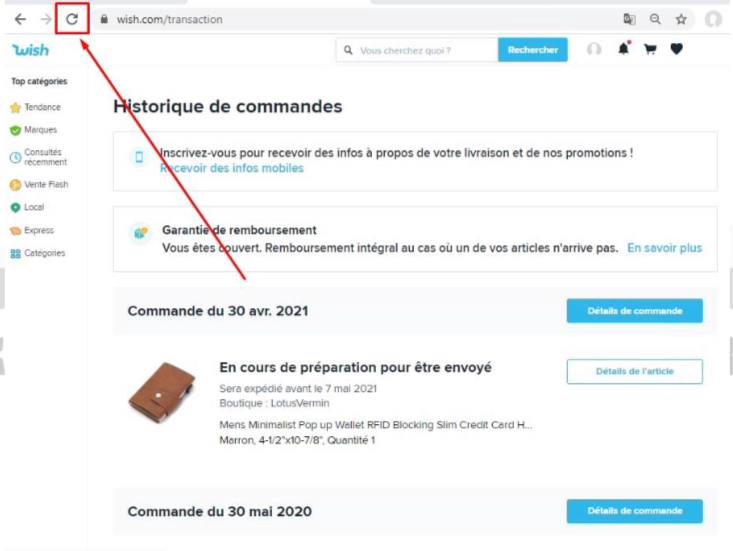
The date in the labels must remain even after the page is refreshed.
2 - DATE IS NO OR MISSED. THE PRODUCT FLYED.
Sometimes it happens that you have driven in the goods, entered the order history, and you see that there is a date on the inscription. But if you refresh the page several times, and the date may disappear. Therefore, it is so important to double-check the success and refresh the page within 2-3 minutes, because you can add 10 products in this way, of which only 4 remained successful after the page was updated.
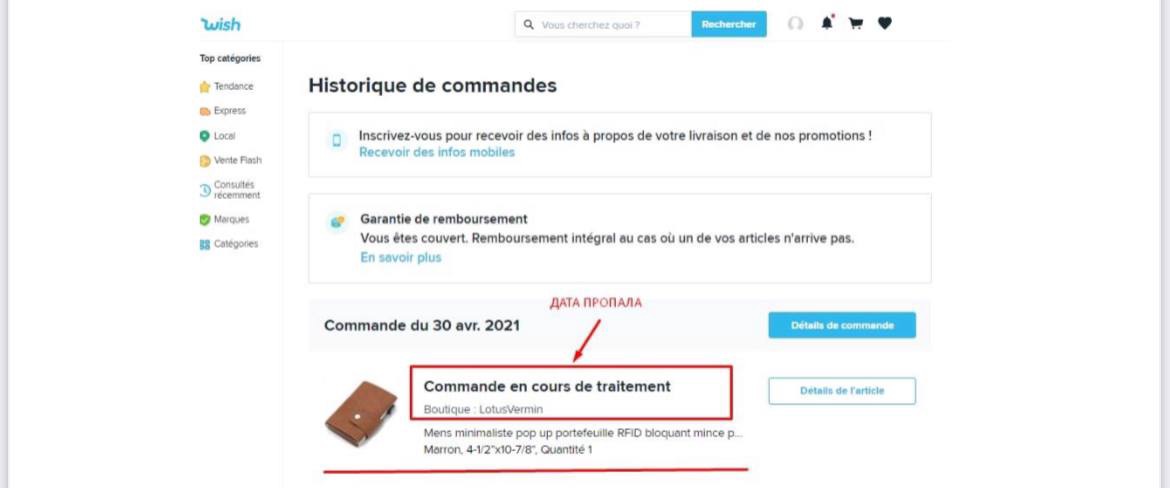
This is how a product rally looks like, unsuccessful driving.
In case you failed to drive in the goods, we do not waste time and log out of the account. To do this, completely clear the browser cookies and restart it. Go to the next account.
Or, in order not to fuck with the constant cleaning of cookies and restarting the browser, you can log into each account through the Incognito mode.
To do this, after launching the browser, we hold down the key combination Ctrl + Shift + N and we open incognito mode. After working with the account, we simply closed the incognito window, pressed the key combination again and go to another account.
Notes:
- Successfully driven goods arrive in your store in the form of an order 8 hours after driving in.
- Do not rush to place an order and try to do something with it. After it arrives at your store, you will have 5 days to arrange it.
- We will talk in more detail about registration of goods, track codes and payment systems in the next step.
Stage 4. Placement of orders and receipt of funds
At this stage we will discuss:
• Placement of active orders that we have driven.
a) We analyze which track codes to insert, where to get it. See information about the track code. We place an active order
b) What the order looks like after registration. History tab
c) Track code has flown. Inserted incorrectly. What to do?
• We follow the store.
d) Periodically check the Payment Status of our placed orders.
e) Consider changes in in-store balances after checkout.
• Limits, payment terms and balances.
• 2FA and its role. Turn on 2FA if it's not already on.
• Payment systems, how the linking takes place. Where to get a payment.
• Recommendations. Links to stores.
So, in the last stage, we discussed with you how to drive in our goods and what a successfully purchased product looks like. As already mentioned, 8 hours after the successful driving, our order arrives at our store. To place such an order, we are given 5 days. To place such an order, we only need track codes.
Who is in the tank, track code is a unique tracking number that sellers give to the buyer in order to keep track of where his package is and when it will arrive approximately.
1.0 Placement of active orders
Many people could already drive in the product and see that active orders are displayed in the Orders -> Unfulfilled Orders tab.
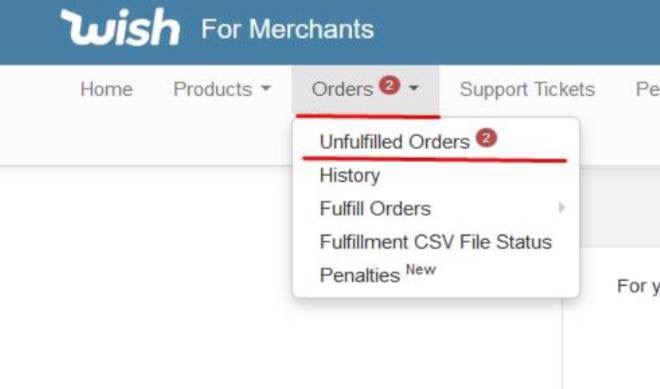
We go to the store, go to the active orders tab and we can see the following.
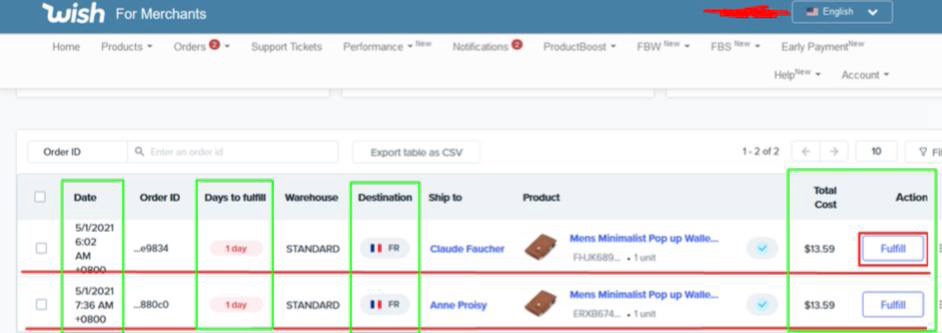
I currently have 2 active orders. Let's analyze the tabs that are interesting and important to us (I marked them in green).
DATE - The date the order arrived. A very important tab, since we will put the track code based on it.
Days to Fulfill - how many days we have left to check out the goods. In case you did not place your orders on time, Penalties - fines - arrive in the Notifications tab. The first penalties are usually not scary as they are $ 0. But further from $ 50 to $ 500, and in general - it is advisable to always send orders on time (I place 2 days after the order arrived).
Destination is the recipient country. That is, the country where the parcel should go. Accordingly, we will select the track code with the same destination country as indicated in the Destination tab.
Total Cost - the total amount that will fall on the Pending balance of our store after placing an order (after we insert the track code).
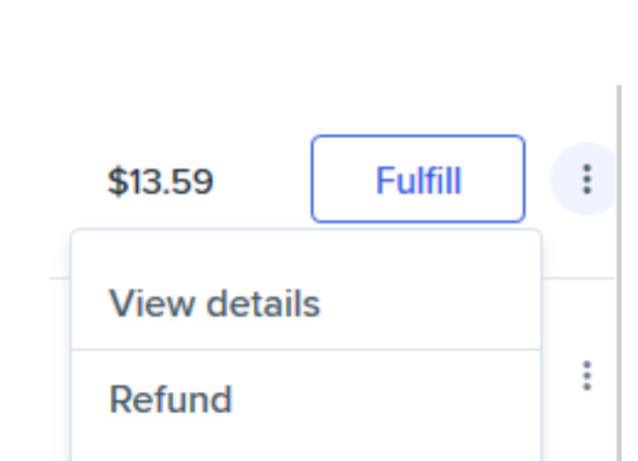
The Fulfill button - we poke there to place an order.
If, for some reason, you cannot place an order on time (there are no track codes, for example), next to the Fulfill button there is an ellipsis button -> Refund to cancel the order.
IMPORTANT: Before we go to insert the track code, be sure to pay attention to two main points - DATE (date of purchase) and Destination (country of destination). Why? Let's talk about this with an example.
For example, I have orders with the country of destination - France - France, and also - the date for both of them is May 1. So my track codes should be:
1) With the date of dispatch NOT LATER THAN 1 MAY. That is, in no way can I insert a track code there, which has the date of dispatch earlier than the purchase itself (I'm not a fucking seller, to predict and send the goods in advance). It is best to use the track code a day or two later than the order date, that is, take the track code from 2, 3
2) The country of receipt of the parcel must be France. Why? Because if the country of receipt is, for example, Spain, and not France, then:
a) This will catch fraud (suspicion) on your store from the side of the system.
b) It happens that the owner of the account from which you made an order saw this order, but does not cancel it, because he likes the product. If the product is not sent to his country according to the track code, he will cancel it and Refund will fly to you (at best), or maybe the store will be banned altogether.
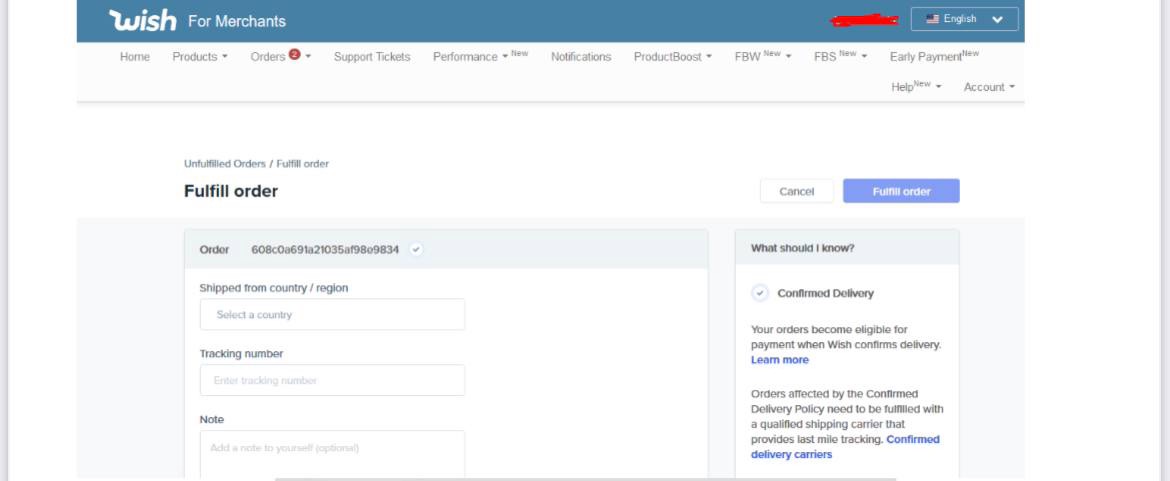
Now let's get down to practice, a lot of theory at once is not good. We press the Fulfill button and we are thrown over here.
Here I will use the example of the track code, which I have to immediately explain how to correctly check the information about the track code, and then fill it out correctly in the form above, which is on the screen. I have a track code, here it is -> 08448713650017. Let's look at it as an example.
After I took the track code, I need to check the information about this track code before filling out the form.
1.1. We check the information about the track code
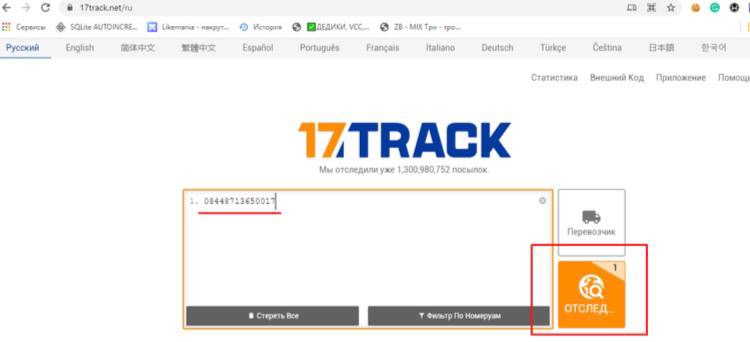
We take the number of our track code and go to the site https://www.17track.net/ to track WHERE and WHERE the sending of this track code is going, as well as on what date the parcel was sent. Insert our track code into the field and click the Track button (screen below)
Usually, if the track code was not used by another carder working in this direction, you will see such a window.
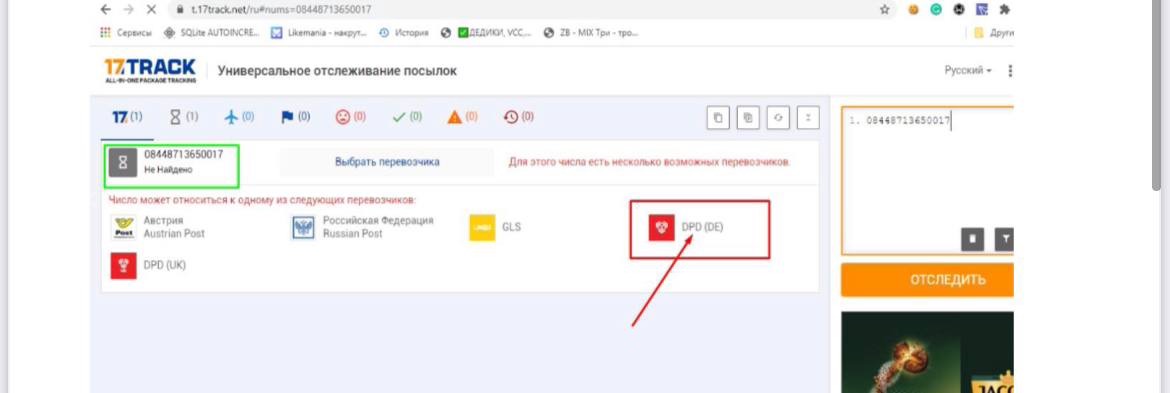
By such a window, I mean the Not Found Inscription in the upper left corner. The fact is that in addition to the seller from whom we take the track codes, other people who work at Wish stores can also get and use these tracks in the same way before the seller puts them up for sale. Therefore, when you see the Not found button, it means that no one has tracked this track code on the site before you. To track it, we need to select the carrier company that owns this track code.
FedEx - track codes that often start with numbers 7. Example -> 786151923840
DPD - track codes that often start with numbers 08. Example -> 08448713650017 (my track is already understood as a DPD track).
My track code is DPD, and therefore, in the screenshot above, I choose the carrier - DPD. Full information about the track code is revealed to us.
1) WHERE the parcel is sent from. From Germany in my case. It doesn't really matter to us which country the parcel comes from, the main thing is where it goes.
2) WHERE is the parcel being sent (as I need, to France, since I have an order with Destination in France)
3) WHEN THE PARCEL WAS SENT (in my case on May 4th. May 4 - later than May 1, and this also suits me)
4) The status of the package. In Transit (on the way). There may be a status DELIVERED (such are usually discarded, preferably on the way)
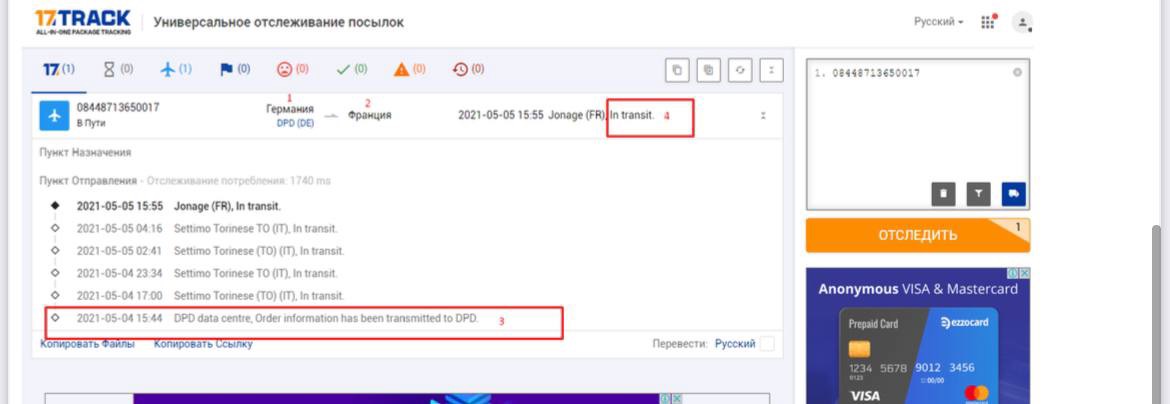
So, my track code fits in all respects (goes to France, on the way, and sent it later on May 1). Now, let's figure out what kind of form it is, and how to fill it out.
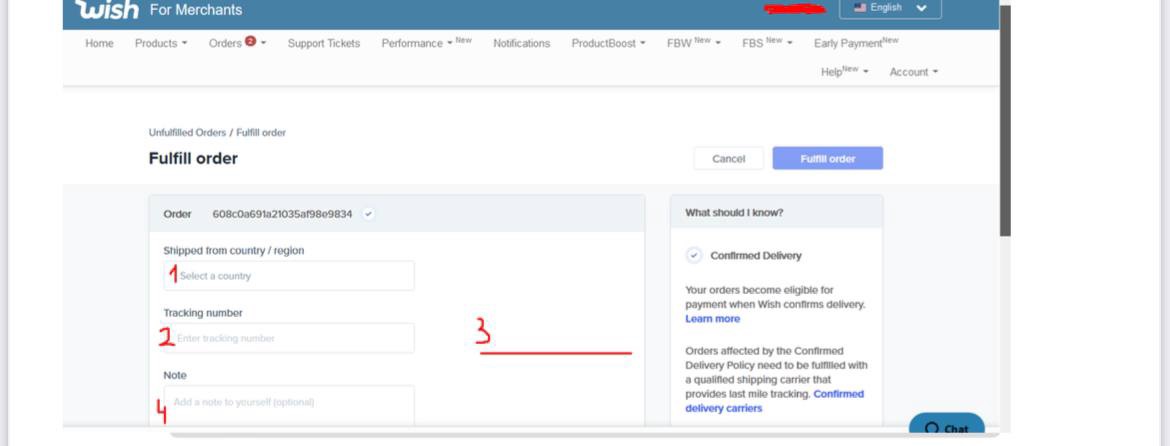
1) We select the COUNTRY from WHERE the goods will be sent. I repeat, WHERE, AND NOT WHERE (you don’t need to fucking choose France here). Which country should I specify? In my case, Germany is natural. (they checked above and my track code showed that it was sending from Germany)
2) Insert the track code itself into the Tracking Number column.
3) The third point - The company to which the dispatch is going (We choose depending on which track we are going to insert. I have DPD in my hands, and therefore I will choose DPD.
Attention! We choose DPD. NOT DPDde, and NOT DPDFR, etc.) - Just DPD).
Now the third item is not visible on the screen yet. Why? Because I have not yet chosen the country where the parcel is coming from (point 1 on the screen)
4) Notes - notes for ourselves. They are NOT REQUIRED to fill.
From theory to practice. Here's what I got after filling out.
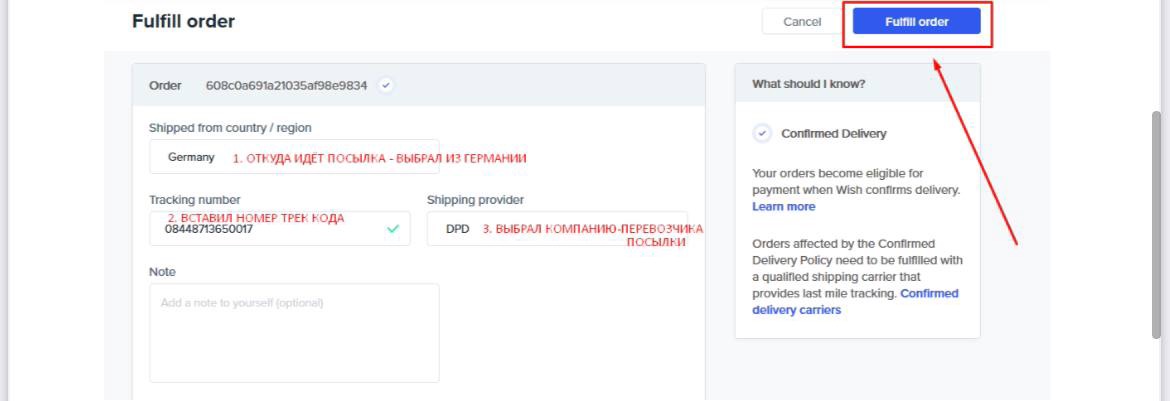
We press Fulfill Order and our order has been successfully completed.
1.2. How can I check that the order has been placed successfully? History Tab Our active order has disappeared and now it is located in the Orders -> History tab as a placed order.
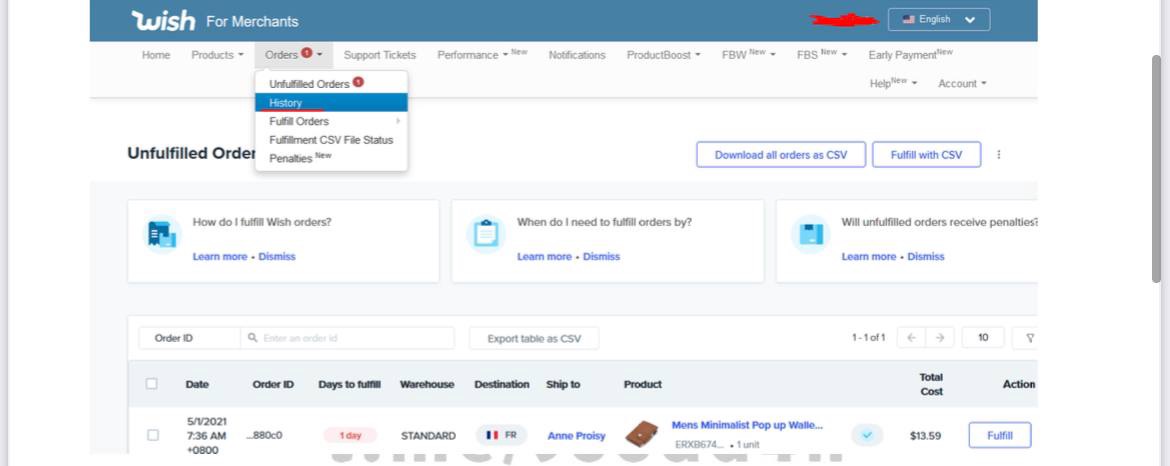
We pass and see our order, which has just been placed (I reduced the browser scale for convenience, using the Ctrl + mouse wheel keys).

Here 3 columns are important for us (I will write down below as A, B, C). We will analyze each in more detail. A - Payment Status (The status of our track code and payments)
1) Successful. Must be paid on <estimated date of payment>. If this is the case for you, then the track code has risen smoothly and is tracked by the Wish system.
2) Canceled. If he writes not eligible for payment, then the order was canceled and nothing can be done with it, we do not touch it.
(On the screenshot below - 2 placed orders. One was canceled, and the second - I placed it now and he got up successfully)
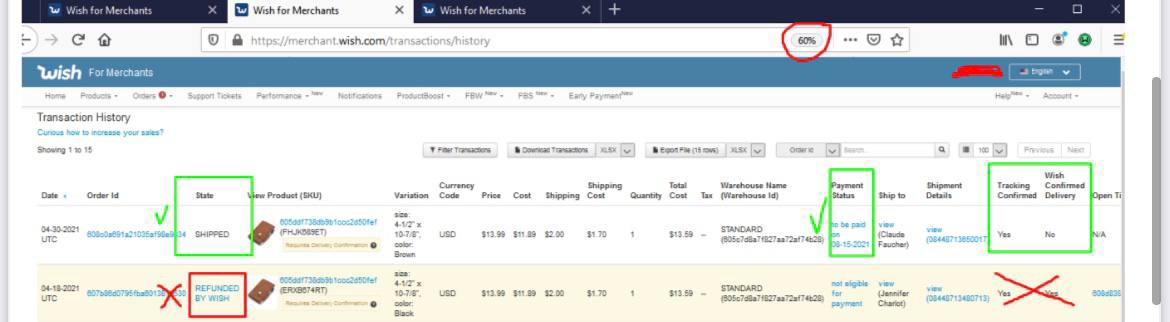
3) Curve track code. If he writes eligible for payment after confirmed (payment will be available after personal confirmation of receipt of the parcel by the buyer), then our track code is no longer tracked in the Wish system and we need to replace it with a new one.
1.3. How to replace a track with a new one, if the code inserted earlier has
fallen off Make the browser scale smaller (use the Ctrl + mouse wheel key combination) or move the slider to the right.
For orders with Payment Status “eligible for payment after confirmed”, you need to replace the track: 1 - scroll to the right and press the Actions button
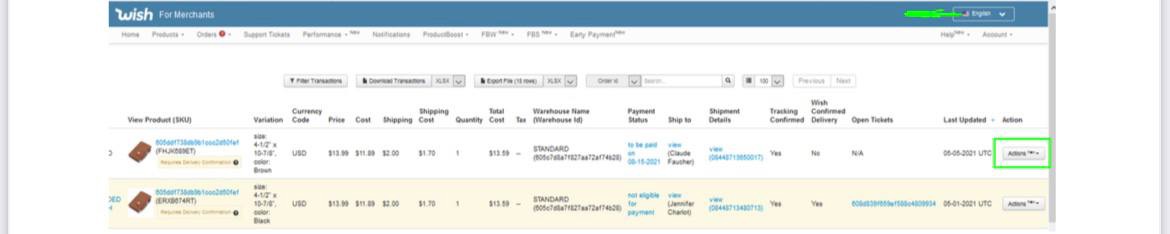
2 - Item Modify Tracking Info, and then insert a fresh track for the last dates on a new one.
P.S. Sometimes this button is not there, so Wish forbade you to change the track code and you won't do anything.
Be careful when pasting the track code.
B - Tracking Confirmed
This column tells us if the Wish system is tracking our track code.
If Yes, then yes, and everything is fine. If No, we wait for some time until Wish is bloated (5-10 minutes, update the page. If it's still No, replace the track code as written above. C - Wish Confirmed Delivery
This column tells us whether our track code to destination or not (YES or NO).
Usually, after placing an order, after 3-7 days the status of this column becomes YES and the order receives the status delivered. Then our funds go to the next payment and are paid to us when the due date is due. If NO - wait patiently.
TOTAL: We have successfully placed an order and checked it in the History tab.
Now you just have to arrange the second, third, etc. in the same way. active orders. Placed all orders? Now just watch every 1-2 days so that they don't fall off, and check the balance of the store.
RECOMMENDATIONS: I usually don't run to insert the track code right away. I do this in at least 2 days. Why? Because if you issue them right away, then it will already be canceled through live tech
vis support. If you place in 1-2 days, there will be those active orders that firmly after 3 days KX brute account (from which you beat), did not cancel the order you made. And also, right away is not normal, because sellers cannot physically send and place 10-15-20 orders per day. They do it only in a day or two, and while they receive the track from the mail, in order to give the buyer = it also takes time. I think we understood, we imitate the real seller as much as possible.
1.4 LIMITS. PAYMENT TERMS. BALANCES. BALANCE CHANGE.
From my own experience, I can say that I never found out the reason for the bans for the entire time of work. According to my statistics, over the past two months, from 30 to 50% of my stores have been blocked.
In each store, I fill in goods in the total amount from $ 150 to $ 300-500, that's enough.
For us, 1 successful paying store can pay for all your work. At the same time, I start pouring money into the store from the 1st to the 8th-10th of each month, as well as from the 16th to the 23rd.
Why is it so? Because, taking into account all the transitions and changes in the order in the flesh before the output to the next number, this is the most convenient time.
Orders are driven in on 1-2 numbers -> 4-5-6 numbers I place orders -> After 3 days, on average, the track status is DELIVERED (these are the 9th and 10th) -> and at least 5 days are needed for the grandmas from Pending Balance to go to Current balance.
Balances
How to check the balance of our store? To do this, we climb into Account -> Account Balance
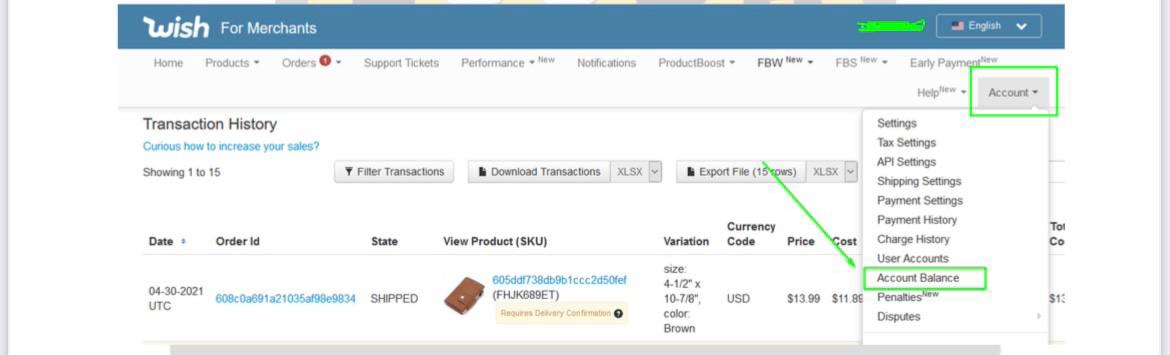
We see two balances here.
Pending Balance - balance that is being confirmed. The money of the newly placed orders falls there and remains there until the order receives the DELIVERED status. When he receives it (usually, as mentioned above, it takes 2-7 days, the money goes to the Current balance exactly 5 days later)
Current Balance - the balance that will be paid to you for the next payment. The Wish platform pays out stably 2 times a month on the same dates. Payments are
made on the 1st and 15th of each month. (anyone interested, they may have Early Payment in the future - to request a payment earlier than on these dates, but not the point, now is not about that).
So, we figured out - grandmothers are written off on the 1st and 15th of every month. It is the Current balance that is written off.
Changing the balance
Pending balance can go to Current up to a month, or maybe after 8 days it will be in Kurent - then whoever is lucky with the track codes. (sometimes I insert track codes that have a status)
You can check the write-off only in the evening, closer to 8 Moscow time. If the account balance was not debited and writes WITHHELD DUE FRAUDULENT ACTIVITY - this is the store's ban.
Success (your current balance has gone to zero, below is such a notification)

Ban (yellow checkbox for suspicious activity and freezing of funds)

1.5 2FA and its role.
In the rules of the Wish platform and mandatory for all stores, there must be:
1.6 Payment systems
The last thing we will sort out with you today is where we will accept all the same payment.
In order to link our payment system, we need to go to Account -> Payment Settings.
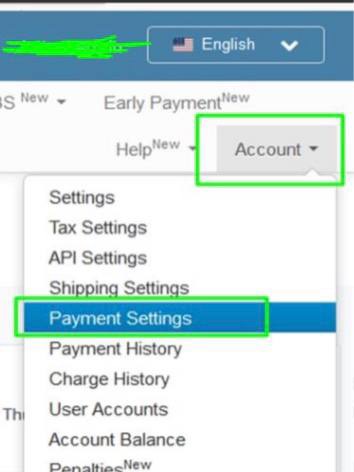
Here we first need to click Agree, agree to the terms of payments.
After that we will need:
As for payment systems, I will tell you in advance that the system does not care what name the payments are made to, so you can even link the same payment system to 5-10 stores. Here Any Name payout.
1.7 Where can I get a payment system?
There is a ton of material on PayPal self-registrations in our channel, you can register, download self-registration and accept payment for it. The main thing is to use one ip for self-registration (OpenVPN and ovpn config, great option).
With Payoneer accounts, it's a little more complicated. To register a Payoneer account you need:
Regarding the geolocation of the wallet, you can register a PP or Payoneer wallet even on documents and data. Many who work, in general, directly withdraw their card to the your country (of course, it is issued to the left person, a drop, which has currency bank details. These details must be linked to Payoneer). I still prefer anonymity and therefore USA PayPal or Payoneer.
If you are not able to register PayPal or Payoneer yourself, you can buy a ready-made one. I saw swinging self-registers in the region from $ 15 to $ 50. Payoneer verified - $ 30-60
I don't know the contacts of the sellers, so ask in chats, look at the forums.
1.8 Sellers:
RECOMMENDATIONS: Throughout all 4 STEPS of authoring training, I chewed every step, term and action for you. The essence of the recommendations is that you do not always act in the same way and do not repeat exactly my every step under a carbon copy. Be virtuosos, imitating the owner of the shop as much as possible. Experiment at every stage, think out your own and draw conclusions from each failure and bad experience.
To register a store, we will need (there will be lists of stores where you can get everything, do not rush with this)
- Windscribe VPN Pro Account
- Google Voice (virtual US number)
- Fake or Real Full info (American data, namely: Surname, SSN, date of birth, address of residence)
- Gmail, outlook (or whatever is convenient for you)
1.1 Store data storage system.
Each store will be a separate folder where we will store:
Mozilla Firefox Portable browser can be downloaded and installed from this link: https://sourceforge.net/projects/portableapps/files/Mozilla Firefox, Portable Ed./
link and looking for old versions of Mozilla 2019-2020 (scroll down):
Important: We download English.paf.exe (NOT EnglishGB.paf) versions, older versions.
Downloaded and installed. WHEN INSTALLING, specify the WAY WHERE TO INSTALL: IN THE FOLDER where we will keep the store.
Create a text file in the same Merchant.txt folder (here we will store logins, passwords and all the data for which we registered)
Back-up codes - needed to restore access to the store in case of loss of Google Voice.
Total at the end of all registration we will get folder with the following content:
1.2 Preparation of data for registration (Filling in Merchant.txt)
Take the purchased fullz and write it to a text file.
Don't have money to buy Full info? Not a problem! We generate a fake-fullz.
Link to the generator site: https://www.fakenamegenerator.com/
Follow the link and click on -> Advanced Options
After clicking you will see the following filters (1-5):
1 - Choose a gender: preferably male. Alternate.
2 - Set the age range: preferably from 25-30 to 50 years.
3 - Select the country: United States
4 - The Switch to region button allows you to change the state to the one you need (choose any, alternate)
5 - Press the Generate button and generate a fake-fullz.
We write down the fake data - fullz (6–8): (See the screen above)
6 - Michael G. Tilley (name of American)
3783 Logan Lane - address of residence of American
Englewood (city), CO (abbreviation of the State of America - in our case Colorado) 80112 (mail index)
7 - SSN - US taxpayer document number, or Social Security Number 651-40-xxxx - instead of four claims (xxxx) we come up with any 4 numbers, for example: 651-40-6194
8 - Birthday: January 15, 1985 - the date of birth of the American
We finished generating the fake-fullz and recording it in Merchant.txt. Go ahead.
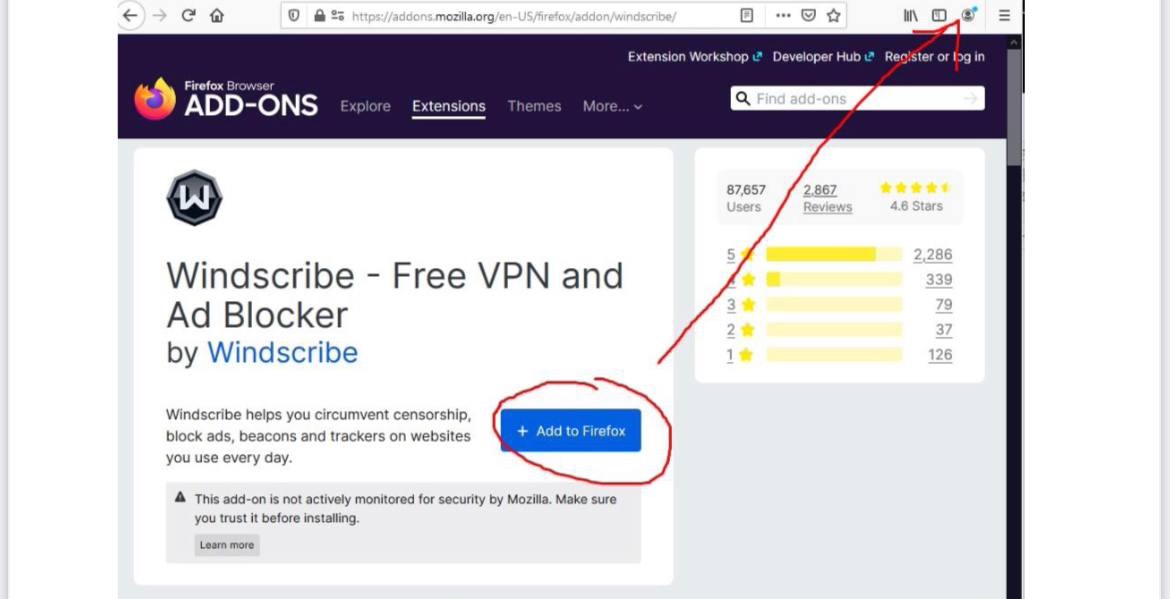
1.3 Installing the Windscribe for Mozilla Firefox extension
Launch the installed Firefox Portable and click on the following link:
Windscribe - Free VPN and Ad Blocker – Get this Extension for 🦊 Firefox (en-US)
Download Windscribe - Free VPN and Ad Blocker for Firefox. Windscribe helps you circumvent censorship, block ads, beacons and trackers on websites you use every day.
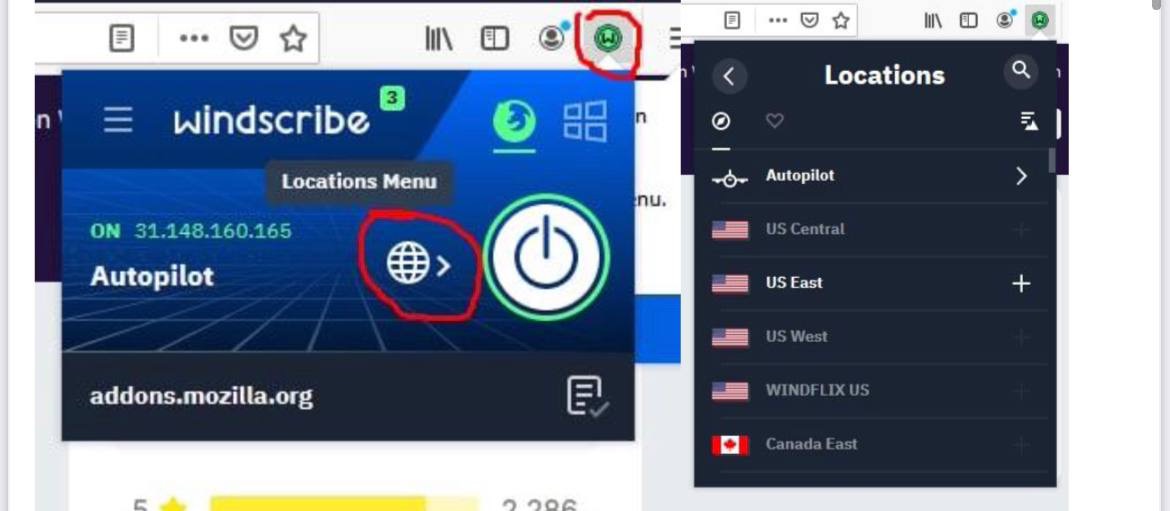
Click Add to Firefox and after downloading the Windscribe extension will appear in the upper right corner.
Click on the extension and enter the username and password of your Windscribe Pro account. Log in? Open the Location Menu to change the country to USA.
Select any US geolocation and any location.
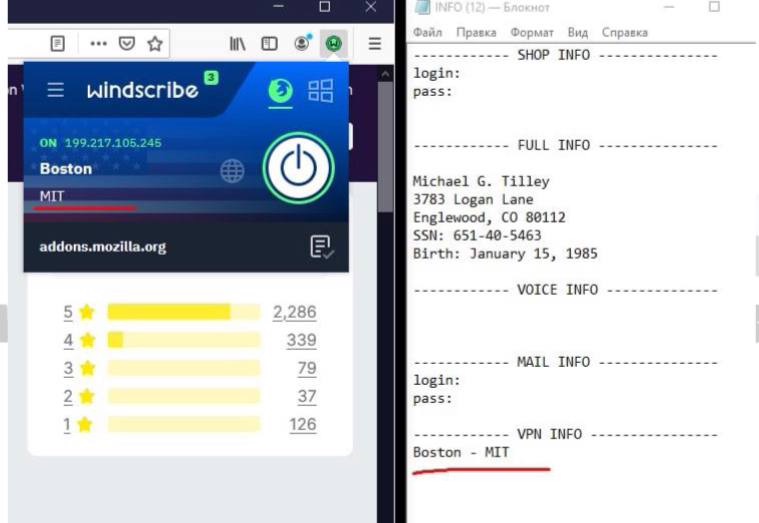
We write the selected geolocation to our Merchant.txt
Very important: In the future, when working with this store, we always use this geolocation, city.
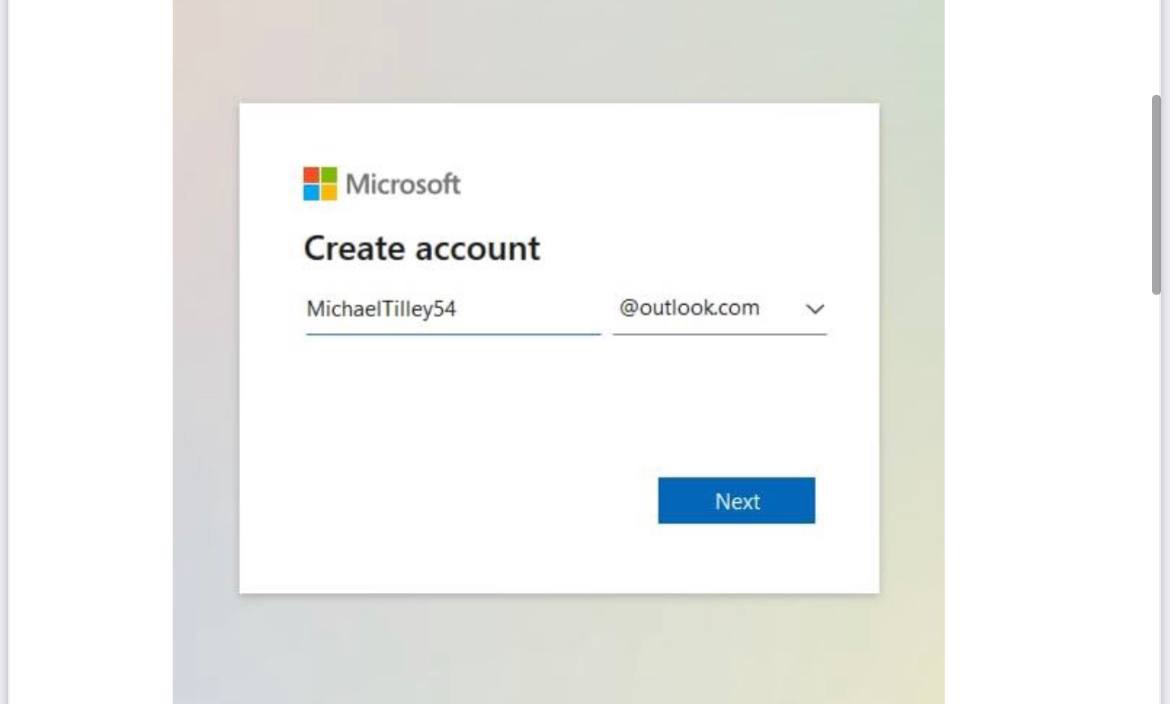
1.4 We register mail, for example outlook.com (does not ask for SMS)
We go to the site https://outlook.live.com/
In the lower right corner we click on the Create Free Account button
Coming up with our mail (preferably we make mail under the name of the fullz)
We write the login to Merchant.txt. On the site Click Next. Also, we come up with a password. IMMEDIATELY WRITE INTO Merchant.txt our data
Next:
1) Enter the name and surname of the fullz
2) Select the country United States (if not automatically selected)
3) Set the date of birth (the same as in the fullz)
4) Pass the captcha (turn the pictures so that they stand exactly)
Got the captcha? Congratulations. Mail registered successfully.
1.5 We buy Google Voice and enter it
Usually Google Voice account consists of the following data: jeromeabdiel907@gmail.com | pass: m@Zamun@26 | reserve mail: maryr.254cronk@outlook.com | pass: NO PASS | MA | (339) 364-8380
Where:
- jeromeabdiel907@gmail.com - Google Voice account login
- m@Zamun@26 - Google Voice account password
- reserve mail - maryr.254cronk@outlook.com backup mail (when you log into your Google account, after the password, it asks you to enter the backup mail login. This is it)
- pass: NO PASS - backup mail password (in our case it is absent)
- MA - the state of the USA, the state to which this USA number belongs (in our case, Massachusetts)
- (339) 364-8380 - in fact, this is already the phone number of our Google voice, which we will enter in the future when registering the store itself.
Understood. We log into our Google Voice
account Logging in is the simplest, like a regular Google account. Follow the link: voice.google.com and click Sign In
Important: do this from an American ip-address.
Next is the most common login to Google Account, where you use the login and password of the purchased Google Voice, and also enter the backup mail login so that you will be allowed into your account.
Are you in? This window will open:
On the left, as you can see, we have a panel with sections for Messages, Calls and Voice-messages. Everything is as simple as possible. We will need a message section, click on it.
We leave the tab with Google Voice open and move on to the main part of our training - registering the store itself.
1.6 Store registration.
The climax of fucking has come and it's time to show the cards.
We will not raise the site and create a store from scratch. Instead, we will use a ready-made and popular platform - merchant.wish.com
Wish.com is a popular Chinese store of all kinds of junk all over the world, which has the opportunity even for ordinary people to create their own store without having an official brand and not being a representative of existing brands (which we will actually use). We will create stores without a brand on this platform and pour money into it (from the brute of wish.com + CC accounts) or self-registers + CC (purchased already in the CC shop), and if the scenario is successful, we will receive payments every 15-20 days.
Go?
We start registering the store. Follow the link merchant.wish.com
Here we click Sign Up for Free. We start filling in the store data:
IMPORTANT: Try to come up with a normal English name for the shop (I usually call it depending on what products I will have in the future). Do not use: too long names, as well as full names.
Email Address - take our previously created outlook
Password - come up with a password AND IMMEDIATELY WRITE ALL DATA IN Merchant.txt Solve the captcha and click Continue.
We are transferred to the second stage of registration: Filling in personal information
Everything is simple here. MANUALLY Fill in the fields using our fullz.
We enter the phone number without spaces and dashes, and then press the Send Verification Code button to confirm and send SMS to our Google Voice. Open the tab with Google Voice.
Enter the received code in the Enter Verification Code field and press the Enter my Store button.
The third moment of registration: Confirm the mail
We press the Go check my email button and you will be transferred to the tab with outlook mail. Here we press Enter My Store
Congratulations, the store is almost complete and the bulk of registration is over.
You will be redirected to the main page of the store:
They write to you that your application for creating a store will be reviewed and approved \ Rejected within 1-3 business days.
Recommendations: We do not recommend creating stores at the end of the week or on weekends, as there is a high probability of the store being blocked. Also, after registering a store, you need to simulate a real seller and climb the site, by tabs for 20-30 minutes (at the bottom of the site there is a panel with the Privacy Policy, Merchant Policy tabs - you can study the rules for running stores pretending to be a real newbie seller)
After 30 minutes , we take the last step for today - We expose delivery to all over the world
We climb into the Account -> Shipping Settings tab.
Re-enter the store's login and password, and we are transferred here:
1 - Click on the Ship to Selected Countries / Regions button 2 - Click on the Add all Countries / Regions button
Next, scroll to the bottom of the site and click on Apply to existing non-promoted products
Click YES and then OK
And damn it, this is Victory - you have successfully completed STEP 1.
Now you just have to wait 24-72 hours for your application to create a store to be approved. In the next step, we will talk about what a successful / rejected order looks like, and also start adding products for sale.
Well, if you read to the end, and also tried it in practice, then I can congratulate you - your burning desire to cut some money took up.
STEP 2.0 - Checking the store's approval. Add products to the store.
So friends, last time in STEP 1 we registered a store with you and had to wait at least a day for our store to be approved.
Today we will check and analyze how the approved store looks like and how it is declined.
We open our folder, where we previously recorded all the information.
We launch the Mozilla browser and open Windscribe in the upper right corner - we connect to the same ip and the same geolocation that we connected to during registration (you should have written it to a text file)
Connected? Go to merchant.wish.com and enter our store using Login (store name) and store password.
After entering, we can have 2 outcomes of events: 1 - Store approved. 2 - Store rejected
Rejected request. The store was blocked.
To avoid frequent blocking of stores at the registration stage, it is recommended:
- Use: 1 Google Voice = 1 unique pure ip = 1 Full info (fullz)
- More imitate the real owner and climb in our store after registration, warm it up longer.
- Use different hardware (PC) for store registration and a unique browser version. (you can use Dedicated files for uniqueness of hardware and Che Browser for uniqueness of the browser)
Unfortunately, it is more common to reach out to those. support does not work. Therefore, if your store is blocked, then you return to stage 1 and register the store (s) with a new one with new data.
Approved application. Shop approved:
How do I know if a store is approved?
1) You have Things to do tasks where you are asked to go through verification and enable 2fa on your store.
2) Our mail, which we registered in stage 1, receives a message with the following content:
We translate from English into your language and it becomes clear that Wish notified us that our application was approved.
If your store has been approved, you follow me further through STEP 2.0
Go to Account -> Settings
Turn on 2FA.
Enter the username and password of the merchant. And we are transferred to the account settings. Click the Turn On button in the Two Factor Authentication item.
We enter your Google Voice number, receive and enter the SMS code that will also be sent to Google Voice.
Next, a window pops up with Back-up codes (codes for restoring access to the store in case of loss of google voice or passwords). WE SAVE Back-up codes as a text file in a folder with all the information.
Two-factor connected successfully. Go ahead. Now we need to add products. We will search for products without a popular brand on Amazon or Ali Express and copy all the information to register them in our store.
Adding products to the store Open the Products tab -> Add new products -> Manual
In parallel, open a new tab in a separate browser and go to the amazon.com site where we will look for products without popular brands.
Now we need to decide with you what products you will upload to the store. I usually add products of one theme. Example:
- Sweatshirts
- Trousers
- Sneakers (there are often crosses with brands, be careful)
- Bracelets
- Bed
- Dishes
- Decorations
- Etc.
IMPORTANT: Pay attention to pictures and product descriptions. The description and photos should not contain the brand name, otherwise the product may, after approval, fall under the branding policy and your product will have to be removed or documents proving that you are a brand representative.
Accordingly, if a brand name appears in the main or additional product description on Amazon, we will erase it. If there is a name on the pictures, crop or blur in Paint or Photoshop.
Start filling. After we have opened Products -> Add new products -> Manual We are transferred here
We start filling in the Product Name, Product Description, tags and come up with a unique product id.
For example, I found unbranded shoes on Amazon. We will issue them.
Go ahead. Fill in the main and additional product photos. Nothing complicated here. Download Lightshot to take screenshots. Create a separate folder where you will add product photos. Screen each photo on Amazon and save to this folder. Next, upload them to wish from your computer
Drop a file here to upload (Upload New) button:
Go ahead.
We expose:
1) The price of the product (Localized Price, in dollars. I am not greedy, I put from 10 to 100 $ depending on the price of the product on the Amazon)
2) The quantity of goods in stock (Quantity)
3) The price for delivery (I usually put from 2 to 6-8 dollars)
4) Declared \ Original name of the goods (we take 2 words from the bulldozer in the main description of the goods)
5) The declared local name of the goods (you can duplicate point 4 in this line
6) How many parts will be in the parcel (since these are shoes, I expose 2)
7) Length of the parcel
8) Width of the parcel
9) Height of the parcel
10) Weight of the parcel
11) Country of origin (I am setting US or any European country - DE, GB, IT)
12) HS Code (coming up with 8-9 random numbers from the bulldozer)
13 ) Declared Value - the declared price (we set exactly the same one that was set above in paragraph 1)
14) Does it contain gunpowder / powders? (Answer Yes \ No) 15) Does it contain liquid? (We answer Yes \ No)
16) Does it contain batteries? (Answer Yes \ No)
17) Does it contain metal? (We answer Yes \ No)
IMPORTANT: According to the point from the 7th to the 10th. If you cannot determine the weight, width and length of the parcel by eye, you can take information from Amazon. To do this, scroll down below and see a description of the parcel of the goods.
After filling out points 4-17, it should look something like this:
Go ahead.
18. We choose which colors of the product we have in stock (look at the pictures that were filled in at the beginning). Check the boxes. If this color is not available, use the Other line
19. We select the Type of size for this item (Men, women, children, hand sizes, etc.) I chose Women's Shoes.
Next, put a checkmark, which sizes we will have in stock.
Moving on. Now we need to fill in each product size / color variation.
A - We set a unique identifier for each product. (Coming up with a set of letters and numbers from the bulldozer)
B - Change the quantity of goods.
IMPORTANT: At the beginning, I indicated the total availability of 480 items, respectively, here I indicate that I have 120 items in stock for each variation. 480 \ 4 options = 120 DONE. Congratulations, you have completed your first product.
We press the Submit button (IN NO EVENT CLEAR, otherwise reset everything that you filled in)
Done, the first item has been successfully added. I usually fill in from 2 to 8 products in each store to make it believable that I am a real seller and to have a variety of purchases. Therefore, I recommend doing the same.
Recommendations
Always set different prices for goods, for example, 14.99, 20, 27.5, 32, 41, 55, 70
Country of Origin for all goods in one store - the same. 1 store - all goods have a country of production US
2 stores - all goods have a country of production DE, etc.
The Product Brand Name item (it is at the beginning of filling) is always left blank.
We vary the price for delivery for each product from $ 2 to $ 8-15
In the future, if you pour from brute, then brute accounts will not allow you to buy for large amounts. Consider this and try to set the price of goods from $ 5 to $ 30-40, this is enough.
Where to see the added product. How do I get a link to a product? Go to the Product tab again -> View All Products
We see our newly added product.
Recently added products have the Hourglass sign hanging on them, which means that the product is in the approval process, which lasts 48-98 hours.
Approved items are marked with a check mark.
In order to pull out a link to our product (in the future, it will be needed to click on it and drive in our product) - click on the link to the right of the product photo.
A link to our product opens in a new tab. It will become operational after the product is approved. Now we just save it to a .txt file and wait 2-5 days for our products to be approved.
Congratulations, you have successfully completed STEP 2 of adding items to your store.
In the next steps, we will disassemble directly by driving our approved products, registration and binding of payment systems (Payoneer or PP), as well as the design of our products.
STEP 3 - Setting up the system and buying (driving in) the products of your store
Hello, annoying newbie. If you read and continue to study STEP 3, then you are already one step away from success and the first cache. Today we will touch upon all aspects of the system settings in different versions, and also consider the successful / unsuccessful driving of your products.
Let me remind you that in the last STEP 2, we learned how to add products to our registered and approved store. Today you will need the links to the products that you pulled out in the last lesson.
For STEP 3 you will need:
- Purchased 911.re (the minimum package there costs $ 26-28 = 150 proxies)
- Download Google Chrome Portable (free option) or Buy Che Browser (monthly subscription costs $ 30 + a couple of profiles. Each profile costs $ 1)
- Buy the material from which we will drive our goods.
- A little patience and perseverance for a couple of good hits.
Are you ready? Let's get started.
1.1 Purchase 911. Setting up 911 and installing Google Chrome Portable \ Che Browser
First of all in setting up the system, it is important to have the purchased 911 ready (at least with the minimum package) and install Google Chrome. In order not to stretch this stage and not repeat myself, I will leave a link to an article in which I previously explained how to install, configure and use 911 software. Official link to their product: 911.re
Link to an article on setting up and using:
Link to Che Browser: https://chebrowser.site/
Recommendations. Download Google Chrome Portable from here https://portableapps.com/, as on other sites a browser with a virus is possible. And also, if you remember, it is not advisable to download the latest versions of the browser, because an ordinary American / European does not update his browser every day and does not follow its updates. We make the maximum imitation of an ordinary customer. Download only the ENG version, and when installing, also specify the language English.
1.2 Basic links during work + Limits on the use of ip 911
The main and simplest links during driving, as I said, are:
911 + Google Chrome Portable 911 + Che Browser
Google Chrome differs from Che Browser in its speed of work. The thing is, Che Browser slows down your internet speed a lot. With it, wish is loaded very slowly, and, accordingly, the speed of driving in your goods is significantly reduced.
In turn, Che Browser has the following advantages:
- When connecting to ip 911 and launching Che Browser, the browser itself is completely reconfigurable. Your browser has built-in unique options for screen expansion, Finger print (a unique imprint of your hardware), and the browser language is completely changed to the language of the country to which you are connected.
- For paranoid psychos: provides greater anonymity.
Based on my work experience, I can conclude that I had great productivity with the usual Google chrome, so today we will consider working with it.
Limits
When driving in, I noticed the following pattern: in the case when you use 1 ip address for one wish brute \ wish self-registration account, the chance of successful driving is much higher (provided that you have normal unused material).
• Ideal driving in (the most productive and at the same time the most expensive)
We use 1 ip address for 1 Wish Brute 2021 \ Wish self-registration account.
At the same time, even if the product was unsuccessful, we clean the browser cookies, exit the browser, change the ip and go to the next account.
How do I clear cookies? The shortcut keys Ctrl + Shift + Delete
In the main settings, put all the checkboxes and set the Time range for all time
. We do the same with the "Additional" tab, check the boxes everywhere and set the Time range for All Time (Screens below).
We clean cookies EVERY TIME BEFORE CHANGING IP AND EXITING THE BROWSER.
• Economical driving (fewer successful drives, less wasting ip, more wasting of material)
We drive in exactly the same way as in an ideal drive, BUT we change ip less often. In this case, we drive in either until the first successful product, or we work out 5-15 Wish Brute accounts, and then we change the ip.
IMPORTANT: If you bought Wish Brute accounts of a certain country, then we select the ip address in 911 for the country of this account (s).
1.3 Purchase of material. We analyze what kind of material we are dealing with.
For driving in, the cheapest option would be to buy Brute Wish accounts.
For those who are in the tank, Brute accounts are accounts that people massively hack using special programs, and then sell. Usually brute accounts are sold in the Login
assword format. Example: krossfire2003@hotmail.co.uk:seamiaks, where
krossfire2003@hotmail.co.uk - account login
seamiaks - account password.
You can learn more about Bruteforce from your beloved google, and we go further.
The priority for us is Wish Brute accounts for 2020-2021 + CC of European countries, namely:
CH - Switzerland (the best in my experience. Allows you to successfully drive in once, + bold cards)
BE - Belgium (In terms of quality, it comes second after CH. Each third account in 2021 = successful driving)
FR - France (Medium quality material. Out of 10 accounts - from 2 to 3 successful driving)
What does 2020-2021 mean? This means that the owner of this account made the last purchase in 2020 or 2021 (accordingly, Wish has more trust in us, the linked CC and the address is in place and the chance of driving in is more)
What does + CC mean? This means that the account holder's credit card is already linked to the account and all we have to do is go to the account, add our product to the cart and try to buy it.
There are also Wish Cash Balances Accounts - these are accounts with an existing internal balance. (The goods bought on such a balance often do not reach our store, so we are not interested in such accounts)
1.4 Directly, having driven (purchase) the goods himself.
What we need to start uploading to our store (create a separate .txt file for convenience):
- Purchased material
You can buy material here:
@Corn_Shopbot
@BruteAreaBot
@razvedkashop_bot
@WishKishMish_bot
@Mewishbot
PS I'm not forcing anyone to buy accounts here. You can search for buyers or get wish accounts yourself. You can also create a Wish Self-Reg account using the cardholder's data and link the already purchased CC to it, and then do it in.
- Virtual card (in the case when you logged into your account and there was no credit card attached during the purchase, we enter our virtual card, update the site and the owner's card should appear in 90% of cases)
- Links to our products
From theory to practice.
We bought the material, open 911 and select the ip address for the country of the material. (ProxyList tab). In my case, I bought accounts Wish Brute FR 2021 (France)
In the Country field, I entered FR (1), and then clicked Search (2). I picked up the ip and double-click on it. Are you connected? Now we need to check our ip for cleanliness on the website whatleaks.com or whoer.net.
Launch the browser from our 911. To do this, go to the Program tab and double-click on our added Google Chrome browser
Go to whoer.net. With proper installation and configuration of 911 (there was an article above), and also if you are lucky and you get one, a clean ip looks like this:
If your ip has 1-2 blacklist, or the Proxy Connection item is red, it's okay, we still use this ip. (It is logical that if all or most of the items are red, change the ip)
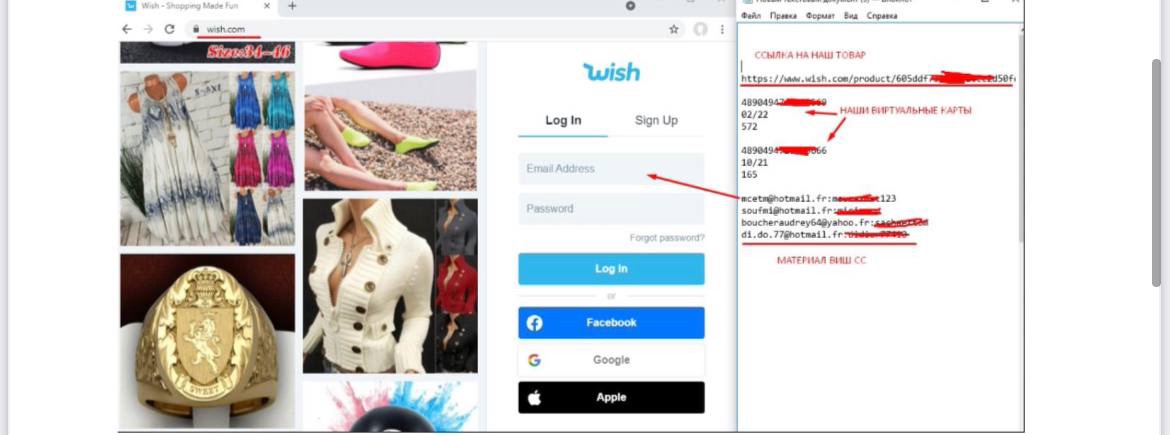
Next, clear the cookies and restart our browser. We go to the site wish.com
Without unnecessary dances with a tambourine, we immediately enter the account by entering \ copying the login and password of our account.
Have you entered? Click Log In.
We are admitted to the account on the main page. (if he writes Login or Password incorrect, then the account is not working and you need to request a replacement from the seller)
We have 5 items in the basket, but that's okay. Already finally, before driving in the goods, we will remove them.
We open a new tab and in a new tab insert a link to our product.
We follow the link and our product opens in front of us, which we added to the store in STEP 2.
Choosing a size and color. Click the Buy button (Ajouter au painer). It's simple.
Before buying, be sure to link a virtual card so that we do not ask for the CVC code and the payment goes through immediately.
Click the Change button (To add a credit card)
We fill in the data of our card:
1 - Card number
2 - CVC code
3 - Validity period
4 - Full name of the card holder (since this is a virtual machine, you can write anything. We write the name from the delivery address)
5 - Postal Code (mail index, similarly we take from the delivery address)
6 - Click “Add card”
After we update the site. (in the upper left corner, if that is the update button)
Now our Card is selected as the main one for payment. Click Change again and change the card to the account owner's card.
We switch to the owner's card (Sometimes there are several of them, try everything)
Removing the rest of the items from the cart
The moment of truth. We press the button Pay.
There are 3 possible events:
1 - We couldn`t process payment - which means: the owner has no money on the card, or other problems with the card.
2 - Asks to enter the cvc code. We enter any 3 digits from the bulldozer (yes, he don't give a fuck what cvc you write, it often allows you to successfully drive in despite the random cvc code)
3 - Immediately throws it to the page with the successfully hammered in the product.
Now we need to check if our product has crashed. To do this, we need to go to the Order History.
In the upper right corner, we have a profile button with you. We point at it with the mouse, but do not poke it. The main account menu opens, and we need to go to Order History.
In this tab, we check if the date is in the main inscription of our order.
To check whether the purchased product has flown off, you MUST refresh the Order History page within 2-3 minutes. So we make sure that the product is successfully driven in and will reach our store 8 hours after ordering.
1 - DATE IS. GOODS SUCCESSFULLY DRIVEN
We update several times
The date in the labels must remain even after the page is refreshed.
2 - DATE IS NO OR MISSED. THE PRODUCT FLYED.
Sometimes it happens that you have driven in the goods, entered the order history, and you see that there is a date on the inscription. But if you refresh the page several times, and the date may disappear. Therefore, it is so important to double-check the success and refresh the page within 2-3 minutes, because you can add 10 products in this way, of which only 4 remained successful after the page was updated.
This is how a product rally looks like, unsuccessful driving.
In case you failed to drive in the goods, we do not waste time and log out of the account. To do this, completely clear the browser cookies and restart it. Go to the next account.
Or, in order not to fuck with the constant cleaning of cookies and restarting the browser, you can log into each account through the Incognito mode.
To do this, after launching the browser, we hold down the key combination Ctrl + Shift + N and we open incognito mode. After working with the account, we simply closed the incognito window, pressed the key combination again and go to another account.
Notes:
- Successfully driven goods arrive in your store in the form of an order 8 hours after driving in.
- Do not rush to place an order and try to do something with it. After it arrives at your store, you will have 5 days to arrange it.
- We will talk in more detail about registration of goods, track codes and payment systems in the next step.
Stage 4. Placement of orders and receipt of funds
At this stage we will discuss:
• Placement of active orders that we have driven.
a) We analyze which track codes to insert, where to get it. See information about the track code. We place an active order
b) What the order looks like after registration. History tab
c) Track code has flown. Inserted incorrectly. What to do?
• We follow the store.
d) Periodically check the Payment Status of our placed orders.
e) Consider changes in in-store balances after checkout.
• Limits, payment terms and balances.
• 2FA and its role. Turn on 2FA if it's not already on.
• Payment systems, how the linking takes place. Where to get a payment.
• Recommendations. Links to stores.
So, in the last stage, we discussed with you how to drive in our goods and what a successfully purchased product looks like. As already mentioned, 8 hours after the successful driving, our order arrives at our store. To place such an order, we are given 5 days. To place such an order, we only need track codes.
Who is in the tank, track code is a unique tracking number that sellers give to the buyer in order to keep track of where his package is and when it will arrive approximately.
1.0 Placement of active orders
Many people could already drive in the product and see that active orders are displayed in the Orders -> Unfulfilled Orders tab.
We go to the store, go to the active orders tab and we can see the following.
I currently have 2 active orders. Let's analyze the tabs that are interesting and important to us (I marked them in green).
DATE - The date the order arrived. A very important tab, since we will put the track code based on it.
Days to Fulfill - how many days we have left to check out the goods. In case you did not place your orders on time, Penalties - fines - arrive in the Notifications tab. The first penalties are usually not scary as they are $ 0. But further from $ 50 to $ 500, and in general - it is advisable to always send orders on time (I place 2 days after the order arrived).
Destination is the recipient country. That is, the country where the parcel should go. Accordingly, we will select the track code with the same destination country as indicated in the Destination tab.
Total Cost - the total amount that will fall on the Pending balance of our store after placing an order (after we insert the track code).
The Fulfill button - we poke there to place an order.
If, for some reason, you cannot place an order on time (there are no track codes, for example), next to the Fulfill button there is an ellipsis button -> Refund to cancel the order.
IMPORTANT: Before we go to insert the track code, be sure to pay attention to two main points - DATE (date of purchase) and Destination (country of destination). Why? Let's talk about this with an example.
For example, I have orders with the country of destination - France - France, and also - the date for both of them is May 1. So my track codes should be:
1) With the date of dispatch NOT LATER THAN 1 MAY. That is, in no way can I insert a track code there, which has the date of dispatch earlier than the purchase itself (I'm not a fucking seller, to predict and send the goods in advance). It is best to use the track code a day or two later than the order date, that is, take the track code from 2, 3
2) The country of receipt of the parcel must be France. Why? Because if the country of receipt is, for example, Spain, and not France, then:
a) This will catch fraud (suspicion) on your store from the side of the system.
b) It happens that the owner of the account from which you made an order saw this order, but does not cancel it, because he likes the product. If the product is not sent to his country according to the track code, he will cancel it and Refund will fly to you (at best), or maybe the store will be banned altogether.
Now let's get down to practice, a lot of theory at once is not good. We press the Fulfill button and we are thrown over here.
Here I will use the example of the track code, which I have to immediately explain how to correctly check the information about the track code, and then fill it out correctly in the form above, which is on the screen. I have a track code, here it is -> 08448713650017. Let's look at it as an example.
After I took the track code, I need to check the information about this track code before filling out the form.
1.1. We check the information about the track code
We take the number of our track code and go to the site https://www.17track.net/ to track WHERE and WHERE the sending of this track code is going, as well as on what date the parcel was sent. Insert our track code into the field and click the Track button (screen below)
Usually, if the track code was not used by another carder working in this direction, you will see such a window.
By such a window, I mean the Not Found Inscription in the upper left corner. The fact is that in addition to the seller from whom we take the track codes, other people who work at Wish stores can also get and use these tracks in the same way before the seller puts them up for sale. Therefore, when you see the Not found button, it means that no one has tracked this track code on the site before you. To track it, we need to select the carrier company that owns this track code.
FedEx - track codes that often start with numbers 7. Example -> 786151923840
DPD - track codes that often start with numbers 08. Example -> 08448713650017 (my track is already understood as a DPD track).
My track code is DPD, and therefore, in the screenshot above, I choose the carrier - DPD. Full information about the track code is revealed to us.
1) WHERE the parcel is sent from. From Germany in my case. It doesn't really matter to us which country the parcel comes from, the main thing is where it goes.
2) WHERE is the parcel being sent (as I need, to France, since I have an order with Destination in France)
3) WHEN THE PARCEL WAS SENT (in my case on May 4th. May 4 - later than May 1, and this also suits me)
4) The status of the package. In Transit (on the way). There may be a status DELIVERED (such are usually discarded, preferably on the way)
So, my track code fits in all respects (goes to France, on the way, and sent it later on May 1). Now, let's figure out what kind of form it is, and how to fill it out.
1) We select the COUNTRY from WHERE the goods will be sent. I repeat, WHERE, AND NOT WHERE (you don’t need to fucking choose France here). Which country should I specify? In my case, Germany is natural. (they checked above and my track code showed that it was sending from Germany)
2) Insert the track code itself into the Tracking Number column.
3) The third point - The company to which the dispatch is going (We choose depending on which track we are going to insert. I have DPD in my hands, and therefore I will choose DPD.
Attention! We choose DPD. NOT DPDde, and NOT DPDFR, etc.) - Just DPD).
Now the third item is not visible on the screen yet. Why? Because I have not yet chosen the country where the parcel is coming from (point 1 on the screen)
4) Notes - notes for ourselves. They are NOT REQUIRED to fill.
From theory to practice. Here's what I got after filling out.
We press Fulfill Order and our order has been successfully completed.
1.2. How can I check that the order has been placed successfully? History Tab Our active order has disappeared and now it is located in the Orders -> History tab as a placed order.
We pass and see our order, which has just been placed (I reduced the browser scale for convenience, using the Ctrl + mouse wheel keys).
Here 3 columns are important for us (I will write down below as A, B, C). We will analyze each in more detail. A - Payment Status (The status of our track code and payments)
1) Successful. Must be paid on <estimated date of payment>. If this is the case for you, then the track code has risen smoothly and is tracked by the Wish system.
2) Canceled. If he writes not eligible for payment, then the order was canceled and nothing can be done with it, we do not touch it.
(On the screenshot below - 2 placed orders. One was canceled, and the second - I placed it now and he got up successfully)
3) Curve track code. If he writes eligible for payment after confirmed (payment will be available after personal confirmation of receipt of the parcel by the buyer), then our track code is no longer tracked in the Wish system and we need to replace it with a new one.
1.3. How to replace a track with a new one, if the code inserted earlier has
fallen off Make the browser scale smaller (use the Ctrl + mouse wheel key combination) or move the slider to the right.
For orders with Payment Status “eligible for payment after confirmed”, you need to replace the track: 1 - scroll to the right and press the Actions button
2 - Item Modify Tracking Info, and then insert a fresh track for the last dates on a new one.
P.S. Sometimes this button is not there, so Wish forbade you to change the track code and you won't do anything.
Be careful when pasting the track code.
B - Tracking Confirmed
This column tells us if the Wish system is tracking our track code.
If Yes, then yes, and everything is fine. If No, we wait for some time until Wish is bloated (5-10 minutes, update the page. If it's still No, replace the track code as written above. C - Wish Confirmed Delivery
This column tells us whether our track code to destination or not (YES or NO).
Usually, after placing an order, after 3-7 days the status of this column becomes YES and the order receives the status delivered. Then our funds go to the next payment and are paid to us when the due date is due. If NO - wait patiently.
TOTAL: We have successfully placed an order and checked it in the History tab.
Now you just have to arrange the second, third, etc. in the same way. active orders. Placed all orders? Now just watch every 1-2 days so that they don't fall off, and check the balance of the store.
RECOMMENDATIONS: I usually don't run to insert the track code right away. I do this in at least 2 days. Why? Because if you issue them right away, then it will already be canceled through live tech
vis support. If you place in 1-2 days, there will be those active orders that firmly after 3 days KX brute account (from which you beat), did not cancel the order you made. And also, right away is not normal, because sellers cannot physically send and place 10-15-20 orders per day. They do it only in a day or two, and while they receive the track from the mail, in order to give the buyer = it also takes time. I think we understood, we imitate the real seller as much as possible.
1.4 LIMITS. PAYMENT TERMS. BALANCES. BALANCE CHANGE.
From my own experience, I can say that I never found out the reason for the bans for the entire time of work. According to my statistics, over the past two months, from 30 to 50% of my stores have been blocked.
In each store, I fill in goods in the total amount from $ 150 to $ 300-500, that's enough.
For us, 1 successful paying store can pay for all your work. At the same time, I start pouring money into the store from the 1st to the 8th-10th of each month, as well as from the 16th to the 23rd.
Why is it so? Because, taking into account all the transitions and changes in the order in the flesh before the output to the next number, this is the most convenient time.
Orders are driven in on 1-2 numbers -> 4-5-6 numbers I place orders -> After 3 days, on average, the track status is DELIVERED (these are the 9th and 10th) -> and at least 5 days are needed for the grandmas from Pending Balance to go to Current balance.
Balances
How to check the balance of our store? To do this, we climb into Account -> Account Balance
We see two balances here.
Pending Balance - balance that is being confirmed. The money of the newly placed orders falls there and remains there until the order receives the DELIVERED status. When he receives it (usually, as mentioned above, it takes 2-7 days, the money goes to the Current balance exactly 5 days later)
Current Balance - the balance that will be paid to you for the next payment. The Wish platform pays out stably 2 times a month on the same dates. Payments are
made on the 1st and 15th of each month. (anyone interested, they may have Early Payment in the future - to request a payment earlier than on these dates, but not the point, now is not about that).
So, we figured out - grandmothers are written off on the 1st and 15th of every month. It is the Current balance that is written off.
Changing the balance
Pending balance can go to Current up to a month, or maybe after 8 days it will be in Kurent - then whoever is lucky with the track codes. (sometimes I insert track codes that have a status)
You can check the write-off only in the evening, closer to 8 Moscow time. If the account balance was not debited and writes WITHHELD DUE FRAUDULENT ACTIVITY - this is the store's ban.
Success (your current balance has gone to zero, below is such a notification)
Ban (yellow checkbox for suspicious activity and freezing of funds)
1.5 2FA and its role.
In the rules of the Wish platform and mandatory for all stores, there must be:
- 2fa included
- Payment system linked
1.6 Payment systems
The last thing we will sort out with you today is where we will accept all the same payment.
In order to link our payment system, we need to go to Account -> Payment Settings.
Here we first need to click Agree, agree to the terms of payments.
After that we will need:
- Select a payment system that we will link. PayPal or Payoneer (the rest there are incomprehensible Chinese garbage, did not try to accept on them)
- Fill in the data before linking the accounts itself
a) Here we enter the Name and Surname of Fullz, to which our store was registered.
b) Phone number (Google voice)
Click Next - Log in to our Payoneer \ PayPal account
After logging in, you will be redirected back to the Payment Settings section and you will see that your payment system is successfully linked. It looks like this:
As for payment systems, I will tell you in advance that the system does not care what name the payments are made to, so you can even link the same payment system to 5-10 stores. Here Any Name payout.
1.7 Where can I get a payment system?
There is a ton of material on PayPal self-registrations in our channel, you can register, download self-registration and accept payment for it. The main thing is to use one ip for self-registration (OpenVPN and ovpn config, great option).
With Payoneer accounts, it's a little more complicated. To register a Payoneer account you need:
- Real valid Full info (fullz)
- Google voice or usa sim card for rent
- Mail addressed to fullz
- Self-reg bank account. Payoneer asks for bank details when registering.
- Documents for verification. (Passport, SSN, DL, whatever, one of these)
Regarding the geolocation of the wallet, you can register a PP or Payoneer wallet even on documents and data. Many who work, in general, directly withdraw their card to the your country (of course, it is issued to the left person, a drop, which has currency bank details. These details must be linked to Payoneer). I still prefer anonymity and therefore USA PayPal or Payoneer.
If you are not able to register PayPal or Payoneer yourself, you can buy a ready-made one. I saw swinging self-registers in the region from $ 15 to $ 50. Payoneer verified - $ 30-60
I don't know the contacts of the sellers, so ask in chats, look at the forums.
1.8 Sellers:
- @FakeTracksBot - Track codes store (the cheapest prices that I found, $ 0.5 for a fake track)
- @oggiecubencis - sells configs. Strictly through the guarantor, I am not responsible for the seller, I just found an offer on the market for your needs.
- @googlevoicebuy_bot - Google Voice accounts
- @full_voice_bot is also a bot, also Google Voice accounts.
RECOMMENDATIONS: Throughout all 4 STEPS of authoring training, I chewed every step, term and action for you. The essence of the recommendations is that you do not always act in the same way and do not repeat exactly my every step under a carbon copy. Be virtuosos, imitating the owner of the shop as much as possible. Experiment at every stage, think out your own and draw conclusions from each failure and bad experience.