You are using an out of date browser. It may not display this or other websites correctly.
You should upgrade or use an alternative browser.
You should upgrade or use an alternative browser.
Help with carding on android/iphone emulator
- Thread starter ivanship
- Start date
Why is it relevant to carding from mobile devices?
For the simple reason that classic carding is slowly becoming obsolete. More and more mobile traffic in shops, an increasing percentage of fraud in purchases from a PC, and, accordingly, a decreasing ratio of fraud in purchases from mobile devices. In other words, there are more honest purchases from mobile devices, less attention.
More carding with pc - more attention to them, and more checks. [And therefore, you need to catch the wave, after all, 2019 is the year, and you need to be in trend and card from mobile devices. So that's it. You do not need to use your own phones for carding, and working with PayPal. And there is no need to buy the left. There are emulators for this, such as Nox and Genymotion.
Let's take a closer look at these two emulators:
The first emulator - Nox
Pros: Fast, free, convenient.
Disadvantages: Only one device is available.
After each drive, it is recommended to reinstall.
The second emulator - Genymotion.
Pluses: the sea of devices. You can make at least a Samsung Galaxy 7, at least an htc desire, at least a tablet, in general, any device. Fast, you can make one phone, and copy it, then launching it through virtual boxing. Comfortable. Disadvantages: to get it for free, you need to work hard. You need to download previous versions from third-party resources, then update them, register on the site of this genimoushen. In general, everything is pretty quick. Everything is quite simple in fact, but for a beginner, it is awkward.
If you are into trouble with emulators, you can, in principle, use any mobile phone bought on the radio market . It is already a matter of personal taste for everyone. The presented software will allow you to do this. But in this case, I cannot be responsible for the result. By the way, it's better to use it without a SIM card.
Whatever emulator we have, it still needs to be prepared. That is, put the software on it! Mobile software means (apk files), well, just tweak the system.
Let's take a look at everything point by point:
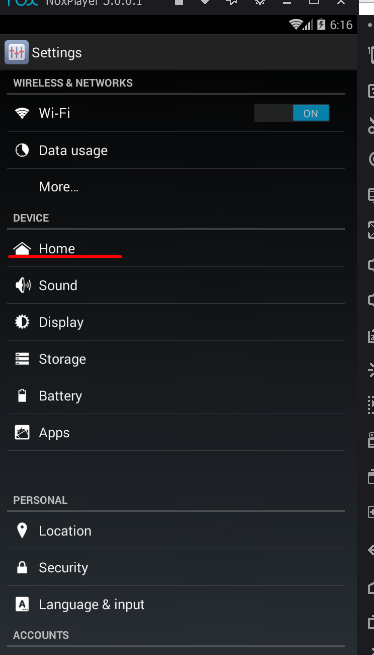
Point 1. First of all, go to the settings, and set the language and time zone of our phone for the country that you are working on. Remember this as our father. This is the foundation.
Point 2. Making a browser. Download firefox from the playmarket (or trashbox) (just write "firefox trashbox" in Google and download apk to our emulator). Install. We open. Then we write "about: config" in the address bar (without quotes, of course). The settings have opened to us. There is a search field. We enter "media.peerconnection.enabled" there (also without quotes). We are exposed to this garbage, and we turn on the "false" mode. What it is? This is disabling WebRtc. In short, so that our real IP address is not fired via webrts.
Point 3. We write in Google "SSH Tunnel trashbox" (kpn tunnel is also good). We switch from the issue to the trashbox, and download this software from there. This software is for enabling tunnels to be turned on specifically on the phone.
Point 4. We write "Phone id changer trashbox" in Google. It will allow us to change the phone data that are hardwired into the firmware (the presence of root rights is required). It is relevant if you use nox, and you will need to reinstall it. But I suppose I do not 100% believe in these data changes, as for me -It will be safer to reinstall the emulator. And you already do whatever you want.
Point 5. We write in Google " Fake GPS trashbox". Also download the software from the trashbox. It will allow us to transfer fake gps data. That is, we roughly * fuck the shop with fake gps coordinates. Like we are with a show-off where we are.
Point 6. We write again in Google "ProxyDroid trashbox" This garbage will allow us to pull the socks on our emulator. Of course it would be easier to pull on the computer right away, but here it is more convenient for someone. I’ll say I pull it on the computer, through the proxy. But there it can float, and therefore it’s better on the mobile right away In general, as anyone.
Point 7. Disable Google services. All that we can disable . So that they do not exist at all, not a single one. Recently, it has been good for eBay through a bunch of android + tunnel correctly built with dns + and application eBay minimal salary.
I warn you right away that in order to drive through Android, we will need at least some knowledge and basics in the field of carding.
So, in addition to carding using a PC, we can drive using an Android device.
The main advantages of driving through Android, relative to a PC, are:
There are many varieties and descriptions of Android system settings, but I will describe the personally tested method. For this we need:
Baidu Root; Framaroot; SuperSU; z4root; Superuser
Important: not all devices can be rooted, and not with the help of every program. I had 2 tablets of a little-known manufacturer with the current version of Android and average technical characteristics, installed many applications on them to obtain root rights, to no avail. Then I purchased a Sony Xperia Z smartphone and successfully rooted, so google rooted compatibility with your device.
In applications for obtaining root rights, everything is intuitive, anyone can figure it out, and if not, then I advise you to watch the video on YouTube on using the application you have chosen.
Got root rights? Moving on!
We need two programs to connect to SSH tunnels:
Configure SSH connection using ConnectBot:
We set values for such parameters:
Configuring traffic sharing in ProxyDroid:
Set the values:
To work on Android, I advise you to download Mozilla, where you must disable WebRTC.
For driving in, SSH itself, in principle, must be absolutely clean in terms of blackouts, have a proxy closer to 0, no more than 2.
Before driving in, we go from Mozilla to whoer.net and look at the following indicators: IP purity by blackouts and whether IP matches IP our SSH. DNS must be under the SSH country, or not visible. The browser's time zone is the same as the IP zone. Languages in all meanings of eng. Also, check with ip-score.com. If something is wrong, then you have made some kind of error in the setup.
That's all. I described the setup and preparation of the Android system for driving.
Carding from the phone
This option is quite suitable for driving into large shops. Certainly not for eBay or amazon. For shops just below the rank.
For many, it is no secret that every year more and more orders of large online retailers are processed through mobile versions and through applications. Carders don't have this analogy. The lion's share of the staffers hits from XP virtual machines or sevens with disabled webrts and / or flash, which immediately comes under close scrutiny from the shop.
Our goal is to be like an ordinary holder (card holder), without special knowledge in the IT sphere, trying to buy socks, fotiki or anything else for himself or a friend.
Knowing the maximum that how to download an application from the market, climb in social networks, make a call.
What is needed for this?
A. Phone / tablet with root rights.
B. Straight arms.
C. Valid CC, socks, vpn.
The first thing we need to do is prepare the phone. If there is or once was a SIM card, be sure to pull it out. Reset to factory settings. The phone of the brand that people know about in Yus is not a Chinese brand name.
Next, you need the required minimum package of applications, everything is on the market.
Namely ccleaner, xposed installer, fake my gps, rootcloak, morelangs, proxydroid, root checker.
In general, let's start setting up.
1. Install the morelangs application and select the en_US setting in it. Requires root. This application will completely bring the language and regional settings to the one we need.
2. We translate the clock format to 1:00 pm. This lies in the android settings, usually the general tab.
3. We put the xposed installer application. More details about the xposed framework module can be found here w3bsit3-dns.com/forum/index.php?showtopic=425052
4. Install the xprivacy module, then upgrade the version to xprivacy pro. How to do it is described here w3bsit3-dns.com/forum/index.php?showtopic=483684 Briefly. This application helps to completely replace all kinds of phone data. Which is exactly what we need.
5. Install the rootcloak application. From the name it is clear that the application hides the root rights for certain applications. It is the only one that works fine, of all the tests. Checking the application. First, install the rootchecker, check the rights. There should be a green check mark that the rights are available. After opening the rootcloak, add the rootchecker to the rootcloak list (add / remove apps-button "+" on the top right - look for rootchecker in the list). If everything is done correctly, then after checking the rights, a red cross should appear, that there are no rights. This action helps to hide the root of the rights from the application into which we will drive.
6. Next, install the fake my gps application. I did not find a topic about him on w3bsit3-dns.com. Here is a link to the off site xposed http://repo.xposed.info/module/com.fakemygps.android This application is good because it replaces location data without using the "Allow mock location" function, which is also fired by shops (myth or truth - xs). Checking the application. We turn on the gps on the bucket, select a random location in the application, then launch google maps. Should show the new location. If so, everything is good. Let's continue.
7. Proxydroid. Well this app is for socks use. Everything is clear here. I take socks on the suites. The quality seems to be quite good. Perhaps someone is using ssh. I still haven't figured out how to do it on a bucket. Who will tell - I will be grateful.
8. Any vpn application. If someone thinks that they will put you on the federal wanted list for a drop / mid-list, you can use paid vpn. Openvpn application is also present on the market. In fact, the machine is ready for carding. Someone may want to be more sophisticated (like me) and proxy the router so that it can immediately issue ip / dns USA or Eu - please.
Another minus N is the number of fraud points, which is important.
One VERY important point. Do not surf on android ip. It is noticed that Google, when searching from ip, transfers the domain. And it allows you to download applications focused on Russia. Which is not very good for us. And of course, I forgot to say only English keyboard. No ru.
Further. Now what to do with all this. It's simple. First, we clean the google market, chrome using force stop (standard procedure, google).
Then we start up ccleaner. We also clean everything.
There is one more subtlety. There is such a thing as adverting ID from Google. She's firing too. It also needs to be changed - we are changing. Then we start up the sock + vpn under the billing address. the closer the better. Get under the zip-finally beauty. Rebuild e-mail on Gmail. Here you need to pay attention.
I register the soap under the name of the drop. And I enter the name of the drop. If you plan to spike the bill not = spike, the mail should be sent to the holder. Applications are scorching. We registered the mail, added it to the Google account on the bucket. We launched fake my gps under the billing address, launched the gps. We start downloading the app from the shop. Downloaded. We launch the rootcloak. We add this application to the list so as not to fire the root of the law. All is ready.
We launch the application. Windows begin to pop up. This xprivacy shows what the application is accessing and what information it wants to know about you.
At this stage, it is better to screen and parse each request (google, etc.) in order to correctly replace the data afterwards. Red requests are critical, without which the application will not be able to function normally. They are always
The rest are at your discretion. Therefore, it is better to initially specify deny for all of them, then change everything in xpricacy (give the info closest to the holder / billing), which will not give you away, and then give the application the right to read this data (by setting it in xprivacy, or by reinstalling the application).
Also, large applications request data from the Facebook application. Therefore, if your shop is interested in this (xprivacy will show it), then it is better to register a fb account in the name of the holder. One very important point. When an application requests the connected function, it can receive the ssid data of the rest of the Wi-Fi networks.
Why do we need android if there are emulators, for example Nox or the same sphera, which is excellent at work and increases the chance of successful driving several times over? Firstly, emulators are fired in serious shops and offices, and secondly, the fraud when driving from mobile devices is much lower. So let's get down to the setup itself!
First, we need an Android with a MediaTek chip, because you can easily change the IMEI with regular software and you don't have to flash anything several times. We get root-rights, how to do it - you can find it on the Internet. We configure it for the country you need (time zone and language) and register a google account under the holder. After that, download Chamelephon from the play store and Device ID Changer, install software and generate device configs. We reboot it and proceed to the next step.
Raising Wi-Fi hotspot:
Here we either buy a ready-made Wi-Fi router with socks5 support or take our laptop and make a Wi-Fi hotspot out of it.
To raise your point, you need a laptop with two network cards and an ubuntu (both LAN, Wi-Fi and two Wi-Fi cards are suitable, there is no difference). We configure the point so that you can connect to it on your android device, detailed here ubuntuhandbook.org/index.php/2014/09/3-ways-create-wifi-hotspot-ubuntu/. Then we configure the socks or ssh tunnel - abidmujtaba.blogspot.com/2016/07/ubuntu-create-wifi-hotspot-access-point.html. In order to prevent WebRTC from firing on our android, we write the following code in ubuntu:
To prevent DNS from burning, we put on the router (not on the virtual one, but on the hardware itself) the dns of the country with which we will work. At this point, the setup is ready - let's get down to the driving process!
Scheme of work:
We connect from our android device to the virtual SSID and check our IP on whoer.net or whatleaks.com (must match the ip of our socks / ssh tunnel), and also see that WebRTC is turned on, but ours is not lit real IP + check dns. If everything is in order, we fly into the play store and download the application with which we will work, be it amazon or PayPal, etc. We log in by login / password from logs or create a self-registration to our mail, it all depends on what you are working with.
You can also use GPS Spoofing if necessary to change the geolocation under the holder / drop address.
If something interests write a comment, if you like the theme and was helpful for you then put Like and I soon will release the second part where more detail.
Nox is an android emulator that will allow us to install a shop / bank / office application and make a drive. Why bother with this and why beat from the emulator? In order to reduce the fraud shop, since from mobile applications + if you are logged in via Facebook or a Google account - fraud is much weaker than from a desktop browser.
First of all, download and install NOX on the virtual VirtualBox, then go to the settings.
Click on the gear and in the "main" tab set root rights and change the device language to the language of the country with which we will work. Then open the "advanced" tab and specify the number of cores and ram for Nox to work, as well as select the type of device and screen extension. Go to the "properties" tab and select the phone model (you can choose the default model or self-defined, where you yourself specify the information you need), IMEI, and also enter the KX or drop number, since applications burn this information.
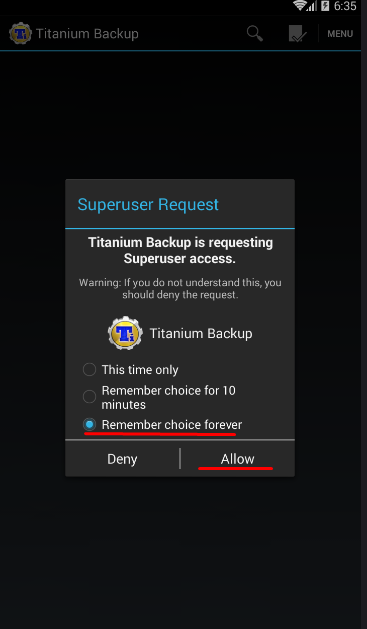
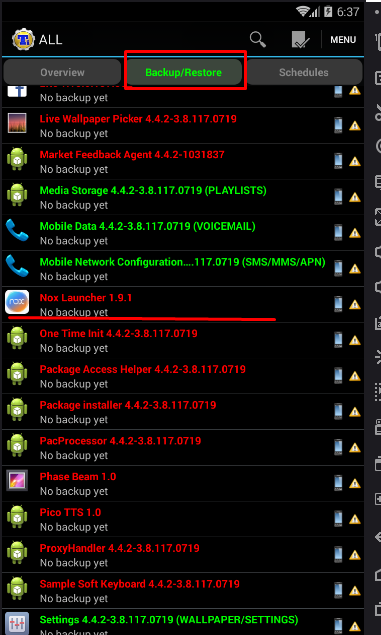
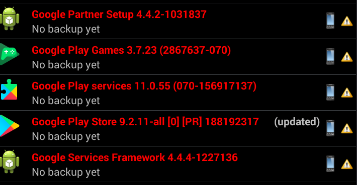
After that, you need to select a launcher for the model of the device that we chose before, this is necessary, since the default is NOX and this is pale. After it has been installed, click on the "home" button. We select our launcher, which will be used as the main one. Now we need to download and install Titanium Backup. After starting, a window will pop up where we need to give root rights to this application. After that, we look for the NOX launcher from the list and delete it, since we do not need it. Then we search and delete the following google services that are burning our system. The output should look like this:
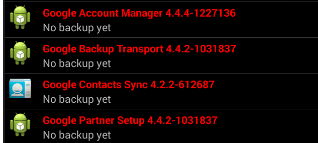
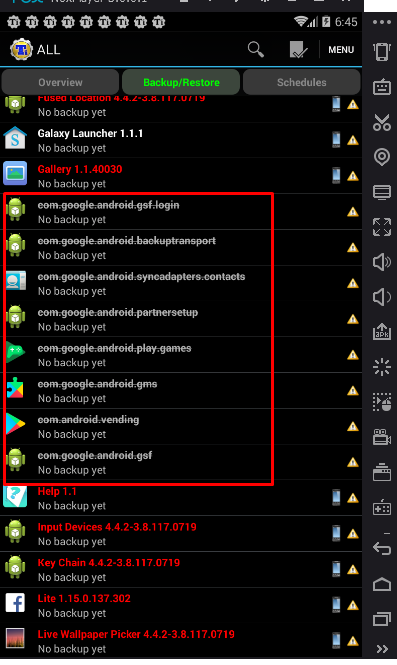
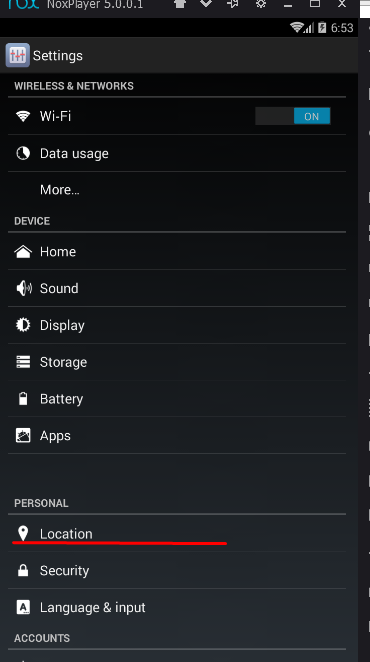
Check or you definitely demolished these services, as this is important! Also put your wallpaper on your desktop, as it burns too. Now we set up the system language, the time zone for the CH and be sure to turn off the geolocation.
Output:
It is possible and quite acceptable to do carding from an emulator, but not desirable, since some anti-fraud systems can detect it, and therefore the order can be canceled.
It is much better to buy a cheap regular phone, configure it correctly and work with it, without using an emulator for a computer. Much will depend on the anti-fraud settings of the system, but you can try.
I advise you to check out this topic for more details:
For the simple reason that classic carding is slowly becoming obsolete. More and more mobile traffic in shops, an increasing percentage of fraud in purchases from a PC, and, accordingly, a decreasing ratio of fraud in purchases from mobile devices. In other words, there are more honest purchases from mobile devices, less attention.
More carding with pc - more attention to them, and more checks. [And therefore, you need to catch the wave, after all, 2019 is the year, and you need to be in trend and card from mobile devices. So that's it. You do not need to use your own phones for carding, and working with PayPal. And there is no need to buy the left. There are emulators for this, such as Nox and Genymotion.
Let's take a closer look at these two emulators:
The first emulator - Nox
Pros: Fast, free, convenient.
Disadvantages: Only one device is available.
After each drive, it is recommended to reinstall.
The second emulator - Genymotion.
Pluses: the sea of devices. You can make at least a Samsung Galaxy 7, at least an htc desire, at least a tablet, in general, any device. Fast, you can make one phone, and copy it, then launching it through virtual boxing. Comfortable. Disadvantages: to get it for free, you need to work hard. You need to download previous versions from third-party resources, then update them, register on the site of this genimoushen. In general, everything is pretty quick. Everything is quite simple in fact, but for a beginner, it is awkward.
If you are into trouble with emulators, you can, in principle, use any mobile phone bought on the radio market . It is already a matter of personal taste for everyone. The presented software will allow you to do this. But in this case, I cannot be responsible for the result. By the way, it's better to use it without a SIM card.
Whatever emulator we have, it still needs to be prepared. That is, put the software on it! Mobile software means (apk files), well, just tweak the system.
Let's take a look at everything point by point:
Point 1. First of all, go to the settings, and set the language and time zone of our phone for the country that you are working on. Remember this as our father. This is the foundation.
Point 2. Making a browser. Download firefox from the playmarket (or trashbox) (just write "firefox trashbox" in Google and download apk to our emulator). Install. We open. Then we write "about: config" in the address bar (without quotes, of course). The settings have opened to us. There is a search field. We enter "media.peerconnection.enabled" there (also without quotes). We are exposed to this garbage, and we turn on the "false" mode. What it is? This is disabling WebRtc. In short, so that our real IP address is not fired via webrts.
Point 3. We write in Google "SSH Tunnel trashbox" (kpn tunnel is also good). We switch from the issue to the trashbox, and download this software from there. This software is for enabling tunnels to be turned on specifically on the phone.
Point 4. We write "Phone id changer trashbox" in Google. It will allow us to change the phone data that are hardwired into the firmware (the presence of root rights is required). It is relevant if you use nox, and you will need to reinstall it. But I suppose I do not 100% believe in these data changes, as for me -It will be safer to reinstall the emulator. And you already do whatever you want.
Point 5. We write in Google " Fake GPS trashbox". Also download the software from the trashbox. It will allow us to transfer fake gps data. That is, we roughly * fuck the shop with fake gps coordinates. Like we are with a show-off where we are.
Point 6. We write again in Google "ProxyDroid trashbox" This garbage will allow us to pull the socks on our emulator. Of course it would be easier to pull on the computer right away, but here it is more convenient for someone. I’ll say I pull it on the computer, through the proxy. But there it can float, and therefore it’s better on the mobile right away In general, as anyone.
Point 7. Disable Google services. All that we can disable . So that they do not exist at all, not a single one. Recently, it has been good for eBay through a bunch of android + tunnel correctly built with dns + and application eBay minimal salary.
I warn you right away that in order to drive through Android, we will need at least some knowledge and basics in the field of carding.
So, in addition to carding using a PC, we can drive using an Android device.
The main advantages of driving through Android, relative to a PC, are:
- The ability to score fewer anti-fraud points;
- Fast and convenient
There are many varieties and descriptions of Android system settings, but I will describe the personally tested method. For this we need:
- Device on Android
- Get root rights to the device. It is very easy. To do this, we need to download the apk application to the device itself from the browser, and then install it.
Baidu Root; Framaroot; SuperSU; z4root; Superuser
Important: not all devices can be rooted, and not with the help of every program. I had 2 tablets of a little-known manufacturer with the current version of Android and average technical characteristics, installed many applications on them to obtain root rights, to no avail. Then I purchased a Sony Xperia Z smartphone and successfully rooted, so google rooted compatibility with your device.
In applications for obtaining root rights, everything is intuitive, anyone can figure it out, and if not, then I advise you to watch the video on YouTube on using the application you have chosen.
Got root rights? Moving on!
We need two programs to connect to SSH tunnels:
- ConnectBot - you can download it from Playmarket. It serves directly for connecting to tunnels.
- ProxyDroid SSH traffic sharing.
Configure SSH connection using ConnectBot:
- On the left side of the screen, select the "SSH" connection type, on the right, enter the SSH data in this form: [email protected] : 22, where 111.222.333.444 is the IP of the tunnel, and 22 is the standard port. And press enter on the keyboard. Next, a window will open. to enter the SSH password.
- Enter the SSH password in the connection window.
- Clamp the connection and select "Edit Redirection"
We set values for such parameters:
- Alias: 127.0.0.1
- Forwarding type: Dynamic (SOCKS)
- From port: 56001
- We press to change.
- ConnectBox settings complete!
Configuring traffic sharing in ProxyDroid:
Set the values:
- Address: 127.0.0.1
- Port: 56001
- Proxy type: SOCKS5
- We put a tick on "For applications (global mode)"
- DNS Proxy - check the box to use the dns of our tunnel.
- If it doesn't work, just remove it.
- ProxyDroid setup complete!
To work on Android, I advise you to download Mozilla, where you must disable WebRTC.
For driving in, SSH itself, in principle, must be absolutely clean in terms of blackouts, have a proxy closer to 0, no more than 2.
Before driving in, we go from Mozilla to whoer.net and look at the following indicators: IP purity by blackouts and whether IP matches IP our SSH. DNS must be under the SSH country, or not visible. The browser's time zone is the same as the IP zone. Languages in all meanings of eng. Also, check with ip-score.com. If something is wrong, then you have made some kind of error in the setup.
That's all. I described the setup and preparation of the Android system for driving.
Carding from the phone
This option is quite suitable for driving into large shops. Certainly not for eBay or amazon. For shops just below the rank.
For many, it is no secret that every year more and more orders of large online retailers are processed through mobile versions and through applications. Carders don't have this analogy. The lion's share of the staffers hits from XP virtual machines or sevens with disabled webrts and / or flash, which immediately comes under close scrutiny from the shop.
Our goal is to be like an ordinary holder (card holder), without special knowledge in the IT sphere, trying to buy socks, fotiki or anything else for himself or a friend.
Knowing the maximum that how to download an application from the market, climb in social networks, make a call.
What is needed for this?
A. Phone / tablet with root rights.
B. Straight arms.
C. Valid CC, socks, vpn.
The first thing we need to do is prepare the phone. If there is or once was a SIM card, be sure to pull it out. Reset to factory settings. The phone of the brand that people know about in Yus is not a Chinese brand name.
Next, you need the required minimum package of applications, everything is on the market.
Namely ccleaner, xposed installer, fake my gps, rootcloak, morelangs, proxydroid, root checker.
In general, let's start setting up.
1. Install the morelangs application and select the en_US setting in it. Requires root. This application will completely bring the language and regional settings to the one we need.
2. We translate the clock format to 1:00 pm. This lies in the android settings, usually the general tab.
3. We put the xposed installer application. More details about the xposed framework module can be found here w3bsit3-dns.com/forum/index.php?showtopic=425052
4. Install the xprivacy module, then upgrade the version to xprivacy pro. How to do it is described here w3bsit3-dns.com/forum/index.php?showtopic=483684 Briefly. This application helps to completely replace all kinds of phone data. Which is exactly what we need.
5. Install the rootcloak application. From the name it is clear that the application hides the root rights for certain applications. It is the only one that works fine, of all the tests. Checking the application. First, install the rootchecker, check the rights. There should be a green check mark that the rights are available. After opening the rootcloak, add the rootchecker to the rootcloak list (add / remove apps-button "+" on the top right - look for rootchecker in the list). If everything is done correctly, then after checking the rights, a red cross should appear, that there are no rights. This action helps to hide the root of the rights from the application into which we will drive.
6. Next, install the fake my gps application. I did not find a topic about him on w3bsit3-dns.com. Here is a link to the off site xposed http://repo.xposed.info/module/com.fakemygps.android This application is good because it replaces location data without using the "Allow mock location" function, which is also fired by shops (myth or truth - xs). Checking the application. We turn on the gps on the bucket, select a random location in the application, then launch google maps. Should show the new location. If so, everything is good. Let's continue.
7. Proxydroid. Well this app is for socks use. Everything is clear here. I take socks on the suites. The quality seems to be quite good. Perhaps someone is using ssh. I still haven't figured out how to do it on a bucket. Who will tell - I will be grateful.
8. Any vpn application. If someone thinks that they will put you on the federal wanted list for a drop / mid-list, you can use paid vpn. Openvpn application is also present on the market. In fact, the machine is ready for carding. Someone may want to be more sophisticated (like me) and proxy the router so that it can immediately issue ip / dns USA or Eu - please.
Another minus N is the number of fraud points, which is important.
One VERY important point. Do not surf on android ip. It is noticed that Google, when searching from ip, transfers the domain. And it allows you to download applications focused on Russia. Which is not very good for us. And of course, I forgot to say only English keyboard. No ru.
Further. Now what to do with all this. It's simple. First, we clean the google market, chrome using force stop (standard procedure, google).
Then we start up ccleaner. We also clean everything.
There is one more subtlety. There is such a thing as adverting ID from Google. She's firing too. It also needs to be changed - we are changing. Then we start up the sock + vpn under the billing address. the closer the better. Get under the zip-finally beauty. Rebuild e-mail on Gmail. Here you need to pay attention.
I register the soap under the name of the drop. And I enter the name of the drop. If you plan to spike the bill not = spike, the mail should be sent to the holder. Applications are scorching. We registered the mail, added it to the Google account on the bucket. We launched fake my gps under the billing address, launched the gps. We start downloading the app from the shop. Downloaded. We launch the rootcloak. We add this application to the list so as not to fire the root of the law. All is ready.
We launch the application. Windows begin to pop up. This xprivacy shows what the application is accessing and what information it wants to know about you.
At this stage, it is better to screen and parse each request (google, etc.) in order to correctly replace the data afterwards. Red requests are critical, without which the application will not be able to function normally. They are always
The rest are at your discretion. Therefore, it is better to initially specify deny for all of them, then change everything in xpricacy (give the info closest to the holder / billing), which will not give you away, and then give the application the right to read this data (by setting it in xprivacy, or by reinstalling the application).
Also, large applications request data from the Facebook application. Therefore, if your shop is interested in this (xprivacy will show it), then it is better to register a fb account in the name of the holder. One very important point. When an application requests the connected function, it can receive the ssid data of the rest of the Wi-Fi networks.
Why do we need android if there are emulators, for example Nox or the same sphera, which is excellent at work and increases the chance of successful driving several times over? Firstly, emulators are fired in serious shops and offices, and secondly, the fraud when driving from mobile devices is much lower. So let's get down to the setup itself!
First, we need an Android with a MediaTek chip, because you can easily change the IMEI with regular software and you don't have to flash anything several times. We get root-rights, how to do it - you can find it on the Internet. We configure it for the country you need (time zone and language) and register a google account under the holder. After that, download Chamelephon from the play store and Device ID Changer, install software and generate device configs. We reboot it and proceed to the next step.
Raising Wi-Fi hotspot:
Here we either buy a ready-made Wi-Fi router with socks5 support or take our laptop and make a Wi-Fi hotspot out of it.
To raise your point, you need a laptop with two network cards and an ubuntu (both LAN, Wi-Fi and two Wi-Fi cards are suitable, there is no difference). We configure the point so that you can connect to it on your android device, detailed here ubuntuhandbook.org/index.php/2014/09/3-ways-create-wifi-hotspot-ubuntu/. Then we configure the socks or ssh tunnel - abidmujtaba.blogspot.com/2016/07/ubuntu-create-wifi-hotspot-access-point.html. In order to prevent WebRTC from firing on our android, we write the following code in ubuntu:
Code:
sudo iptables -t raw -I PREROUTING -p udp -m multiport --dports 3478,19302 -j DROPTo prevent DNS from burning, we put on the router (not on the virtual one, but on the hardware itself) the dns of the country with which we will work. At this point, the setup is ready - let's get down to the driving process!
Scheme of work:
We connect from our android device to the virtual SSID and check our IP on whoer.net or whatleaks.com (must match the ip of our socks / ssh tunnel), and also see that WebRTC is turned on, but ours is not lit real IP + check dns. If everything is in order, we fly into the play store and download the application with which we will work, be it amazon or PayPal, etc. We log in by login / password from logs or create a self-registration to our mail, it all depends on what you are working with.
You can also use GPS Spoofing if necessary to change the geolocation under the holder / drop address.
If something interests write a comment, if you like the theme and was helpful for you then put Like and I soon will release the second part where more detail.
Nox is an android emulator that will allow us to install a shop / bank / office application and make a drive. Why bother with this and why beat from the emulator? In order to reduce the fraud shop, since from mobile applications + if you are logged in via Facebook or a Google account - fraud is much weaker than from a desktop browser.
First of all, download and install NOX on the virtual VirtualBox, then go to the settings.
Click on the gear and in the "main" tab set root rights and change the device language to the language of the country with which we will work. Then open the "advanced" tab and specify the number of cores and ram for Nox to work, as well as select the type of device and screen extension. Go to the "properties" tab and select the phone model (you can choose the default model or self-defined, where you yourself specify the information you need), IMEI, and also enter the KX or drop number, since applications burn this information.
After that, you need to select a launcher for the model of the device that we chose before, this is necessary, since the default is NOX and this is pale. After it has been installed, click on the "home" button. We select our launcher, which will be used as the main one. Now we need to download and install Titanium Backup. After starting, a window will pop up where we need to give root rights to this application. After that, we look for the NOX launcher from the list and delete it, since we do not need it. Then we search and delete the following google services that are burning our system. The output should look like this:
Check or you definitely demolished these services, as this is important! Also put your wallpaper on your desktop, as it burns too. Now we set up the system language, the time zone for the CH and be sure to turn off the geolocation.
Output:
It is possible and quite acceptable to do carding from an emulator, but not desirable, since some anti-fraud systems can detect it, and therefore the order can be canceled.
It is much better to buy a cheap regular phone, configure it correctly and work with it, without using an emulator for a computer. Much will depend on the anti-fraud settings of the system, but you can try.
I advise you to check out this topic for more details:
I would like to share my experience in the field of staff thorn.The main thing for a successful drive is to give / replace the store with the information that he himself wants.
This option is not suitable for driving into large shops. It will be suitable for shops with a lower rank than Amazon and eBay.
For many, it is no secret that every year more and more orders from large online retailers are processed through mobile versions and through applications. Carders do not have such an analogy.
The lion's share of the staffers hits from XP virtual machines or sevens with disabled webrts or flash, which immediately comes under close scrutiny from the shop. Our goal is to be like an ordinary holder, without any special knowledge in the IT sphere, trying to buy anything for himself. Knowing the maximum how to download an application from the market, climb in social networks, call. What is needed for this?
1. Phone / tablet with root rights.
2. Straight arms.
3. CC, socks, vpn.
The first thing we need to do is prepare the phone. If there is or once was a SIM card, be sure to pull it out. Reset to factory settings. The phone of the brand that people know about in US is not a Chinese brand name.
Next, you need the required minimum package of applications, everything is on the market. Namely ccleaner, xposed installer, fake my gps, rootcloak, morelangs, proxydroid, root checker.
Anonymous router from any router (Tor, SSH, Socks5)
The whole assembly consists of a laptop + a router.
A laptop performs the software role of a router, and a router is hardware that distributes the Internet via Wi-FI or Ethernet cable For an example, I'll take a regular xiaomi nano router (It's small, it can be powered from USB and it distributes the Internet both via Wi-FI and Ethernet cable .)
.jpg")
+ we need an Ethernet cable to connect this router to a laptop
.jpg")
1) standard actions for any router: Press Reset in the router itself to reset everything to factory settings. I will connect via the default Wi-FI network to the point and set the Wi-Fi network name and password.
.jpg")
2) Now I will connect all this to (computer / laptop)
.jpg")
3) Software Part: Software that will distribute (anonymous Internet to our router!)
Double SSH Tunnel Manager
4) Download the Double SSH Tunnel Manager program , unpack and run!
The program will offer you to install the Virtual Adapter, we agree! after which in the list of adapters you will see something like the following picture.
.jpg")
5) then remove all the checkmarks from these two adapters
.jpg")
6) now we need to combine these 2 adapters into a bridge and configure this bridge by unchecking the boxes from IP4 and IP6
.jpg")
That's all !!! the settings are completed after connecting to the anonymous network, everything will be distributed through our router !!!
Answers to questions:
What anonymous network can I connect?
- The simplest thing is to connect the TOR network for this, the manager must be connected to the Tor network and you need to point the slider down.
.jpg")
How to connect Socks5, SSH, Socks5 Back-connect, TorOnionSocks, LocalSocks5, ShadowSocks?
.jpg")
Can different connection chains be used?
- You can connect Tor, Socks5, SSH, Socks5 Back-connect, LocalSocks5, ShadowSocks as the first connection, use ssh, socks5 as the second chain.
Can I use a VPN?
- Yes. you can ... (for this, use the VPN monitor in the program, you will need to register the IP of your VPN there)
What WebRTC will be displayed on whoer.net and similar sites.
- Any browser out of the box will show the WebRTC of your Socks or SSH.
The site 2ip.ru/privacy/ determine the ping and say that it is a tunnel or a proxy?
- Some sites can identify you by a time delay example 2ip.ru/privacy/
in order to avoid this, use the AntiPing function
(AntiPing slows down, so don't forget to return the slider to its original position)
I made all the settings correctly. but after connecting it writes "Unidentified network"
-You need to check all the settings again. then be sure to restart the OS.
Will the DNS program change on the host computer?
- No, it will not. DNS changes only for your router.
"MikroTik" or the long-awaited SOCKS5

I understand perfectly well that you have gotten sick of the ubiquitous microtics, but this is really interesting. In fact, the article was written with a delay of 4 months (SOCKS5 support appeared back in January 2020), but better late than never, especially since there is not much information about this and few people are aware of it.
So let's get started!
Background
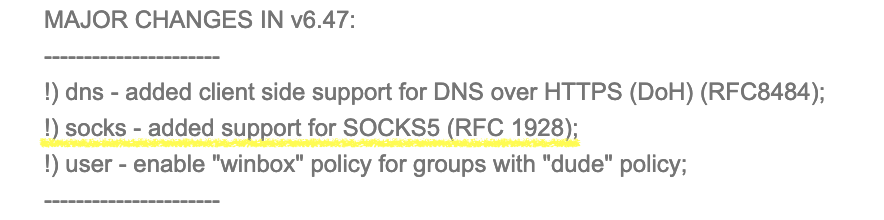
Mikrotik is a very powerful tool that (IMHO) should be in the household of any network engineer. Huge functionality and a set of tools that are constantly updated with each release. In the Changelog for RouterOS 6.47 (beta), SOCKS5 support was noticed, which I personally have been waiting for several years (and many others, judging by the numerous "Feature Requests" on forum.mikrotik.com):
Judging by one of the threads of the above forum, support for the built-in SOCKS5 server started with version 6.47beta19.
Customization
The setup, as always with MikroTik, is quite simple and fits into four lines.
The subject was a virtual server with CHR (Cloud Hosted Router), updated to 6.47beta53.
The "beta" prefix in the RouterOS version means that it is intended solely for testing and sending bug reports to support [at] mikrotik.com. I strongly recommend that you take your time with the hardware upgrade under load and wait for a Long-Term or at least a Stable release. If you decide to upgrade, then carefully read the Changelog to be aware of all the changes and possible problems.
We configure the SOCKS5 server, select password authorization (it is possible to make it open), the port is specified as 3327 (different from the standard 1080), so as not to get into botnet scan lists:
Next, add the user:
Create an exception rule in the firewall:
And move our rule before the “drop” rule:
Done! A SOCKS5 proxy server has been set up on our microtica.
Check
Like any resident of the Russian Federation, having a proxy server in Europe, I immediately remember about telegrams, and the performance of the freshly configured SOCKS5 server was checked on it:

Calls also work fine, despite the limitation of the Free version of CHR at 1Mbps.
Then it became interesting how the POF (Passive OS Fingerprint) introduced by Mikrotik would look like (checked on WhatLeaks):
It can be seen that the system is defined as Linux, which is logical (because it is its kernel that underlies ROS) and cannot but rejoice. Yes, it was possible to change the user-agent, but we have a slightly different task.
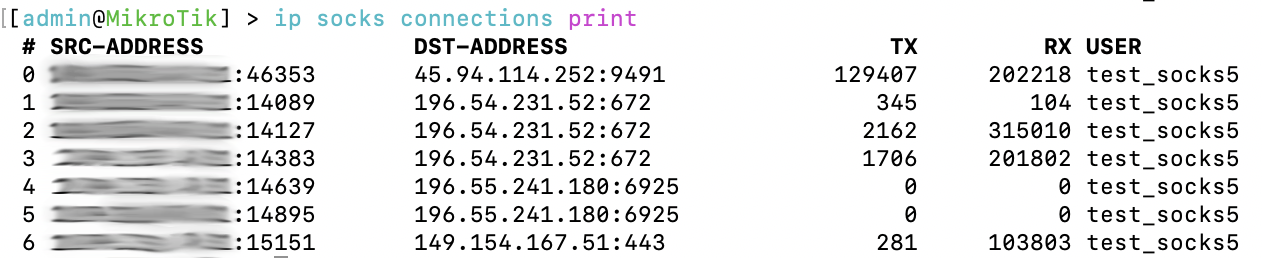
At the same time, on the microtic itself, as befits a real server, statistics on connections and traffic are displayed:
Conclusion
In fact, there is a lot missing (for example, support for RADIUS authentication), but I sincerely believe that this option will also be improved. It is important to note that this is still a router and its main task is traffic forwarding, and the rest of the "features" are rather simply pleasant. In any case, the realization that a $ 50 piece of hardware can do so many things excites the imagination.
Setting up Socks5 on a MikroTik router
Starting from the stable version 6.47 MikroTik began to support the Socks5 function.
Another useful feature is the ability to authorize at the user level. This option is optional and may not be used when connecting to Socks5.
Setting up Socks5 on a MikroTik router
Socks5 is configured in two steps:
Socks5 Activation
The setting is IP -> Socks

By default, Port = 1080, but it is better to change all standard ports to others, in order to increase the security of the MikroTik router.
Creating an account for Socks5
The setting is located IP -> Socks -> Users

In this case, you need to change the authorization method to password.

Other Socks5 features in MikroTik
The main parameters for connection via Socks5 are defined, they can be supplemented with two sections:
Setting up Access Socks5
The setting is IP -> Socks -> Access

Connections section
The setting is IP -> Socks -> Connections

Contains all connections that go through Socks5 on the current MikroTik router (router).
Configuring Firewall for Socks5 in MikroTik
The basic Firewall has restrictions on incoming traffic (chain = input) and in order for Socks5 to fully function in MikroTik, it is necessary to add an allow rule (access) higher than the deny rule (drop).
Configuring Firewall for Socks5
The setting is IP → Firewall → Filter Rules

Connecting to Socks5 MikroTik via Firefox
Below we will consider two types of connection: with and without authorization.
Configuring Firefox to connect to Socks5 with authorization
For this type of connection, an external add-on will be used (Add-on) Proxy Toggle

You can master MikroTik using the online course "Configuring MikroTik Equipment". The course covers all topics from the official MTCNA program. The author is the official trainer of MikroTik. The material is suitable both for those who have been working with MikroTik equipment for a long time, and for those who have not yet held it in their hands. It includes 162 video lessons, 45 laboratory works, self-test questions and a synopsis.
That's all, thanks for your attention")
The whole assembly consists of a laptop + a router.
A laptop performs the software role of a router, and a router is hardware that distributes the Internet via Wi-FI or Ethernet cable For an example, I'll take a regular xiaomi nano router (It's small, it can be powered from USB and it distributes the Internet both via Wi-FI and Ethernet cable .)
+ we need an Ethernet cable to connect this router to a laptop
1) standard actions for any router: Press Reset in the router itself to reset everything to factory settings. I will connect via the default Wi-FI network to the point and set the Wi-Fi network name and password.
2) Now I will connect all this to (computer / laptop)
3) Software Part: Software that will distribute (anonymous Internet to our router!)
Double SSH Tunnel Manager
4) Download the Double SSH Tunnel Manager program , unpack and run!
The program will offer you to install the Virtual Adapter, we agree! after which in the list of adapters you will see something like the following picture.
5) then remove all the checkmarks from these two adapters
6) now we need to combine these 2 adapters into a bridge and configure this bridge by unchecking the boxes from IP4 and IP6
That's all !!! the settings are completed after connecting to the anonymous network, everything will be distributed through our router !!!
Answers to questions:
What anonymous network can I connect?
- The simplest thing is to connect the TOR network for this, the manager must be connected to the Tor network and you need to point the slider down.
How to connect Socks5, SSH, Socks5 Back-connect, TorOnionSocks, LocalSocks5, ShadowSocks?
Can different connection chains be used?
- You can connect Tor, Socks5, SSH, Socks5 Back-connect, LocalSocks5, ShadowSocks as the first connection, use ssh, socks5 as the second chain.
Can I use a VPN?
- Yes. you can ... (for this, use the VPN monitor in the program, you will need to register the IP of your VPN there)
What WebRTC will be displayed on whoer.net and similar sites.
- Any browser out of the box will show the WebRTC of your Socks or SSH.
The site 2ip.ru/privacy/ determine the ping and say that it is a tunnel or a proxy?
- Some sites can identify you by a time delay example 2ip.ru/privacy/
in order to avoid this, use the AntiPing function
(AntiPing slows down, so don't forget to return the slider to its original position)
I made all the settings correctly. but after connecting it writes "Unidentified network"
-You need to check all the settings again. then be sure to restart the OS.
Will the DNS program change on the host computer?
- No, it will not. DNS changes only for your router.
"MikroTik" or the long-awaited SOCKS5
I understand perfectly well that you have gotten sick of the ubiquitous microtics, but this is really interesting. In fact, the article was written with a delay of 4 months (SOCKS5 support appeared back in January 2020), but better late than never, especially since there is not much information about this and few people are aware of it.
So let's get started!
Background
Mikrotik is a very powerful tool that (IMHO) should be in the household of any network engineer. Huge functionality and a set of tools that are constantly updated with each release. In the Changelog for RouterOS 6.47 (beta), SOCKS5 support was noticed, which I personally have been waiting for several years (and many others, judging by the numerous "Feature Requests" on forum.mikrotik.com):
Judging by one of the threads of the above forum, support for the built-in SOCKS5 server started with version 6.47beta19.
Customization
The setup, as always with MikroTik, is quite simple and fits into four lines.
The subject was a virtual server with CHR (Cloud Hosted Router), updated to 6.47beta53.
The "beta" prefix in the RouterOS version means that it is intended solely for testing and sending bug reports to support [at] mikrotik.com. I strongly recommend that you take your time with the hardware upgrade under load and wait for a Long-Term or at least a Stable release. If you decide to upgrade, then carefully read the Changelog to be aware of all the changes and possible problems.
We configure the SOCKS5 server, select password authorization (it is possible to make it open), the port is specified as 3327 (different from the standard 1080), so as not to get into botnet scan lists:
Code:
ip socks set enabled=yes version=5 port=3327 auth-method=passwordNext, add the user:
Code:
ip socks users add name=test_socks5 password=Str0nGP@SSw0RDCreate an exception rule in the firewall:
Code:
ip firewall filter add chain=input protocol=tcp dst-port=3327 action=accept comment="SOCKS5 TCP"And move our rule before the “drop” rule:
Code:
ip firewall filter move [/ip firewall filter find comment="SOCKS5 TCP"] 0Done! A SOCKS5 proxy server has been set up on our microtica.
Check
Like any resident of the Russian Federation, having a proxy server in Europe, I immediately remember about telegrams, and the performance of the freshly configured SOCKS5 server was checked on it:
Calls also work fine, despite the limitation of the Free version of CHR at 1Mbps.
Then it became interesting how the POF (Passive OS Fingerprint) introduced by Mikrotik would look like (checked on WhatLeaks):
| With SOCKS5 disabled | With SOCKS5 enabled |
|---|---|

|

|
At the same time, on the microtic itself, as befits a real server, statistics on connections and traffic are displayed:
Conclusion
In fact, there is a lot missing (for example, support for RADIUS authentication), but I sincerely believe that this option will also be improved. It is important to note that this is still a router and its main task is traffic forwarding, and the rest of the "features" are rather simply pleasant. In any case, the realization that a $ 50 piece of hardware can do so many things excites the imagination.
Setting up Socks5 on a MikroTik router
Starting from the stable version 6.47 MikroTik began to support the Socks5 function.
It is worth noting that Socks5 uses both UDP and TCP, this allows for the highest performance and makes Socks5 the most popular protocol for communicating with a proxy server.Socks (Socket Secure) is a protocol by which all traffic can be sent to a proxy server. But unlike the standard http proxy, socks (v4 and v5) can work with https traffic.
Another useful feature is the ability to authorize at the user level. This option is optional and may not be used when connecting to Socks5.
Setting up Socks5 on a MikroTik router
Socks5 is configured in two steps:
- Activation of Socks5 by MikroTik;
- Client (application) connection.
Socks5 Activation
The setting is IP -> Socks
By default, Port = 1080, but it is better to change all standard ports to others, in order to increase the security of the MikroTik router.
Creating an account for Socks5
The setting is located IP -> Socks -> Users
In this case, you need to change the authorization method to password.
Other Socks5 features in MikroTik
The main parameters for connection via Socks5 are defined, they can be supplemented with two sections:
Setting up Access Socks5
The setting is IP -> Socks -> Access
Code:
/ ip socks set enabled = yes port = 24572 version = 5
/ ip socks access add action = deny dst-address = vk.com
/ ip socks users add name = Socks5-User password = Socks5-User- Re-play
- Copy to Clipboard
- Pause
- Full View
Connections section
The setting is IP -> Socks -> Connections
Contains all connections that go through Socks5 on the current MikroTik router (router).
Configuring Firewall for Socks5 in MikroTik
The basic Firewall has restrictions on incoming traffic (chain = input) and in order for Socks5 to fully function in MikroTik, it is necessary to add an allow rule (access) higher than the deny rule (drop).
Configuring Firewall for Socks5
The setting is IP → Firewall → Filter Rules
Code:
/ ip firewall filter
add action = accept chain = input comment = Socks5 dst-port = 24572 \
in-interface-list = WAN protocol = tcp- Re-play
- Copy to Clipboard
- Pause
- Full View
Connecting to Socks5 MikroTik via Firefox
Below we will consider two types of connection: with and without authorization.
Configuring Firefox to connect to Socks5 with authorization
For this type of connection, an external add-on will be used (Add-on) Proxy Toggle
You can master MikroTik using the online course "Configuring MikroTik Equipment". The course covers all topics from the official MTCNA program. The author is the official trainer of MikroTik. The material is suitable both for those who have been working with MikroTik equipment for a long time, and for those who have not yet held it in their hands. It includes 162 video lessons, 45 laboratory works, self-test questions and a synopsis.
That's all, thanks for your attention
Similar threads
- Replies
- 1
- Views
- 164
- Replies
- 1
- Views
- 183
- Replies
- 0
- Views
- 255